


How to get a nice photo rendering
You have been working hard on the new decoration of your living room and want to show to your friends how beautiful it will be when the works will be finished? The following tip will help you to create the best photorealistic rendering.
Similarly to photography, the quality of a picture rendered with a computer depends on various criteria:
- the point of view where the camera is placed
- the lens of the camera with its field of view and depth of field
- the size in pixels of the computed image
- the lights in the scene. Keep in mind the etymological meaning of photography "drawing with light", because without good light, you won't get a nice picture!
Selecting a point of view
As explained in the Editing 3D view section of the user's guide and help, Sweet Home 3D offers two main categories of points of view in the 3D view menu: Aerial view, the default option, and Virtual visit.
The Aerial view mode lets you choose a point of view around the designed home, and dragging the mouse in the 3D view will make the point of view turn around its center. When the Aerial view centered on selection option is selected in preferences, the moves in the 3D view will be centered on the selected object, like for the door selected in the following home used to for this tip.

The Virtual visit mode lets you choose a point of view of a human visitor which location is drawn in the plan. To choose the point of view of your choice, you can move and rotate the visitor in the plan or use the mouse and the keyboard arrows when the 3D view has the focus (just click in the 3D view).

Actually, this visitor is a kind of camera that can be placed anywhere and oriented like you want. Thanks to the dialog box displayed with the 3D view > Modify virtual visitor menu item, you may precisely choose its location and orientation. This dialog box lets you also change the field of view of the lens of the camera, like with a zoom. By default, the horizontal field of view is 63°, which matches a focal length of 29mm on a 24x36 full frame camera.

The following image shows the framing obtained with a wider field of view equal to 70°.

Once you found the right point of view and field of view, store this information with the 3D view > Store point of view menu item to be able to easily restore it later with the 3D view > Go to point of view menu, in case you moved the visitor meanwhile.
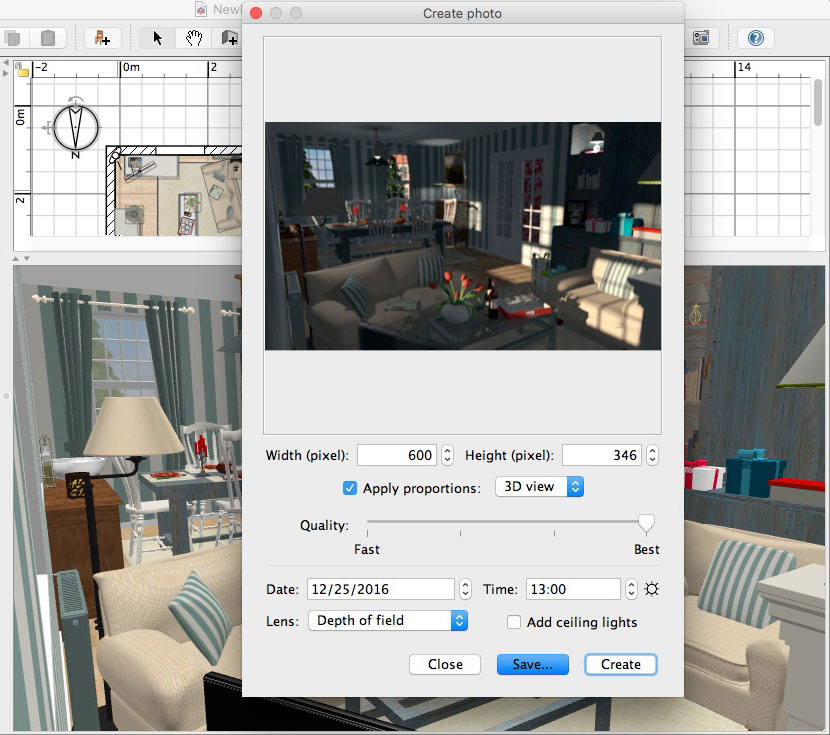
Creating a photo
As explained in the Creating photos section of the help, the 3D view > Create photo menu item lets you create images from the framing shown in the 3D view. The Quality slider displayed in the Create photo pane has 4 levels, from the fastest level which uses the same rendering quality as in the 3D view, to the best level which computes a more photo realistic picture that takes into account the lights placed in the scene. The higher the quality level is, the longer it will take to process a picture.

When one of the two best quality levels is selected, the Create photo pane proposes some additional options at its bottom shown in the following capture. The Lens drop down list lets you choose some special lenses, like the Depth of field one which forces the focus distance to 250 cm with a limited depth of field (by default, the lens is a pinhole with an infinite depth of field). The Fisheye and Spherical lenses are used in special circumstances that are not treated in this tip.

Depending on the destination of the computed photo, you may need to modify its size in pixels. Like with a real camera, images with more pixels show more details and can be displayed on a larger surface, but they will take more time to be computed and will generate larger files. Therefore, you should rather create large images only once the lighting of image is correct.

If applying the proportions of the 3D view to the image doesn't match your needs, you may select a more standard ratio or even don't apply any ratio when the width or the height of the image is changed.

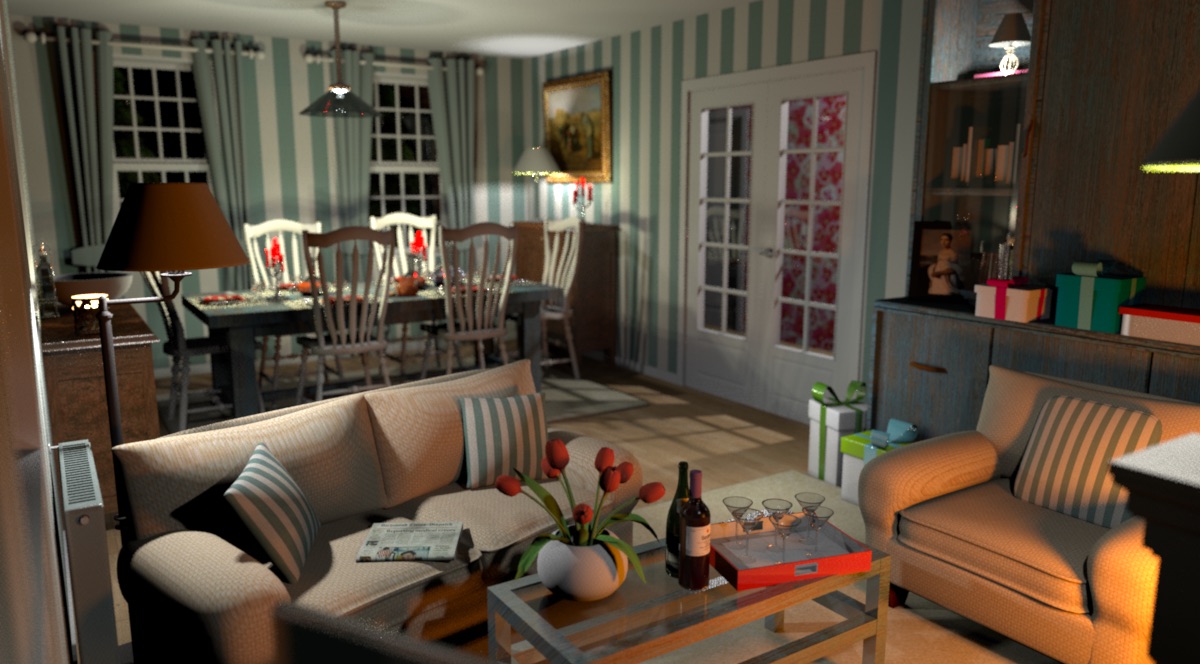
Let's try to render a 600 pixels wide image at the best quality level with the Depth of field lens. The following image shows the result obtained after clicking on the Create button and a few minutes of process.

Improving lighting
Pictures computed at the two best quality levels takes into account the different lamps in the plan, the sunlight during the daytime and the extra light sources you may have added to the scene. By default, Sweet Home 3D adds also ceiling lights in the middle of each room to let you make some quick tests, but in the previous rendering, these lights plus the lamps in the plan ended to a too bright image.
Therefore, if your home has many lights and lamps, try first to remove the Add ceiling lights option to improve the lighting. Without that option, the computed image shown below is much better in our case.

Let's continue to improve this rendering by handling sunlight and lights power.
The direction and power of sun rays depend on the Date and Time chosen in the Create photo dialog, for example Christmas at 1 PM.

Sunlight depends also on the geographical location and the orientation of the edited home. You can change these settings by selecting Plan > Modify compass menu item, but generally, setting the North direction by rotating the compass in the plan will be enough (see also the Editing compass section in the help and Sunlight simulation tip).

Lamps and other source lights added to a home can emit more or less light. The power of these lights is set by default at 50% of their maximum. In case they produce too much light, you may need to adjust their power with their light power indicator, or with the Light power field in the pane displayed by the Furniture > Modify… menu item, when you want to modify the power of more than a light at a time.

Power indicator of a light

Let's try to render a new image with the date set to the 25th of December at lunch time, the North direction set to let sun rays enter in the house through the windows at the left of the visitor, candles extinguished and all the lamps at 10% of their maximum power. We also set the shininess to Matt for the objects that look too shiny (like the tulips or the bookcase on the right).
You could expect that the sunlight would be enough to light the scene, but when a picture is computed at a point of view placed in a house, sunlight actually doesn't produce that much light in Sweet Home 3D, as shown in the following image.
To get a better rendering, you should add some extra light sources to your scene and enlarge them to produce softer shadows (see also How to get softer shadows tip).
In our scene, we added three White light sources (found in the Lights category of the catalog), two large ones with their power set to 20%, and a smaller one with its power set to 15%. When you resize light sources, avoid choosing a size or an elevation that would make the light source touch the ceiling, otherwise the ceiling will be black at its intersection with the light.

Once the image is computed, we get the following nicer result.

You can also try different light colors. The following rendering uses warmer Incandescent light sources with the same previously used power settings.

Sweet Home 3D proposes in the Light category many light sources with various colors and temperatures. We encourage you to try them, but keep in mind that the more lights you add to the scene, the longer it will take to compute.
Finally, let's render the same scene at night on the 24th of December at 20:00, with the power of the lamps set between 10% and 30% and the power of the candles set between 5% and 20%. Two of the previous source lights were removed and the last one was placed near the gifts to highlight them. And last but not least, we placed a Fireglow light source in the fireplace at the right with a power set to 20%.
The sky texture was also replaced by a color to make it dark at night, and more objects shininess was reset to matt (for the door, windows, frames around paintings…). Once computed, we get the following result.
Nice place to receive your friends, isn't it? So, we wish you a very good Christmas evening! 
If you're interested, the scene shown in this tip comes from the file SimpleLights.sh3d (9.4 MB - designed by eTeks and distributed under CC-BY license).
To go further
In addition to the help pages mentioned in this tip, you can view the video How to create nice photo renderings.
Sweet Home 3D community also counts many helpful users able to produce amazing pictures, among which:
- Enko Nyito proposes some plug-ins which lets you change additional settings in the photo rendering engine, particularly the focus distance and the radius of the Depth of field lens. See also his interview in the blog.
- Cecilia produces wonderful photo renderings with Sweet Home 3D, like the ones shown in this thread where she describes her work. See also her interview in the blog.
- Anh Dinh and Mazoola explained their use of light sources in renderings in this thread.
And finally, a big thank you to Christopher Kulla for programming Sunflow, the photorealistic rendering engine used in Sweet Home 3D by default. If you need to compute images more quickly, you could also try the YafaRay rendering engine added to version 7.0.


