

How to design a swimming pool
This tips shows how to design a buried swimming pool using level, wall and room features available in Sweet Home 3D.
Main steps
To create a swimming pool, you will have to:
- create an underground level,
- draw its walls and its bottom,
- eventually add a slope,
- finally add a transparent water surface.
Create an underground level
Select the Plan > Add level menu item to add a new level to your home. Then select the Plan > Modify level menu item in order to make this new level become an underground level. Enter pool depth in Elevation text field, and change its name. You don't have to change the thickness and the height. Don't worry if there is no visual effect in the 3D view when you close the dialog box.

Draw walls and bottom
Now you have to draw the walls in the underground level. You may draw a simple rectangular shape for a basic pool, but you can also draw a round shape, using round walls. To do that, draw a quadrilateral shape with points that will placed at key points of the pool, then modify the arc extent of each wall to get the round shape of the pool. To get a bean shape, you'll probably have to make more than one modification, but after a while you should success. Keep in mind to disable magnetism while you move the end points of the round walls, otherwise the magnetism behavior might prevent you from placing the point where you want.
 |
 |
| Initial shape with key points | Modified shape with round walls |

Once done, select all the walls and choose the menu item Plan > Modify walls. Change the height of the walls with a value equal to the depth of the pool plus the height of its edge. Change their thickness with a value equal to the width of the pool edge. Finally, set also the color of the wall top in the 3D view to match the color of the top of the edge.

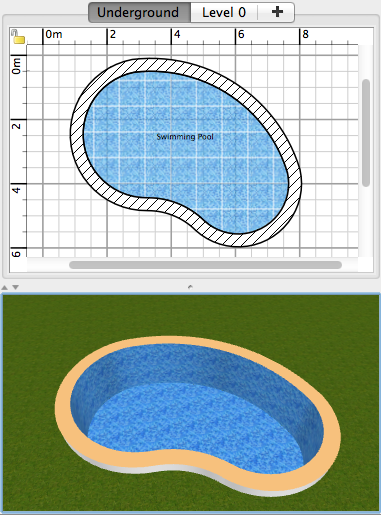
Finally, select the room creation tool and add a room by double-clicking in the center of your pool. Modify this new room to change the color or texture of the bottom of the pool and its wall sides (the texture used here comes from this SH3T library). Unselect also the Display ceiling check box.
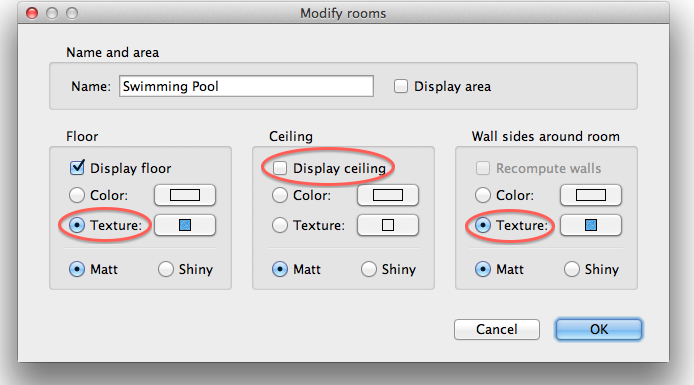
Once the Modify rooms dialog is closed, here is what you should get:
Add a slope
You may add a slope, or skip this step if you don't want to. First, download the 3D model of a triangle here and import it in the plan: select the Furniture > Import furniture menu item, choose the downloaded file and finish the importation. Place the triangle in the pool and change its width and its height to get a shape matching the slope you want.
If you've drawn a round pool, the triangle will probably go beyond the pool edge and make undesired holes outside the pool, as shown in the following screen capture. To hide these holes, draw a room at the ground level around the pool. As the screen capture shows, this room shouldn't intersect with the pool surface, otherwise it will hide the bottom of the pool. To achieve this kind of drawing, draw two rooms one beside the other or if you choose the option to draw only one room, draw the points on the pool edge in the reverse order of the points outside the pool.
 |
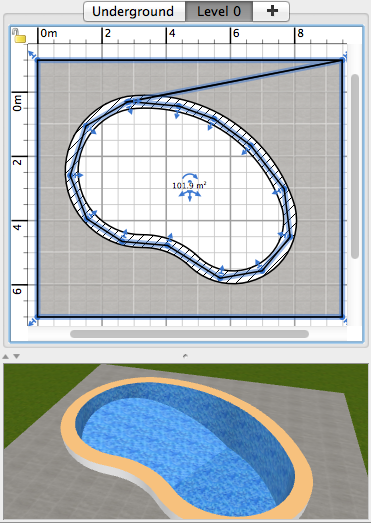 |
| Once the slope triangle is placed | Once the room is drawn around the pool |
During these operations, keep in mind to disable magnetism while placing the triangle and the room points to avoid constraints.
Add water
The final step consists in adding water to the pool. While the ground level is selected, double-click in the middle of the pool to create a room in it. Then, change the texture of this new room to a water texture (the one used here comes from the same SH3T library as the texture of the pool bottom) and unselect its Display ceiling check box.
As the screen captures below shows, the water looks correct in the pool but isn't transparent. If you want it to be transparent, click on the 3D view > Change 3D view menu item and change the walls transparency. The transparency you set will be applied to room floors only if their elevation is greater than 0. As the room you created is at elevation 0, it will be transparent only if you elevate the ground level a little. Thus, temporarily change the ground elevation, by double-clicking on its tab above the plan and set the elevation to 0.1.
 |
| Before changing transparency | After changing transparency |
After these changes, everything is transparent, not only the water. To have only the water transparent as wanted, you'll have to export the room as a 3D model, and import it again following these steps: select the room matching the water, choose the 3D view > Export to OBJ format menu item, select a name for the 3D model exported file (any name will fit since it's for temporary use), and, when prompted, click on Export selection button.
Then, reset transparency and ground elevation to their initial values, eventually using the Edit > Undo menu item, and delete the exported room, because it will be replaced by the imported 3D model. Finally, select the Furniture > Import furniture menu item, choose the OBJ file you exported, and finish the importation. Move the imported objet to the exact place of the water, disabling the magnetism and using the keyboard arrows to help you.
Here is the result you should get:
![]()
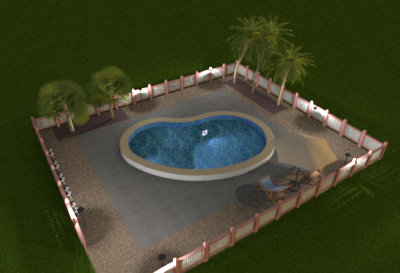
Final result
After adding some decorations and a few lights, here is what you can get with the photo creation tool.
If you're interested, the home file created in this tip is available in the file SwimmingPool.sh3d (3.5 MB - designed by eTeks and distributed under CC-BY license). If you want to reuse the swimming pool in an other home, you may also import also its 3D model from the file SwimmingPool.zip.
Thanks to Sophie for her help in the writing of this tip.


