Plug-in developer's guide
Introduction
Installing development tools
Programming a plug-in
Going further
 Introduction Introduction
From version 1.5, it's possible to add new features to Sweet Home 3D with plug-in files
placed in your plug-ins folder. This allows Java programmers to develop and distribute
new features for Sweet Home 3D without modifying the source files
of the current version (which is good for upward compatibility), and without delivering a full version of the program
(which is good for delivery size).
This document describes the tools required to create plug-ins, then shows how to program
a plug-in that computes
the maximum volume of the movable furniture added to a home, and finally gives some additional
information that will
help you to go further.
Installing
development tools
If Sweet Home 3D targets a general audience, developing plug-ins requires special skills, and you should know
how to program in Java with an IDE, before
going further. This guide shows how to build a plug-in with Eclipse, but
you can use the IDE of your choice, or no IDE at all.
Download and install Eclipse
First download Eclipse from https://www.eclipse.org/. The version named Eclipse
IDE for Java Developers is enough to develop a plug-in, but you can download any version for Java development.
Once downloaded, installing Eclipse is very simple: just uncompress the archive you'll get, open the eclipse folder
and depending on your system, run the file named eclipse.exe (under Windows), eclipse.app (under
Mac OS X) or eclipse (under Linux).
At the first run, Eclipse will require you to choose a workspace folder, where will be stored plug-in
projects.
Once done, choose File > New > Project out of the menu to create a new project, select Java > Java
project in the New project wizard that will be displayed, enter VolumePlugin as project name
and click on Finish button. Finally, close the Welcome tab to discover your workspace as shown
in figure 1.
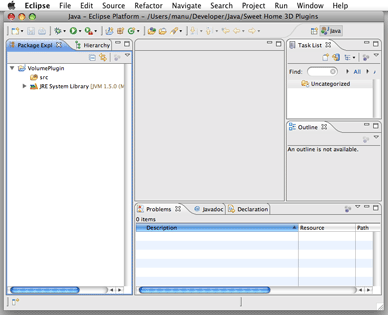
Figure 1. Eclipse
workspace
Download and install Sweet Home 3D library
The development of a plug-in is based on some classes of Sweet Home
3D that Eclipse must know to be able to build your project. The easiest
way to add Sweet Home 3D classes to Eclipse is to download the JAR executable
version of Sweet Home 3D available at https://sourceforge.net/projects/sweethome3d/files/SweetHome3D/SweetHome3D-7.5/SweetHome3D-7.5.jar/download.
Once downloaded, drag and drop the file SweetHome3D-7.5.jar
on the VolumePlugin project icon in the Package Explorer
view of Eclipse, and choose the item Build Path > Add to Build
Path in the contextual menu of SweetHome3D-7.5.jar file,
as shown in figure 2.

Figure 2. Adding SweetHome3D-7.5.jar to Build Path
Programming
a plug-in
Now that you installed the required tools, let's see how you can program your first plug-in for Sweet Home 3D.
Creating the plug-in class
First, create a new subclass of com.eteks.sweethome3d.plugin.Plugin by choosing File
> New > Class menu
item in Eclipse.

Figure 3. Creating a new class
In the New Java Class dialog, enter VolumePlugin as the class name, enter a package (here the
chosen package was com.eteks.test),
and choose com.eteks.sweethome3d.plugin.Plugin as
the super class of VolumePlugin. Once done, click on Finish. Eclipse will create the file of the
new class with the following content:
package com.eteks.test;
import com.eteks.sweethome3d.plugin.Plugin;
import com.eteks.sweethome3d.plugin.PluginAction;
public class VolumePlugin extends Plugin {
@Override
public PluginAction[] getActions() {
return null;
}
}
As you can guess from the TODO comment, you must now change the implementation of the getActions method
to return a plug-in action able to compute the volume of the movable furniture. Replace return null; by
the following statement:
return new PluginAction [] {new VolumeAction()};
and choose Edition > Quick Fix out
of Eclipse menu to create the missing class VolumeAction, as shown in figure 4.

Figure 4. Using Quick fix to generate a missing class
In the New Java Class dialog that appears, select the Enclosing type check box to create an inner
class of VolumePlugin and click on Finish. This will create the class VolumeAction that
inherits from com.eteks.sweethome3d.plugin.PluginAction class and contains an empty execute method:
public class VolumeAction extends PluginAction {
@Override
public void execute() {
}
}
This method is the one that Sweet Home 3D will call when the user will launch the plug-in action ; thus this is
the place where you must implement how to compute the volume of the furniture and display
it:
public class VolumeAction extends PluginAction {
@Override
public void execute() {
float volumeInCm3 = 0;
for (PieceOfFurniture piece : getHome().getFurniture()) {
if (piece.isMovable()) {
volumeInCm3 += piece.getWidth()
* piece.getDepth()
* piece.getHeight();
}
}
String message = String.format(
"The maximum volume of the movable furniture in home is %.2f m\u00b3.",
volumeInCm3 / 1000000);
JOptionPane.showMessageDialog(null, message);
}
}
Now that you specified what you want the plug-in to do, you must describe how the user will launch
this new action. You have the choice between adding a new menu item to a menu, and/or
a new button to the tools bar. This choice is done by setting the appropriate properties of the plug-in
action at its creation. For example, if you want the users to launch the volume action with the
menu item Compute
volume found
in the Tools menu, you'll add the following constructor to VolumnAction class:
public VolumeAction() {
putPropertyValue(Property.NAME, "Compute volume");
putPropertyValue(Property.MENU, "Tools");
setEnabled(true);
}
The VolumePlugin plug-in class is now programmed,
and almost ready to work as a plug-in in Sweet Home 3D. The two last things to do are:
- creating an ApplicationPlugin.properties description file,
- putting the files together in a JAR file.
Creating the plug-in description file
An ApplicationPlugin.properties file
describes the plug-in name, its class, the Sweet Home 3D and Java minimum versions under which it is supported,
and legal stuff. Choose File > New > File from
Eclipse menu, enter the file name ApplicationPlugin.properties and click on Finish, as shown
in figure 5.

Figure 5. Creating a new file
Then enter the following description in the new file and save it:
name=Movable furniture volume
class=com.eteks.test.VolumePlugin
description=Computes the volume of the movable furniture in home
version=1.0
license=GNU GPL
provider=(C) Copyrights 2024 Space Mushrooms
applicationMinimumVersion=1.5
javaMinimumVersion=1.5
Creating the plug-in JAR
The plug-in JAR contains the class files created from the compilation of the VolumePlugin.java file,
and the ApplicationPlugin.properties file. As Eclipse compiles a Java file as soon as you save it, you
just have to choose File > Export... from the menu and select Java > JAR file in the Export dialog
that will be displayed. In the Jar Export wizard that appears as shown in figure 6, select the project check
box and enter the path of a JAR file placed in the Sweet Home 3D plug-ins folder. This appropriate folder depends
on your system as follows:
- under Windows Vista / 7 / 8 / 10 / 11, this folder is C:\Users\user\AppData\Roaming\eTeks\Sweet
Home 3D\plugins,
- under Windows XP and previous versions of Windows, this folder is C:\Documents and Settings\user\Application Data\eTeks\Sweet
Home 3D\plugins,
- under macOS, it's the subfolder Library/Application Support/eTeks/Sweet Home 3D/plugins of your
user folder,
- under Linux and other Unix, it's the subfolder .eteks/sweethome3d/plugins of your user folder.

Figure 6. Exporting to a JAR file
Testing the plug-in
The plug-in you
developed will run in Sweet Home 3D, either with the Java
Web Start version, the installers
version, or the SweetHome3D-7.5.jar
you downloaded previously. As the latest one is an executable JAR, you
can run it by double-clicking on it or with the following command:
java -jar /path/to/SweetHome3D-7.5.jar
As long as you're testing, you will probably prefer to run Sweet Home 3D with this command, to be
able to read in the console the stack trace of the exceptions thrown during the execution of your plug-in.
Once Sweet Home 3D is launched, you'll see the new menu and its item appear as shown in figure 7:

Figure 7. Plug-in menu
If you choose the new menu item for the home example created in user's
guide, you'll get the following result:

Figure 8. Plug-in in action
Debugging the plug-in
If you need to debug your plug-in from Eclipse, create a debug configuration by following these steps:
- Choose Run > Debug Configurations... from the menu, select Java Application item in the available configurations list of the
Debug configurations dialog box, click on the New button at the top left and enter a name for the configuration.
- Click on the Search... button at the right of the Main class text field and double click on the SweetHome3DBootstrap class
among the proposed classes.
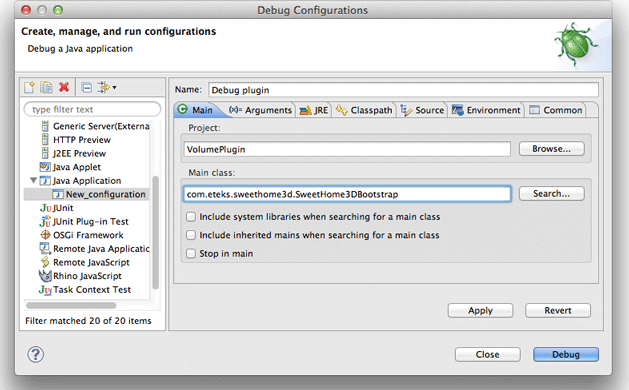
Figure 9. Creating a debug configuration
- Click on the Classpath tab, select the VolumePlugin (default classpath) sub item of the User Entries item in
the Classpath list and click on the Remove button.
- Click on the User Entries item in the Classpath list, click on the Add JARs... button, select
SweetHome3D-7.5.jar item and confirm your choice.
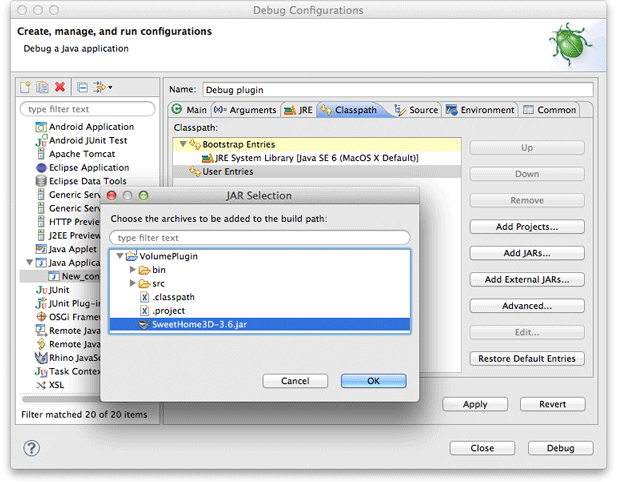
Figure 10. Setting the classpath of the debug configuration
- Select the Source tab, click on the Add... button, double click on the Java Project item in the Add Source dialog box, select
the VolumePlugin item in the Project Selection popup and confirm your choice.
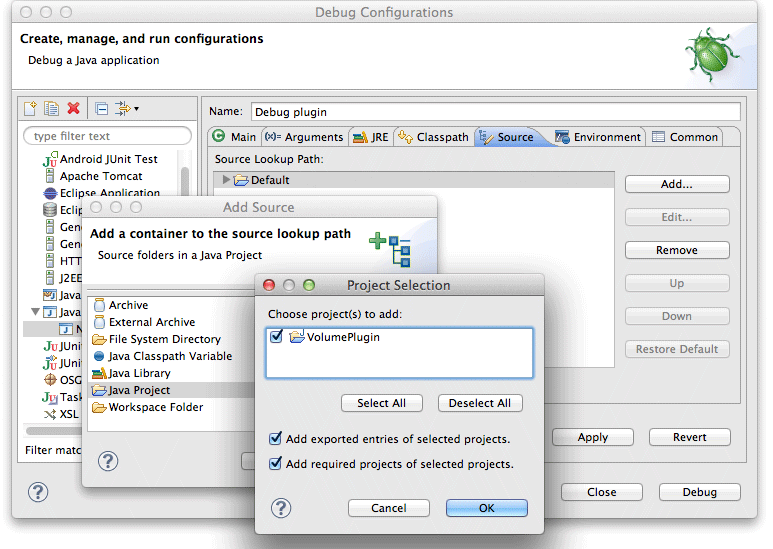
Figure 11. Setting the source path of the debug configuration
- Finally, click on the Debug button to launch Sweet Home 3D in debug mode. Once the program is running, open the VolumePlugin.java file,
set a breakpoint in the execute method and choose Tools > Compute volume from Sweet Home 3D menu. Eclipse will stop on the selected
breakpoint to let you execute the program step by step and inspect variables value.

Figure 12. Eclipse
debug perspective

|
Each time you modify the source code of your plug-in, don't forget to generate the plug-in JAR
before launching the debug configuration you created. To speed up the JAR export process in eclipse, go to the second step of
the JAR export wizard and select the option Save the description of this JAR in the workspace. This will add a new item
in the project with a contextual Create JAR menu item. |
Deploying the plug-in
Once ready, your plug-in may be deployed on the computer of other Sweet Home 3D users by simply copying it in
their plug-ins folder. From version 1.6, a plug-in file may be also
installed in the plug-ins folder of Sweet Home 3D by double-clicking on it, if its extension is SH3P (simply change
the file extension from .zip to .sh3p).
If double-clicking on a .sh3p file doesn't launch Sweet Home 3D (most chances under Linux), you can also install a plug-in
with the following command in a Terminal window (where SweetHome3D is the name of the executable file
provided with Sweet Home 3D installers):
/path/to/SweetHome3D /path/to/plugin.sh3p
To stop using a plug-in, remove its file from the plug-ins folder and relaunch Sweet Home 3D.
|
|
If you want your plug-in to be able to run with all Sweet Home 3D installers available on this web site,
take care to keep it compliant with Java 5, by selecting 1.5 in the field Compiler compliance level available
in the Java Compiler section of the dialog box shown by the Project > Properties menu item of Eclipse.
If you use a Java compiler version where Java 1.5 compatibility is not available anymore, try to target at least Java 1.8 still
used in recent versions of Sweet Home 3D and set javaMinimumVersion in the ApplicationPlugin.properties file of
your plug-in accordingly. |
Going
further
The programming of the first plug-in showed you the big picture.
Here's some additional information that will help you to go further.
Sweet Home 3D API - Javadoc
The most useful documentation to develop a new plug-in is the Sweet
Home 3D API (Application Programming
Interface), generated with javadoc tool.
Use only the classes of com.eteks.sweethome3d.plugin,
com.eteks.sweethome3d.model,
com.eteks.sweethome3d.tools and
com.eteks.sweethome3d.viewcontroller packages in
your plug-in if you want it to be upward compatible with future versions of Sweet Home 3D. This will be largely
enough to program any plug-in that works on the home data available in Sweet Home 3D.
The packages matching the other layers of the program are included in the Javadoc for information purpose only.
Don't rely on their API, as it may still change in the future with no guarantee of upward compatibility (anyway
you'll see no reference to a class of com.eteks.sweethome3d.swing,
com.eteks.sweethome3d.j3d,
com.eteks.sweethome3d.io or
com.eteks.sweethome3d packages in the aforementioned
packages).
Model classes architecture
Sweet Home 3D is based on a MVC (Model View Controller) architecture,
so understanding how is organized its Model layer is essential. The
figure 13 (available also at PDF
format) presents almost all the classes and interfaces available
in the version 1.5 of com.eteks.sweethome3d.model
package that matches this Model layer.

Figure 13. UML diagram of com.eteks.sweethome3d.model package
(click on a class to view its javadoc)
The central class in the Model layer is the HomeApplication class
(10), the abstract super class of SweetHome3D application
main class. The instance of this class gives access to the Home instances
(7) currently edited, and to the UserPreferences object
(11) that stores the length unit in use (12),
the furniture catalog (14)
and the textures catalog (15)
from which the user chooses pieces
of furniture (17) and textures (18).
A Home instance
(7) stores all the objects the user created in the home plan:
These objects implement the Selectable interface
(1) as well as the ObserverCamera object
(4), that stores the location of the camera in the Virtual visitor mode. All the external information managed
by Model objects, like the icon and the 3D model of a piece
of furniture (16), or the image of a texture (20)
is accessed through the Content interface
(19), implemented by the URLContent class
and other classes of the com.eteks.sweethome3d.tools package.
This UML diagram should help you understand which classes are available
in the Sweet Home 3D model and how you can access to them, but you'll
probably notice that no constructors and no mutators (or setters if
you prefer) are cited in it. It's just by lack of room but you can use
them with no problem in a plug-in class. Note also that any modification
of an existing object of the model will be notified to the displayed
components either with PropertyChangeEvents,
with CollectionEvents
(8) or with SelectionEvents
(6), thus allowing all changes to be reflected immediately on screen.
|
|
Sweet Home 3D model isn't thread safe for performance reasons. All modifications of
an object belonging to the model should be done in the Event Dispatch Thread.
|
Plug-in classes architecture
The architecture of plug-in classes is much more simple to understand than the Model layer's one.
The com.eteks.sweethome3d.plugin package
contains only three classes among which you're supposed to use only Plugin
and PluginAction classes,
as shown in figure 14 (also available at PDF format).

Figure 14. UML diagram of com.eteks.sweethome3d.plugin package
(click on a class to view its javadoc)
A PluginManager instance (1) is created
at application launch and searchs the plug-ins installed in user's plug-ins folder.
Each time a new home is edited, this manager instanciates and configures a Plugin object
(3) for each plug-in found at launch time. Then, it calls the getActions method
to retrieve all the actions (4) that will
be added as menu items and/or tool bar buttons in the home window. Each action is an instance of PluginAction,
which looks like Action class, with
its execute method and its modifiable
properties (2).
Note that the Plugin class gives you access
to an UndoableEditSupport instance
through its getUndoableEditSupport method.
As soon as you modify a home or its objects (furniture, walls...) in the execute method of
a PluginAction instance, you should
also post an UndoableEdit object
to the undoable edit support returned by getUndoableEditSupport method, otherwise users won't be
able to undo/redo correctly the changes you made.
Localization
If you plan to develop a plug-in for Sweet Home 3D users community, try to localize the strings it displays
either in actions name and menu or in dialogs you'll create (or at least prepare its localization).
Two constructors
of the PluginAction class
will help you to organize the translation of actions properties with .properties files, and if
you need to translate other strings in your plug-in (like the one in the dialog shown by the tested
plug-in) reuse
these .properties files
with ResourceBundle Java
class.
If you prefer to limit the number of properties files, you might even write the values of the action properties
and other strings in the ApplicationPlugin.properties description
file of your plug-in.
If you want an example that uses this architecture, download the Export to SH3F plug-in available
at https://www.sweethome3d.com/plugins/ExportToSH3F-1.0.sh3p,
and unzip it (this plug-in file contains also the source code of the plug-in).
As described in Help forum, this plug-in creates
a SH3F file that contains all the furniture you imported in the furniture catalog of Sweet Home 3D.
Contributing plug-ins
You can post the plug-ins you programmed in Plug-ins
Contributions Tracking
System to share them with Sweet Home 3D users community.
Many features can be added to Sweet Home 3D thanks to plug-ins, from importers to exporters, but also plug-ins able
to modify the data of a home like the Home
Rotator Plug-in developed by Michel Mbem and others listed in the Tutorial for Plug-ins and Extensions (PDF)
written by Hans Dirkse and in the Plug-ins and tools page.
Last update : August 20, 2024
|


