France
Joined: Nov 7, 2005
Post Count: 9432
Status:
Offline
Re: Sweet Home 3D 6.0
Here's version 6.0 Beta 2 (I removed offline running and file associations to avoid conflicts with installed versions).
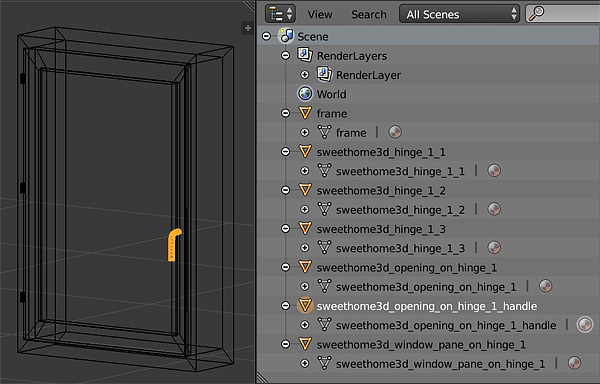
ndorigatti, you're going to be happy, I continued the programmation of 3D models deformation and succeeded to extend it for rotations around hinges and translations along rails. This was quite tough to manage wide opened doors and windows, but I finally managed to make it work too
So, it's now possible to open windows, doors, cabinets and other objects when their modification pane displays a button named Modify openings or Modify posture for mannequins. This is now the case for 32 models in the updated default catalog. I added the default tag (défaut in French) to the 100 models of this catalog to let you find these models more quickly if you installed more libraries.
When you click on the Modify openings button, a dialog box appears to let you rotate or slide some parts.
I added a Reset shape button to reset openings or mannequin to their initial position (i.e. the one in their 3D model file) and three buttons to let you quickly change the point of view on the edited model. There's no limitations on the angles or translations, and you'll have to visually check if the 3D model will remain consistant or not. You can open sashes at a larger width than window's one and the drawing of the sashes in the plan will keep their size and location correctly. The selection rectangle in the plan will match the total width and depth of the 3D model like until now, even if this may lead to strange rectangles like in the following screenshot.
As soon as an object is deformed, its size can be changed only proportionally, otherwise this could lead to strange shapes. If ever you need a wider or deeper or higher object, first reset its shape, change the dimensions you want, and deform again its shape.
This new feature works thanks to naming conventions in the 3D model files where are described the various parts of the mannequin, the hinges and their openings, as well as the rails and their sliding parts. Remember the ability to declare a shape as a mirror thanks to sweethome3d_window_mirror prefix? Here, it's the same thing, but with more prefixes: - Hinge parts are prefixed by sweethome3d_hinge_ followed by the order number of the hinge axis they describe, starting from 1 (for example, sweethome3d_hinge_1, sweethome3d_hinge_2,...). A given axis can be defined with more than one part, for example with 2 shapes named sweethome3d_hinge_1_top and sweethome3d_hinge_1_bottom. - The parts of an opening able to turn around the hinge numbered x should be prefixed by sweethome3d_opening_on_hinge_ followed by the same number x. For example, sweethome3d_opening_on_hinge_1_door and sweethome3d_opening_on_hinge_1_handle will rotate around the axis defined by sweethome3d_hinge_1, or defined by sweethome3d_hinge_1_top and sweethome3d_hinge_1_bottom. If you want to define transparent panes directly without a transparent material, you can also use the prefix sweethome3d_window_pane_on_hinge_ followed by the hinge number. The axis direction of the hinge x is guessed from the largest dimension of the global bounding box of the hinge parts. Thus, if the largest dimension of a hinge is its height, the axis will be vertical, if its largest dimension is its depth the axis will be horizontal in Y direction and if its largest dimension is its width the axis will be also horizontal but in X direction. Axes can only be parallel to X, Y or Z axes at the moment, but this looks largely enough. The axis may be defined with some dummy parts that are not visible (like in the kitchen cabinet).
- Straight rail parts are prefixed by sweethome3d_rail_ followed by the order number of the rail axis they describe, starting from 1 (for example, sweethome3d_rail_1, sweethome3d_rail_2,...). A given axis can be defined with more than one part too. If a 3D model has multiple openings translating along a unique rail, you may also use the prefix sweethome3d_unique_rail instead. - The parts of an opening able to move along the rail numbered x should be prefixed by sweethome3d_opening_on_rail_ followed by the same number x. For example, sweethome3d_opening_on_rail_1_door and sweethome3d_opening_on_rail_1_handle will translate along the direction of the axis defined by sweethome3d_rail_1. If you want to define transparent panes directly without a transparent material, you can also use the prefix sweethome3d_window_pane_on_rail_ followed by the rail number. If a unique rail is used, you still have to number each opening to be able to distinguish the different openings that can be moved. Similarly to hinges, the axis direction of the rail x is guessed from the largest dimension of the global bounding box of the rail parts. Thus, if the largest dimension of a rail is its height, the axis will be vertical, if its largest dimension is its depth the axis will be horizontal in Y direction and if its largest dimension is its width the axis will be in X direction. Axes can only be parallel to X, Y or Z axes at the moment.
- The different parts of a mannequin are prefixed by: sweethome3d_mannequin_abdomen, sweethome3d_mannequin_chest, sweethome3d_mannequin_pelvis, sweethome3d_mannequin_neck, sweethome3d_mannequin_head, sweethome3d_mannequin_left_shoulder, sweethome3d_mannequin_left_arm, sweethome3d_mannequin_left_elbow, sweethome3d_mannequin_left_forearm, sweethome3d_mannequin_left_wrist, sweethome3d_mannequin_left_hand, sweethome3d_mannequin_left_hip, sweethome3d_mannequin_left_thigh, sweethome3d_mannequin_left_knee, sweethome3d_mannequin_left_leg, sweethome3d_mannequin_left_ankle, sweethome3d_mannequin_left_foot, sweethome3d_mannequin_right_shoulder, sweethome3d_mannequin_right_arm, sweethome3d_mannequin_right_elbow, sweethome3d_mannequin_right_forearm, sweethome3d_mannequin_right_wrist, sweethome3d_mannequin_right_hand, sweethome3d_mannequin_right_hip, sweethome3d_mannequin_right_thigh, sweethome3d_mannequin_right_knee, sweethome3d_mannequin_right_leg, sweethome3d_mannequin_right_ankle, sweethome3d_mannequin_right_foot and all these prefixes must be found in a 3D model file, otherwise Sweet Home 3D won't accept to handle it as an articulated mannequin.
How to use these prefixes in your own 3D model files? In a file at OBJ format, it's quite easy because the parts of a 3D model are defined by lines starting by g or o, so you just have to look for these lines and add the good prefixes to make it work. If you want to visually identify these parts, you can import your 3D model in Blender, click and rename the different parts, and reexport them at OBJ format.
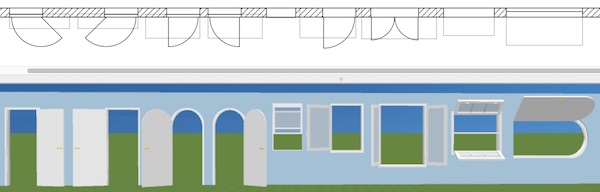
If you want to quickly test these features on existing homes, simply open the demos available in Sweet Home 3D, and play with the openings available in them.
okh, I tried a few times to deform the head of the mannequin, but it gave only weird results. The problem is that if you start to give it a more human look, you probably have to change all the limbs and not only one part. Feel free to try yourself by moving vertices (or adding some) on the existing model in Blender, but it's a very time-consuming task. I'll try to define some texture coordinates on the head to check if it can give interesting results. About changing limb colors, I plan to improve the Material modification dialog box by allowing multiple selection in the materials list. Finally, I also changed the frame.obj file to use a separated MTL file with clear material names. This kind of object with a double use is already weird enough, not to make it more complicated for beginners! I tend to use predefined colors in the default catalog to simplify code organization, but sometimes I wonder if I shouldn't forget this old habit.
Thanks all for your feedback
----------------------------------------
Emmanuel Puybaret, Sweet Home 3D creator
Joined: May 12, 2013
Post Count: 1545
Status:
Offline
Re: Sweet Home 3D 6.0
Wow. This is exciting. Looking very much forward to experiment with a new set of windows.
Took a sneak peak before work today. Only thing I noticed (but this was a very quick test), was that if: 1) I import window85x123.obj as a Door/Window, place it in the wall, and then modify the opening, the proportions are ok and the window looks right, however, if 2) I import window85x123.obj as a Door/Window, modify the opening, and then place it in the wall, the window is too deep for the wall.
And the proportions seem to be auto-locked when opening is modified. But there is a logic here, just need to get my head around how this works - and how translates into my own window collection - how to use this with some of my other favourite properties doorOrWindowWallThickness# doorOrWindowWallDistance#
Anyway, congratulations. Very interesting development. Will test properly later.
Italia
Joined: May 12, 2017
Post Count: 65
Status:
Offline
Re: Sweet Home 3D 6.0
woow, that's amazing and fast! I'll try to take out some time in the next days to try the deformatiions, and if I understand them, I'll try to update my models!!! thank you!!!
Joined: May 28, 2015
Post Count: 607
Status:
Offline
Re: Sweet Home 3D 6.0
@Puybaret
The openings of the doors, windows or furniture work rather well if one keeps in mind a direction and a coherent opening angle relative to the hinges.
When sliding the doors of the default slider window, the display is correct only after changing the wall thickness. Demo-Studio
By adding 2 cylinders as axes of rotation, it is possible to open the Turn window .
You can also use the "Modify openings..." feature to modify articulated lights. Wall spotlight
I like it!
----------------------------------------
EnkoNyito
----------------------------------------
[Edit 1 times,
last edit by enkonyito at Jul 7, 2018, 7:38:24 PM]
Joined: May 12, 2013
Post Count: 1545
Status:
Offline
Re: Sweet Home 3D 6.0
You can also use the "Modify openings..." feature to modify articulated lights.
Wow again, I had not thought of that. Yes, there are some possiblities here that are really amazing. Of course, it means that some of us will have to go back and redesign lots and lots of (private) models. Apparently not only windows and doors, but all the lamps too... And come to think of it, I will need to fill my fridge and cupboards.
As soon as an object is deformed, its size can be changed only proportionally...
Quite - thanks for pointing this out discretely. Ignore my previous comment. There you go, one should sometimes read the instructions.
..allowing multiple selection in the materials list.
Yes, that would be brilliant. It is sometimes quite timeconsuming to change models with many (similar) surfaces - like the mannequin.
Feel free to try yourself by moving vertices (or adding some) on the existing model in Blender, but it's a very time-consuming task.
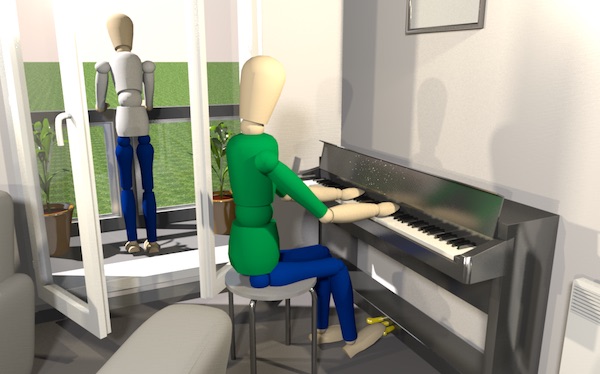
Clearly, and I am not sure I have the patience or skill, but the potential is super interesting. And an experienced Blender (or whatever) user, should be able to come up with something. Then again, for my purposes the mannequin is sufficient - putting mannequin(s) in different positions around a construction is a great help in visualising a room at a glance.
..thanks to naming conventions in the 3D model files where are described the various parts of the mannequin, the hinges and their openings, as well as the rails and their sliding parts...
Actually, this all looks very straight-forward. But I will have a problem remembering all of this. Sometimes I have thought about the need for updating the SVG mini manual with advanced properties. With all these new elements to making models, it no longer does SH3D justice.
Finally, I also changed the frame.obj file to use a separated MTL file with clear material names. This kind of object with a double use is already weird enough, not to make it more complicated for beginners! I tend to use predefined colors in the default catalog to simplify code organization, but sometimes I wonder if I shouldn't forget this old habit...
The frame is certainly easier to understand now. But I also would not worry too much about the other models. And I certainly see the rationale for keeping it simple.
France
Joined: Nov 7, 2005
Post Count: 9432
Status:
Offline
Re: Sweet Home 3D 6.0
Thanks for your comments
EnkoNyito, thanks for trying modifications on the Turn window and the Wall spotlight. The issue on the latest is that the light sources associated with the 3D model won't rotate themselves, but I have an idea to make it work: if a light source intersects with a rotated part, it sounds logical to make it rotate too. About your test on the Slider window, this shouldn't happen simply because the windows of this model aren't supposed to go beyond the frame!
Okh, I will be very happy if you update your manual or create another one. But maybe, it will be better to wait for the final release of version 6.0
----------------------------------------
Emmanuel Puybaret, Sweet Home 3D creator
Joined: May 12, 2013
Post Count: 1545
Status:
Offline
Re: Sweet Home 3D 6.0
Still have not been able to find any anomalies in 6.0. No craches, no beta issues.
..have an idea to make it work: if a light source intersects with a rotated part, it sounds logical to make it rotate too...
Should be interesting.
.. better to wait for the final release of version 6.0...
And wait until I get my head around all of these very nice new properties for SH3D models . It seems to me that it is now possible to create very good models that will work in any context AND have extra custom features in SH3D. Your work on the axes and pivot points of models, really changes the approach to making good models for SH3D.
Actually I started editing the SVG stuff using proper SVG figures and also changing pressentation slightly now that I know a bit more about SVG paths (and maybe ditching .pdf for proper .html to stick with the non-proprietary approach). Thought of adding something about - multiple light sources, - illustrations on window/door properties (sashes/wall distance), - how to simplify models using your 261 approach, - and maybe something about Ceciliabr's interesting high-res testing in thread 8292 (but advanced use of lights and optical density may be more in the realm of the rendering/light experts), - obj g/o prefix sweethome3d_window_mirror and now a full catalogue of excitig new prefixes, - possibly also price information depending on where 6.0 goes - do not think I want to mention that until I know it will bepart of the default interface (even if it is fully available for advanced users already), - and maybe mention something about Home.xml. For anyone having edited .xml before, it really is a super fast way of changing furniture properties directly without the FurniturePropertyCatalogue detour.
That said - I will be happy to sum up notes into the mini-guide as a reference (which basically is what it is), if anyone has wishes for putting other cheat-sheets into the manual...
Anyway, I am always surprised when I see your priorities for SH3D development. Good news is that they are always pleasant surprises... I really did not see the 6.0 features coming...
Thanks and good luck with the rest of the implementation.
Joined: May 28, 2015
Post Count: 607
Status:
Offline
Re: Sweet Home 3D 6.0
@Puybaret
The issue on the latest is that the light sources associated with the 3D model won't rotate themselves, but I have an idea to make it work: if a light source intersects with a rotated part, it sounds logical to make it rotate too.
If it works it would be nice. Otherwise, the number of articulated lights is limited at the moment.
About your test on the Slider window, this shouldn't happen simply because the windows of this model aren't supposed to go beyond the frame!
I realized this by observing the object in detail and comparing with reality. Would it be possible for the opening to be stopped by the frame? For a pocket door , we can find a trick to integrate it into the wall.
----------------------------------------
EnkoNyito
France
Joined: Nov 7, 2005
Post Count: 9432
Status:
Offline
Re: Sweet Home 3D 6.0
Okh, you seem to have plenty of ideas to occupy your long nights of the next winter
Enkonyito, I didn't succeed to make the articulated light work yet, but will continue to try.
Would it be possible for the opening to be stopped by the frame?
I have a few ideas about how to set bounds on rotations and translations, but I don't think it will appear before the final release of version 6.0.
----------------------------------------
Emmanuel Puybaret, Sweet Home 3D creator