Changes: - Added Edit -> Rotate action - rotates the selected objects in arbitrary angles - Flip wall styles on mirroring (you can mirror objects by using negative factors in then resize dialog, e.g. Width = -100% mirrors the selected objects on the Y axis)
Joined: Sep 15, 2010
Post Count: 40
Status:
Offline
Re: New plugin: Advanced plan editing
Look at the Attached files section below of the comments. You can open that section with a little arrow handle on the right. There you'll find two files, the AdvancedEditing.sh3p file is the plugin you need to download.
Click here for a direct download (this link works for version 1.2 only, as soon as a new version is available it will vanish).
Netherlands
Joined: Sep 26, 2009
Post Count: 4014
Status:
Offline
Re: New plugin: Advanced plan editing
Tobias,
I am starting to like your plug-in VERY much. Especially the possibility to adjust the coordinates for rooms is very useful.
Nevertheless, I have a request for additional features: join walls.
What I would like to see, is: - 1 - After splitting a wall, I would like to be able to join the two wall segments, so that it becomes one wall again. If possible we could have some control about which colour or texture should be kept. A simple solution could be to apply the colour or texture of the segment that's chosen first to the combined wall. - 2 - Connect the end point and starting point of a series of wall segments. Example: If I draw a room, but the end point doesn't connect properly with the starting point, I don't get a nice "closed" corner. It would be nice if we could specify two end points and connect these to form a closed room.
Thanks :-)
Hans
----------------------------------------
Hans
Netherlands
Joined: Sep 26, 2009
Post Count: 4014
Status:
Offline
Re: New plugin: Advanced plan editing
Tobias,
1 - Split wall --> Join walls What I would like here, is in fact a kind of Undo for the Split wall function. It should (re-)connect two parts of a straight wall.
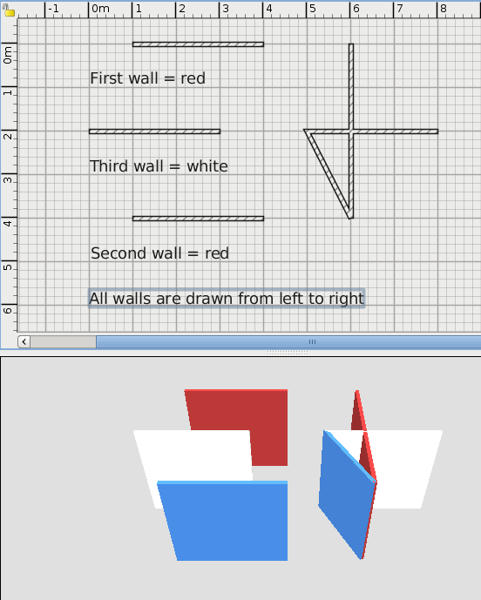
2 - I am in the process of writing a tutorial for all plug-ins. This is an image I made to illustrate the behaviour of the Connect walls function as it behaves now.
EDIT Only now do I see there's a small mistake in the picture: the walls were drawn in this order: red-blue-white (in the picture it says red-white-blue; being Dutch makes it difficult to change the order of some colours...). I chose an example with three walls to better illustrate the behaviour of the function.
Here is the correct picture.
END EDIT
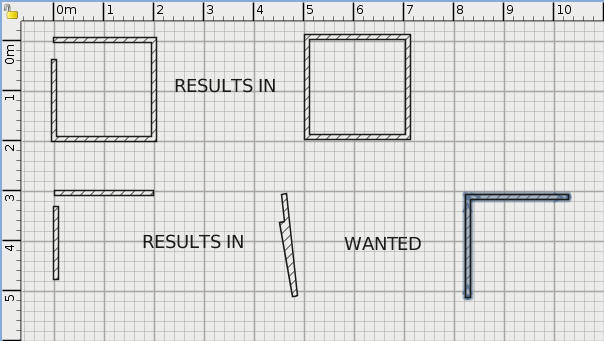
I made a new image that better shows what I would like. First it shows current behaviour: an open room can be closed, correcting a "mistake" that often happens. The second part of the image shows something that might be a useful new function.
EDIT 2 I think this could be implemented by asking "Wall 1: Connect end point or start point?" and then "Wall 2: Connect end point or start point?" END EDIT 2
There is a variation on the second example: joining walls in a T-junction or a Y-junction, although its use would be more limited.
I hope this clarifies what I meant.
Hans
----------------------------------------
Hans
new website - under constuction hansdirkse.info
----------------------------------------
[Edit 1 times,
last edit by hansmex at Oct 4, 2010, 12:11:47 PM]
Joined: Sep 15, 2010
Post Count: 40
Status:
Offline
Re: New plugin: Advanced plan editing
Hi Hans,
for the "Join walls" function - I could write that action, for sure. But I'll wait until Emmanuel moves the wall actions into their own menu - as you already mentioned in the 3.0 thread, the menu is quite huge, right now. And as long as you can achieve the described behaviour with small effort (in the way I mentioned it), I think its not that important.
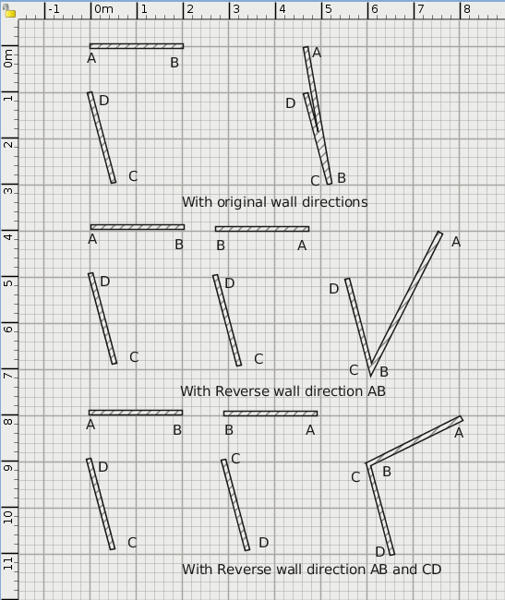
To the images: The "connect walls" action has nothing to do with the order the walls were drawn (as long as you select one by one): It connects the endpoint of first selected wall with the startpoint of the second selected wall. To achieve the desired behaviour of your last example, select the walls in the right order and reverse the walls before the action if necessary.
Netherlands
Joined: Sep 26, 2009
Post Count: 4014
Status:
Offline
Re: New plugin: Advanced plan editing
Tobias,
First of all, as I'm writing this tutorial I want to thoroughly understand how each plug-in and each function works. I'm pretty sure other users may have similar questions. Or am I the only stupid guy here? So I'm not trying to annoy you, just wanting to understand the details.
Also, I edited my last post: I corrected the picture and added some text.
After reading your last post, I followed your instructions and reversed wall direction. Now I can join two walls, more or less in the way I want. Wow!
Nevertheless, it's a bit of a hassle. Would it be possible to change the plug-in in such a way that we can point at the end points of the lines we want to connect? Like: the first end point clicked connects to the second end point clicked. That way the plug-in would work much more intuitively.
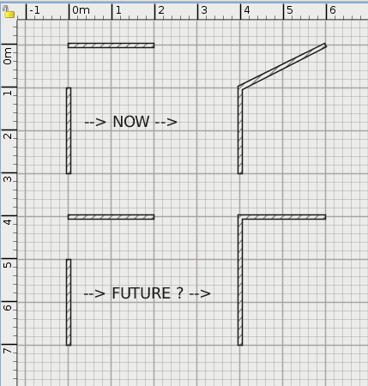
One further request: in the current behaviour the walls are connected by moving one wall. Ideally it would also be possible to connect walls by stretching or extending them, as shown in the image below. Each option has its advantages, so I think (f you agree) that the current behaviour should be kept, and the "new" behaviour should be added, maybe with a dialogue box asking "Move or stretch?"
EDIT This is a more complete "visual description" of the current behaviour of this plug-in.
END EDIT
Hans
----------------------------------------
Hans
new website - under constuction hansdirkse.info
----------------------------------------
[Edit 1 times,
last edit by hansmex at Oct 4, 2010, 1:31:00 PM]
Joined: Sep 15, 2010
Post Count: 40
Status:
Offline
Re: New plugin: Advanced plan editing
Hi Hans,
I'm developing software since many years - I know that users don't understand the intention (and power) of some functions at first, so don't hesitate to ask...
Currently a plugin has not the possibility to interact with the user interface of SH3D (at least not officially), thus I could show a dialog where you select the points to connect, but I can't let the user select the points on the plan, neither can I visualize that point in the plan. I think I implement the dialog in the next version of the plugin, that way I could show a notification when there is a previous connection that would be removed, too (as there is always only one for each start/endpoint).
Btw. I don't move the wall, I just move the end points - if you look at your upper image, you'll notice that the upper wall is stretched there. The lower image you can achieve by reversing the direction of both walls and selecting the lower wall first. Maybe you should display the direction of the walls in your tutorial (by selecting them before taking the screen shots).