Russia
Joined: Aug 13, 2022
Post Count: 240
Status:
Offline
Re: Apartment project with lighting by invisible hemispheres. I continue advertising
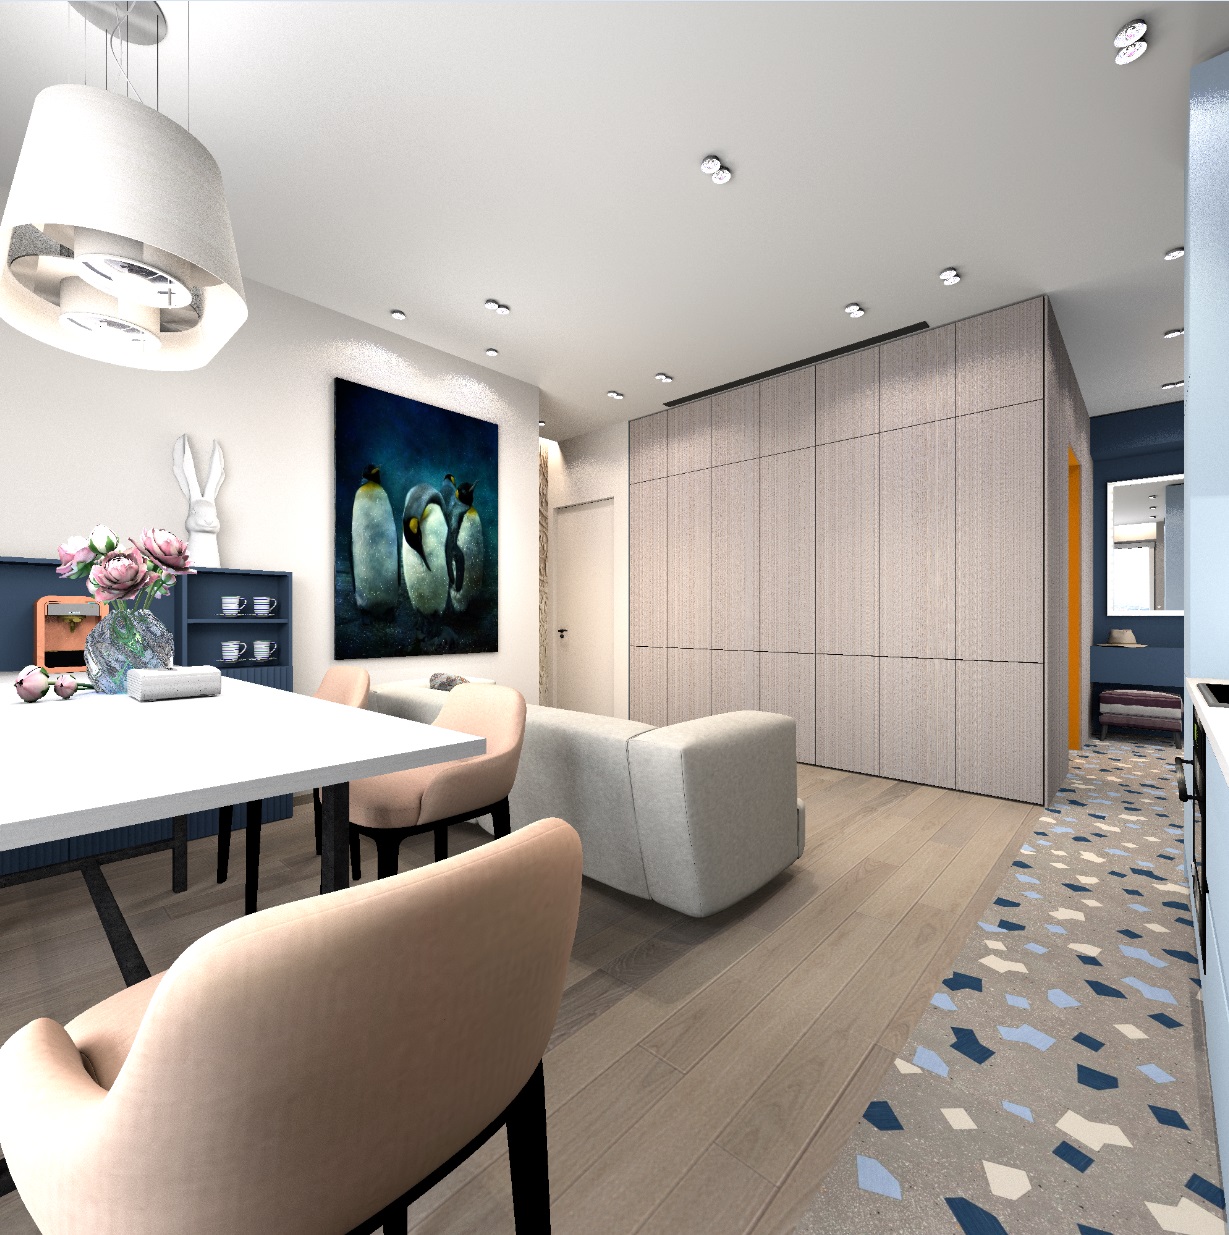
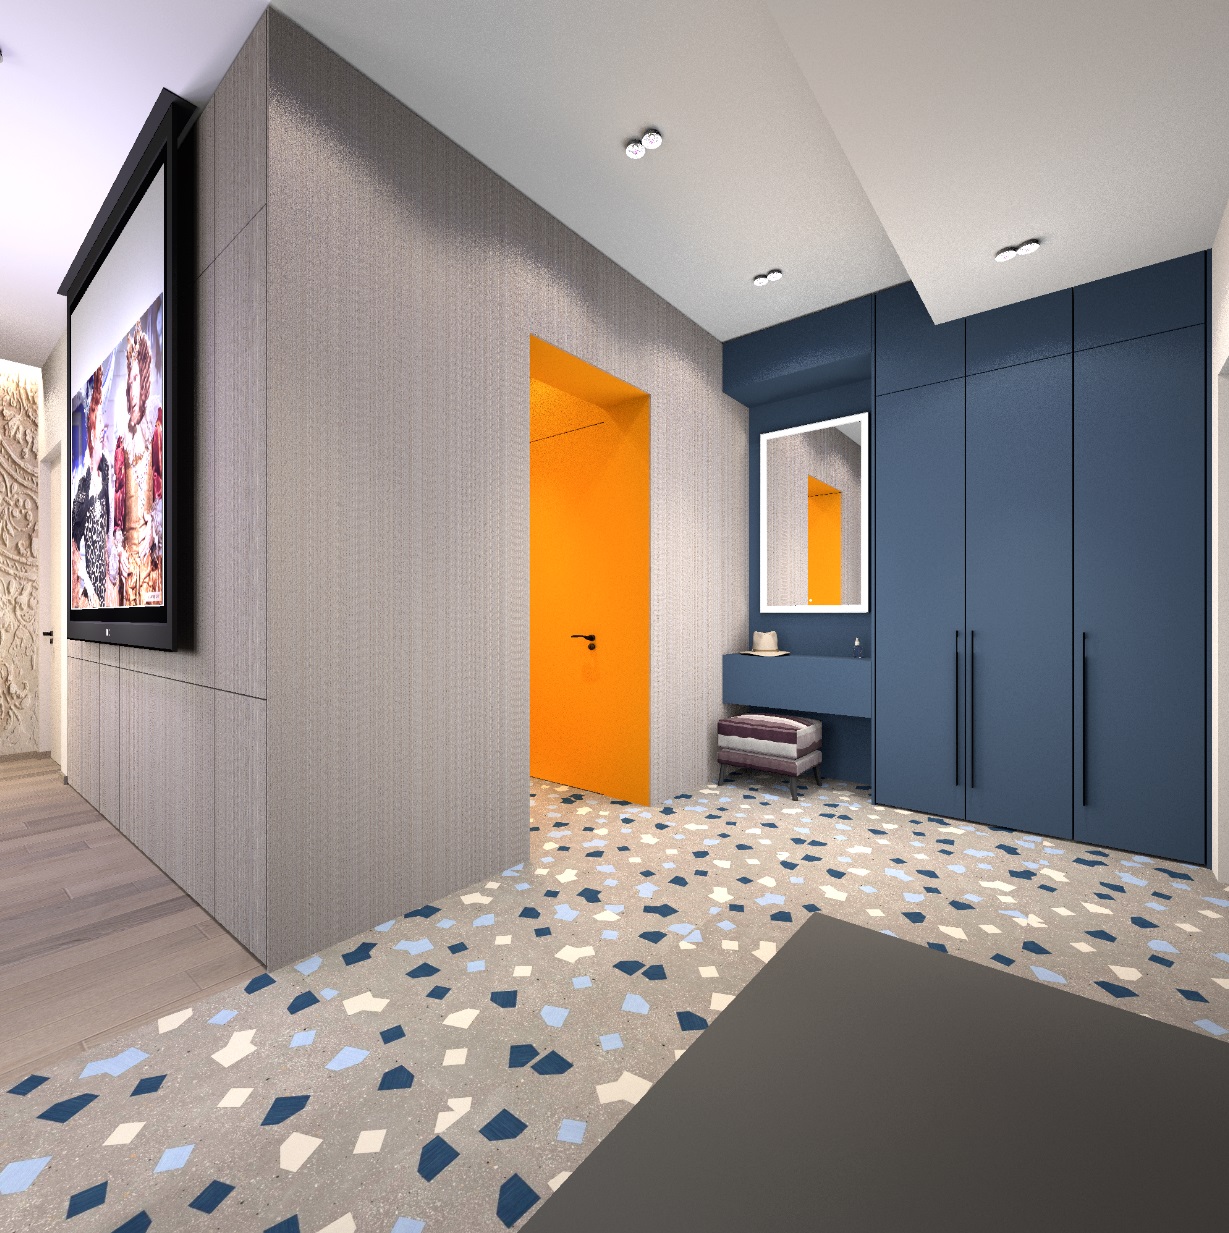
Hello in the New Year. I want to tell you about my way of showing a cinema room in a room. There are several zones in my room, there is a dining table, a sofa, a kitchen, two vestibules. Everywhere there are their own groups of lights, controlled through their switches and dimmers. There is a projector screen built into the ceiling (it stands on the table). During the day, the screen is hidden in the ceiling, in the evening you can watch a movie. There is a great temptation to turn on all the lights like in a real cinema. But after all, we have an interior first of all, and not a cinema with popcorn. Therefore, we need to prepare. To turn off the lights selectively, I copy the necessary lights and in this copy I remove all the light powers to zero, if they are there (I give them a name with the initial word off---). I have my own homemade spots built into the ceiling, I made them from two hanging lamps of different sizes and power, and this pair is complemented by two luminous spheres for local visual effects. I have told you how these spots are made here https://www.sweethome3d.com/support/forum/viewthread_thread,12554 , they shine very truthfully and give the necessary falling shadows from objects. The lamps turned out to be good. https://www.mediafire.com/view/tkoyssq2trrx60...%25BE%25D0%25B9.jpg/file#
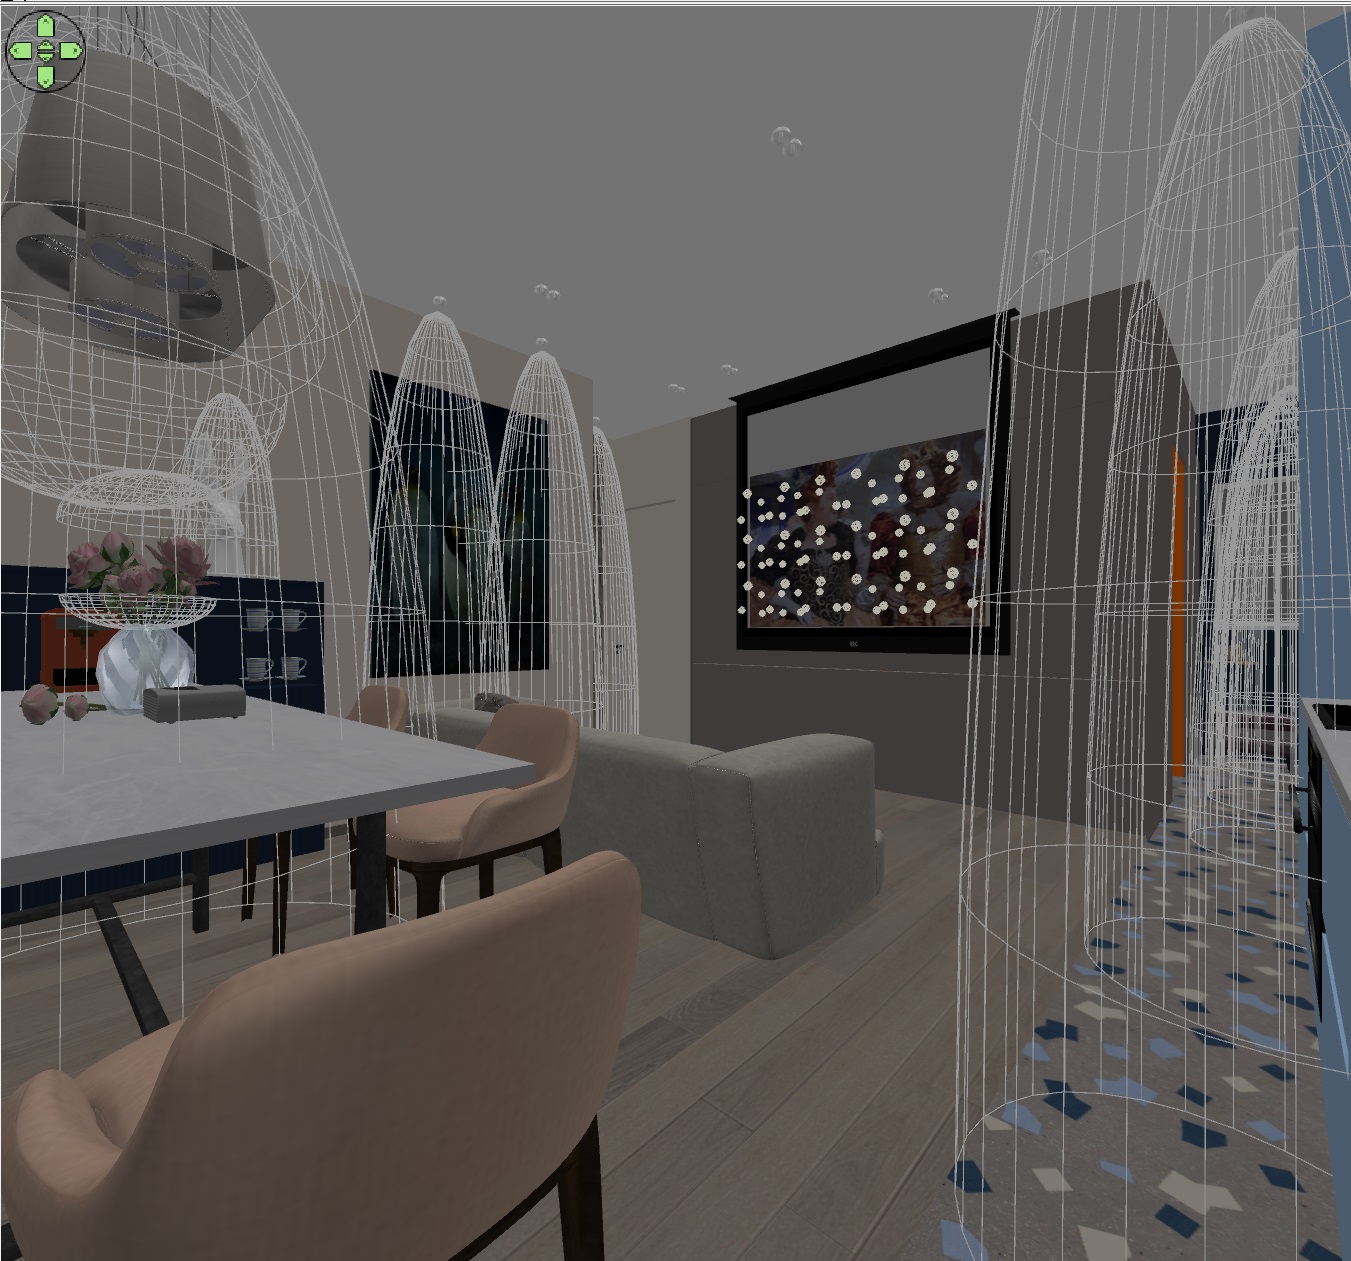
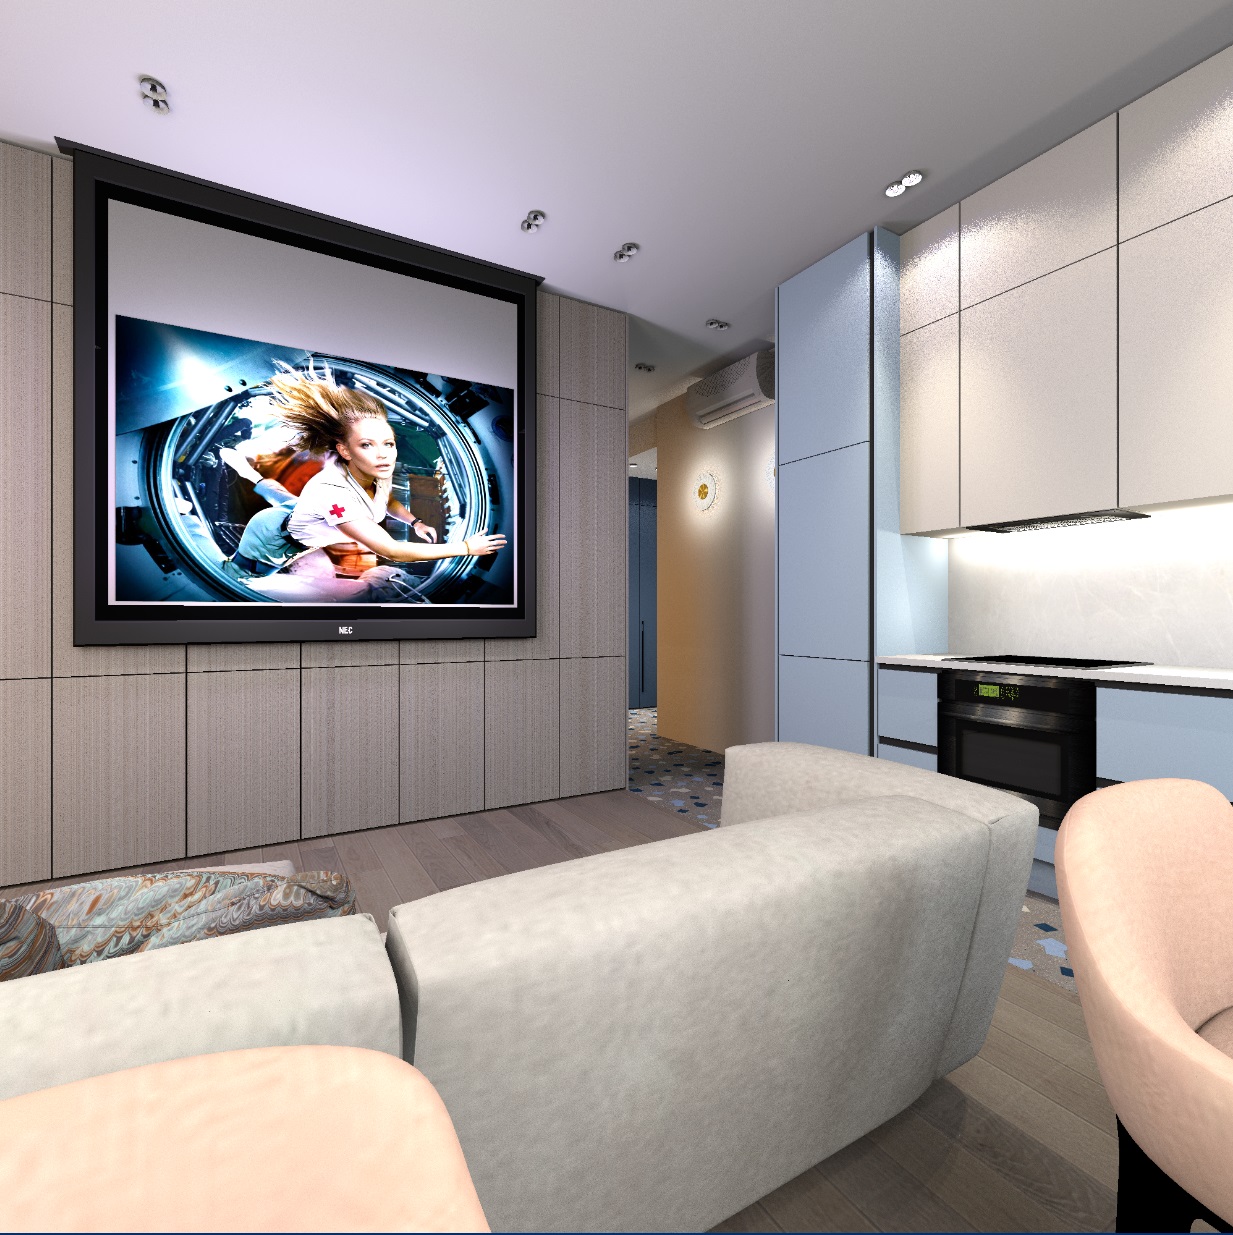
My belief is that you need to turn off only part of the lights in the room in order to work with the picture more delicately, not primitively out of complete darkness. To turn off the desired lamp, I combine it and the copy-off and after combining make the lamp with power invisible. In its place, there is a dummy that looks like a switched-off lamp. I decided to turn off the row of lights along the cabinet and screen and the two lights above the sofa. I also removed the extra organza backlight on the window and replaced the background on the street (city view) with a blue sky. In deep night mode, the texture of the sky will be shown outside the window brightly and without darkening, so you can choose any pictures - sunset, night stars, moon. The window is slightly reflected in the mirror in the hallway, so an evening view in the window is needed even there. Now about how to make a glowing screen from a projector. I tried different options - panels, hemispheres, balls and realized that it was best to make groups of small multicolored spheres and evenly distribute them next to the screen over the entire area. The regularity of such a grid is not necessary, you can place balls with different steps. Some of the balls need a lilac color, this color is most similar to the general light of the TV screen. Such a group of lamps gives a very important illumination effect on the ceiling and floor, as it will be from a real screen with reflected light from a projector. It is important to give a non-bright white color of the screen itself (the background around the image), slightly gray, so that the white areas of the image burn brighter than this background. As a result, these are the pictures. Daytime lighting Lighting in the evening hemispheres for evening lighting, balls at the screen I also successfully applied the texture method to the fabric. Sometimes it is impossible to find the right seamless texture of a fine-patterned material. I needed to draw a texture for a linen-colored fabric. I took the complex color texture of gray oak parquet and applied this texture on a scale of 1%. The result is thin scars on the entire surface of the box, very similar to the fabric. This 1% method is great if you need to depict a uniform texture of the desired complex color. It can be used for both walls and furniture.
Russia
Joined: Aug 13, 2022
Post Count: 240
Status:
Offline
Re: Apartment project with lighting by invisible hemispheres. I continue advertising
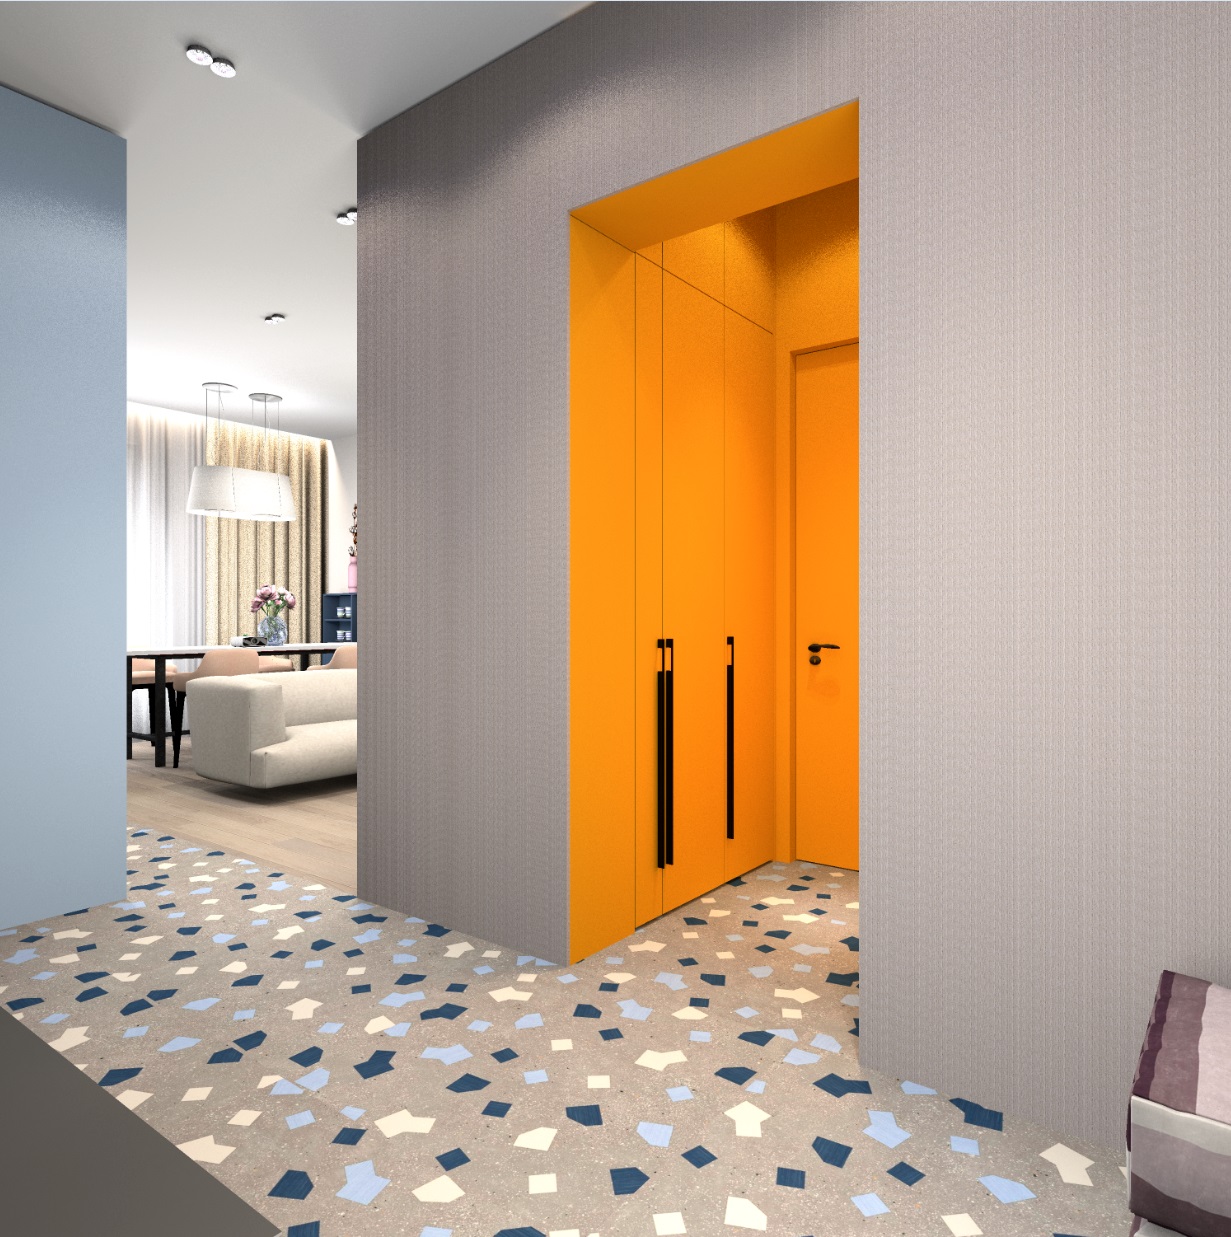
often, the narrow layout of the hallway or corridor does not allow you to show the view in the right size, the walls interfere. There is an easy way to make part of the walls invisible, and in their place install very low replacements of a dark neutral color. Then you can move the camera further away and take a wider view. And it will be clear that there is actually a wall here.
Russia
Joined: Aug 13, 2022
Post Count: 240
Status:
Offline
Re: Apartment project with lighting by invisible hemispheres. I continue advertising
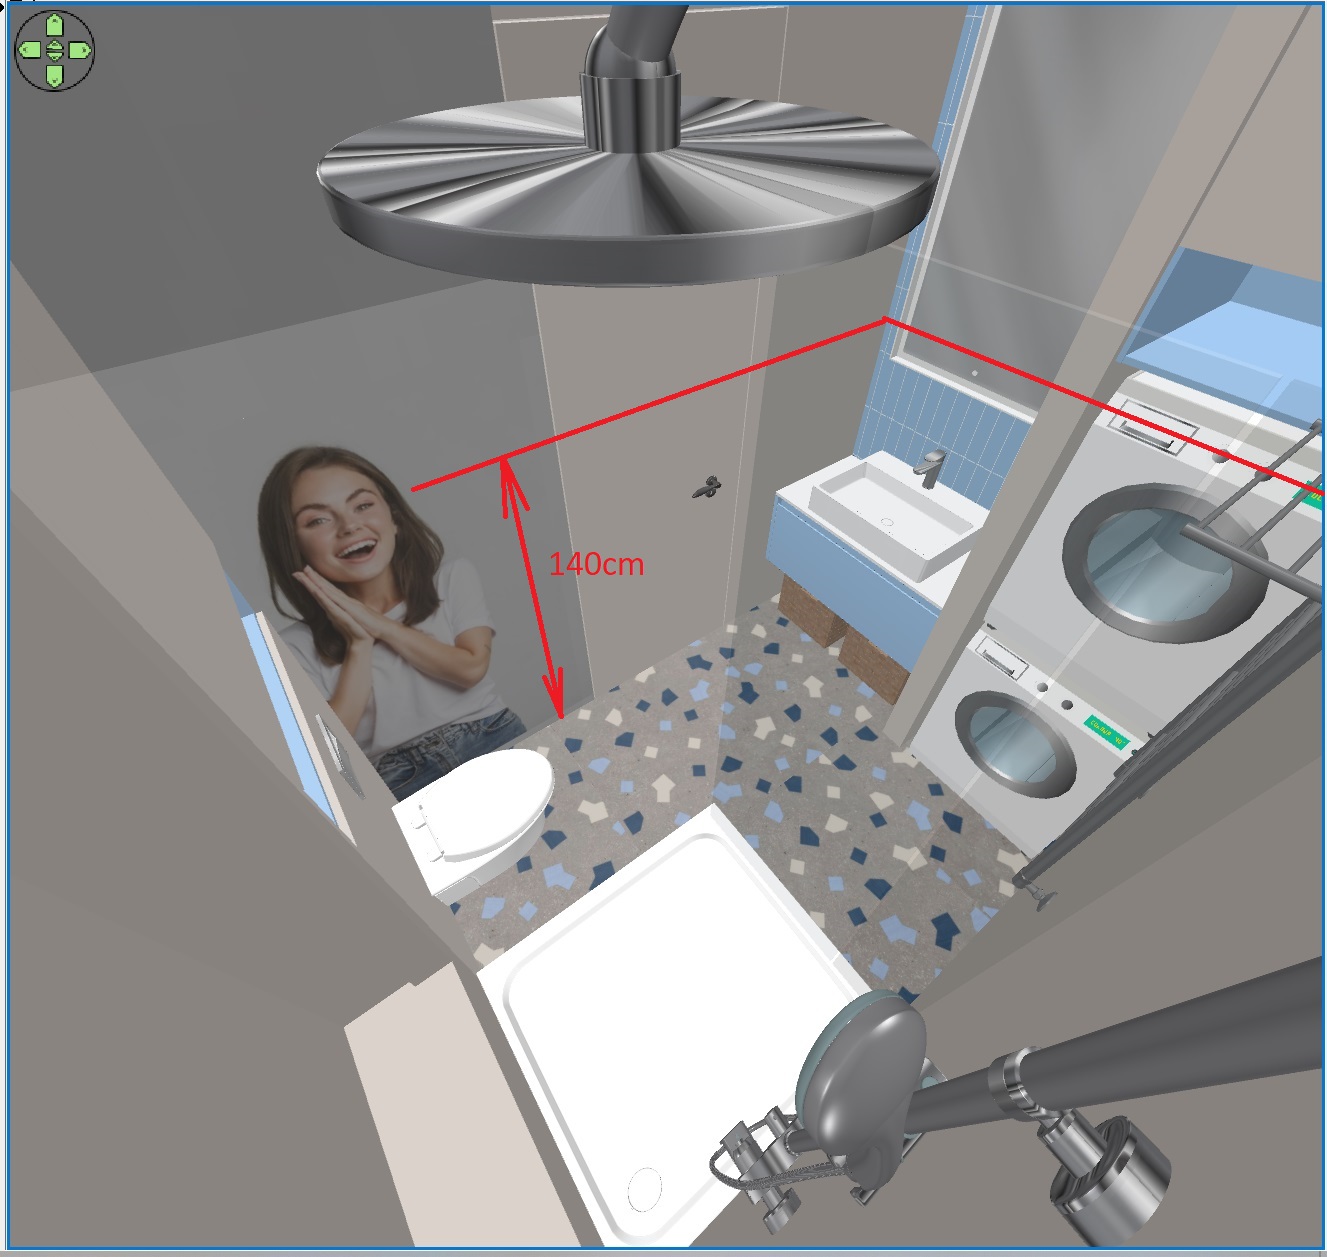
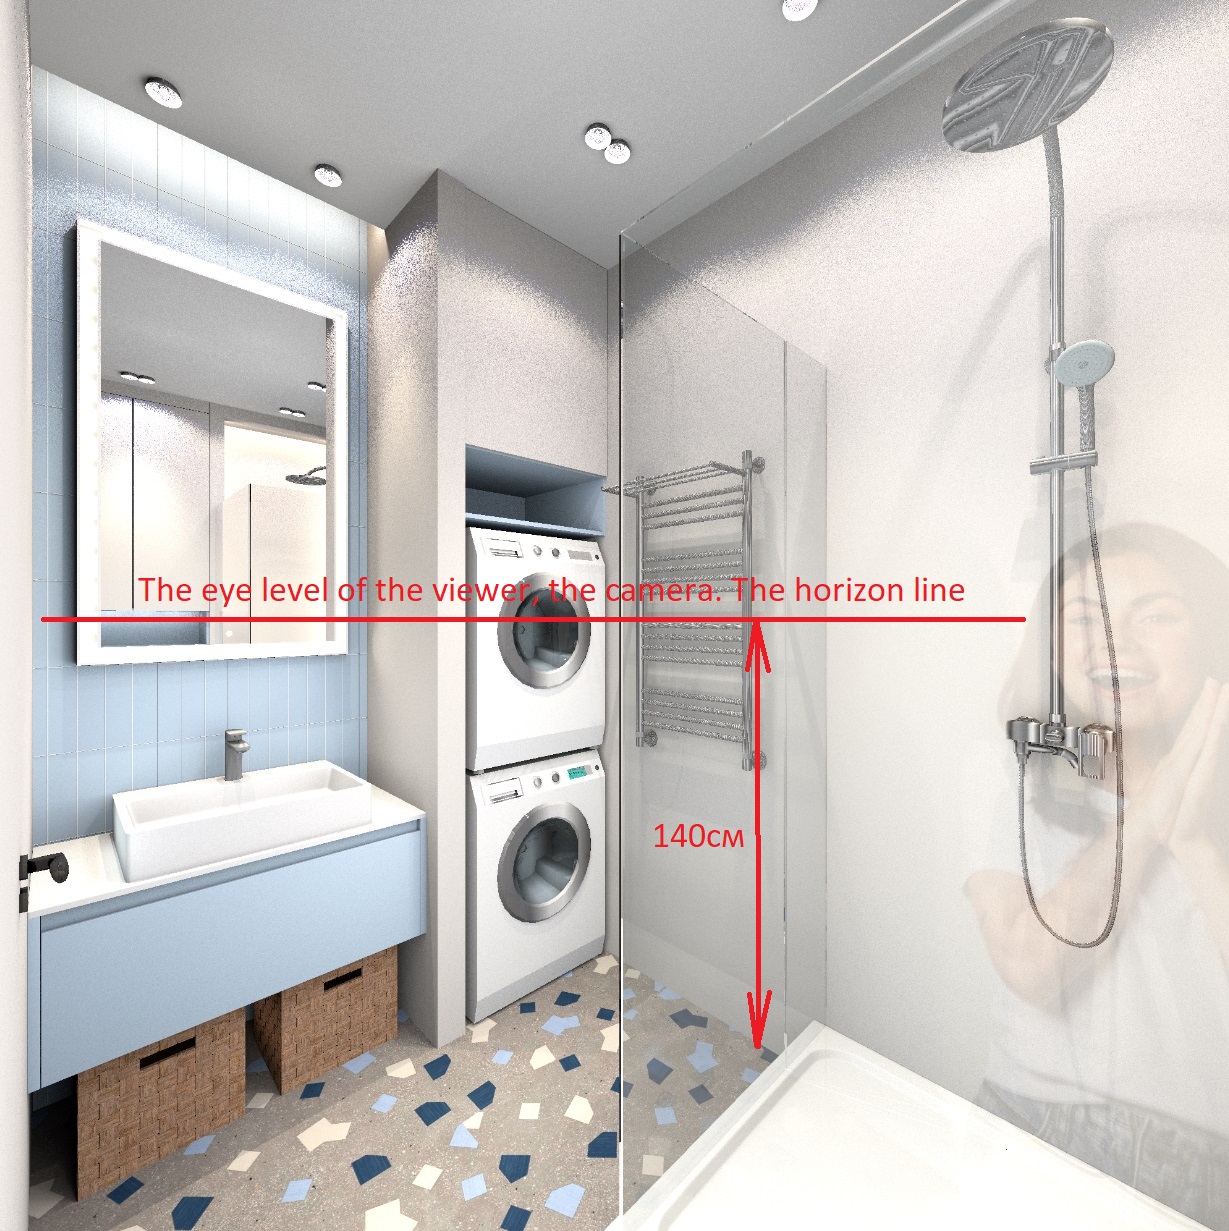
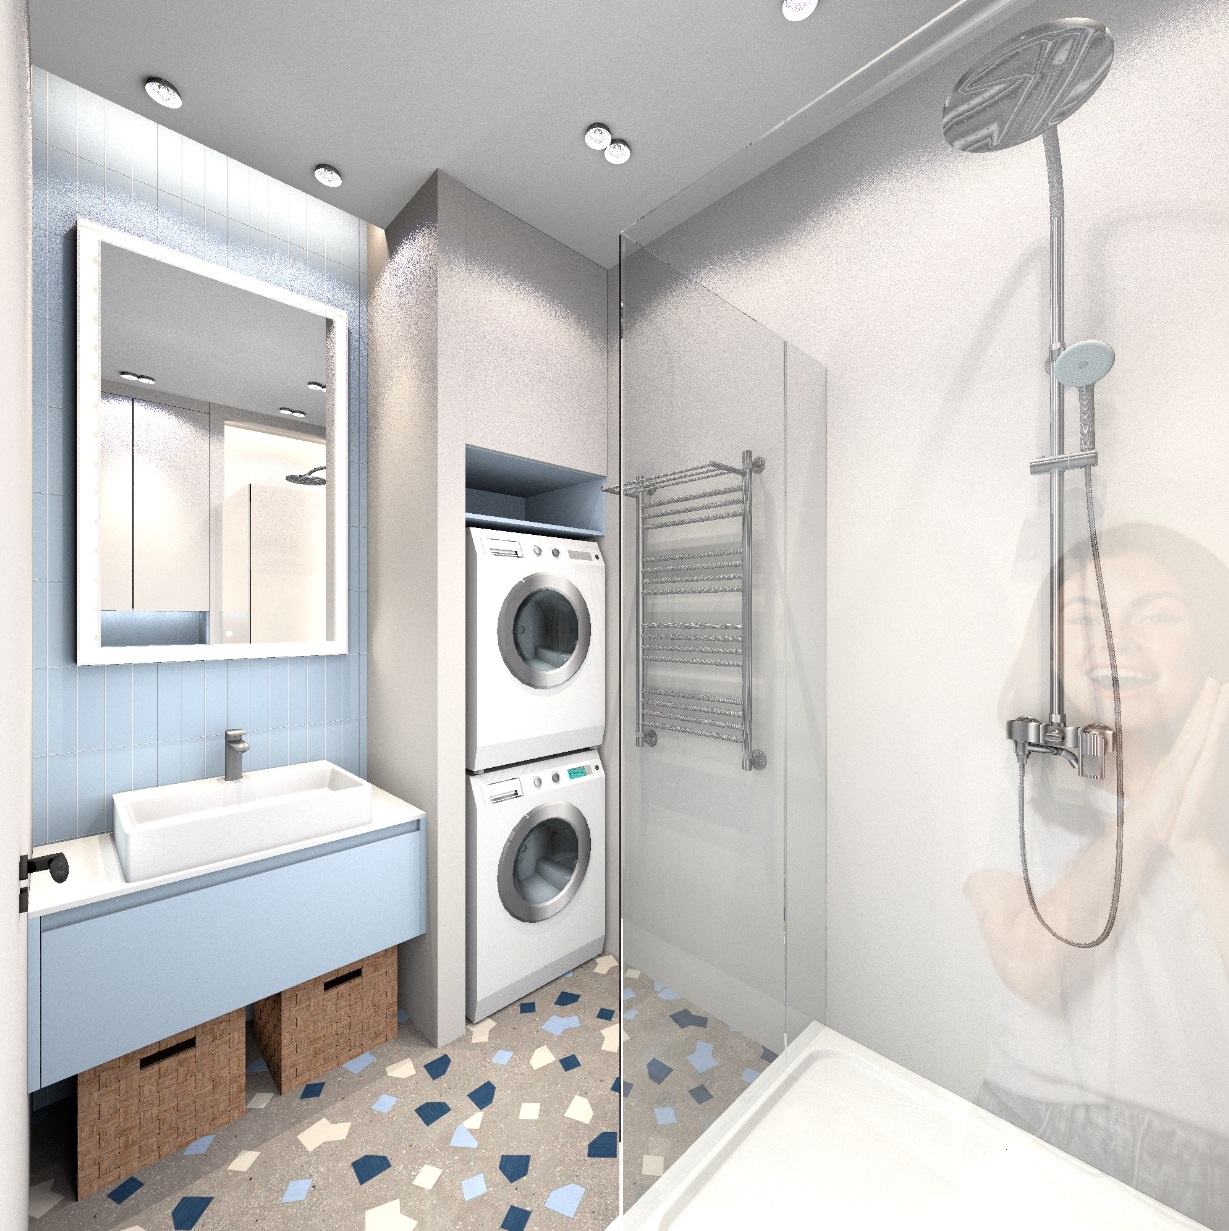
hi. I continue experimenting with reflections. In the next topic, there was a conversation about people in the interior, about the fact that people turn out to be some kind of ugly. Resembling zombies. And that if you use other super realistic models, then the choice is limited and they are very heavy, rendering in SH3D becomes pointlessly long. My idea is to abandon 3D models altogether. This method is not always possible to use. But if a reflective surface is designed in the interior - glass in the closet, lacquered kitchen doors, a window with glass or a glass door - then it can be useful. The idea is to get a reflection of a PHOTO of a person on the wall. If everything is done correctly, there will be a truthful effect of reflecting the viewer, as if the viewer accidentally got into the frame in the reflection. I am currently working on a bathroom that has a glass shower enclosure. The walls are tiled in light colors, this is a difficult case, because the reflections will be minimal in brightness, they will almost disappear in reality. But we still need to show a bright interior, there's nothing we can do. I placed the camera in the corner of the room, and behind the camera on the wall I posted a photo of a pretty girl on a light, even background. A smooth background is important, because it will also get into the reflection and may look strange if it is mottled. The most important condition for a good result is to position the photo so that the eyes in this photo are exactly at the eye level of the camera (virtual visitor in SH3D). I set the camera to 140cm, and posted the photo the same way. Therefore, the reflection is also obtained at the viewer's level, as in reality. In order for the reflection to appear in my bright bathroom, I specially illuminated it with a unidirectional invisible panel of 30%. This is a very powerful light, but it is necessary to defeat the light tone of the walls, otherwise the reflection will not appear. If the walls are darker, then less power is needed for illumination, 3-10%. please note - initially the photo is like this, and in order for this image to be reflected, you need to make a mirror photo on the wall. Or do not, and then the reflection will turn over. the girl's eyes are exactly at the level of 140 cm, this is important for realistic reflection. It doesn't matter at all if the whole figure is there, the main thing is the eyes. If the figure is not complete, there will be a feeling that the person leaned closer to the glass, and that's it. I see great prospects for this idea. I will try to put thin glass walls in the interior and place photos of people behind the camera. Then translucent, very realistic PHANTOMS may appear in the interior. Now choosing a realistic person becomes much easier. There are millions of photos on the Internet. If something interesting turns out, I'll post the result here.
Russia
Joined: Aug 13, 2022
Post Count: 240
Status:
Offline
Re: Apartment project with lighting by invisible hemispheres. I continue advertising
I also want to say something. Now you can take a photo of yourself!! Or a photo of the customer and put it in his own interior! This is already ethical, there will be no strangers on private territory))
Russia
Joined: Aug 13, 2022
Post Count: 240
Status:
Offline
Re: Apartment project with lighting by invisible hemispheres. I continue advertising
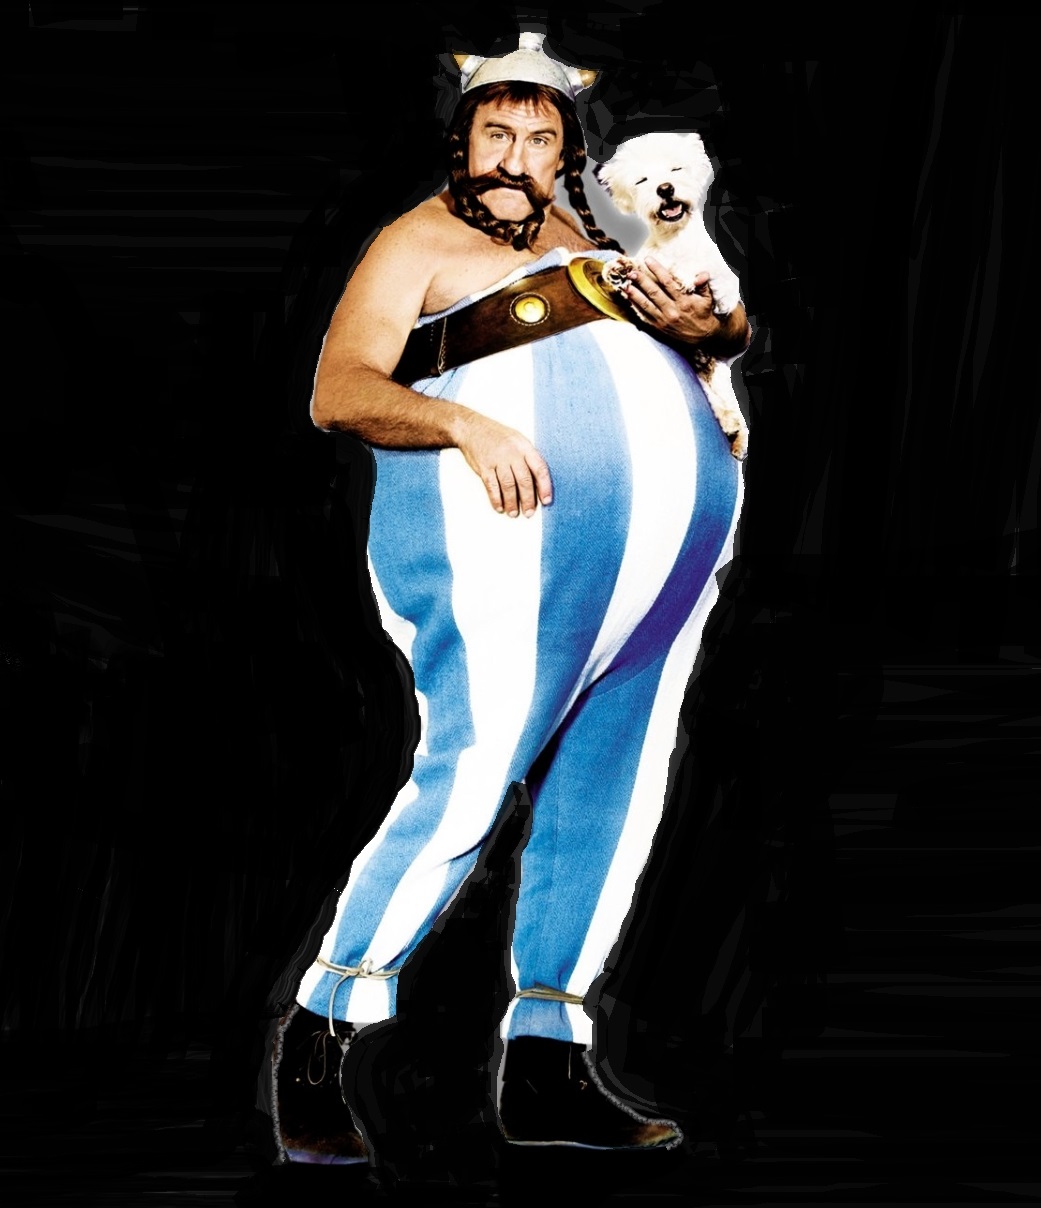
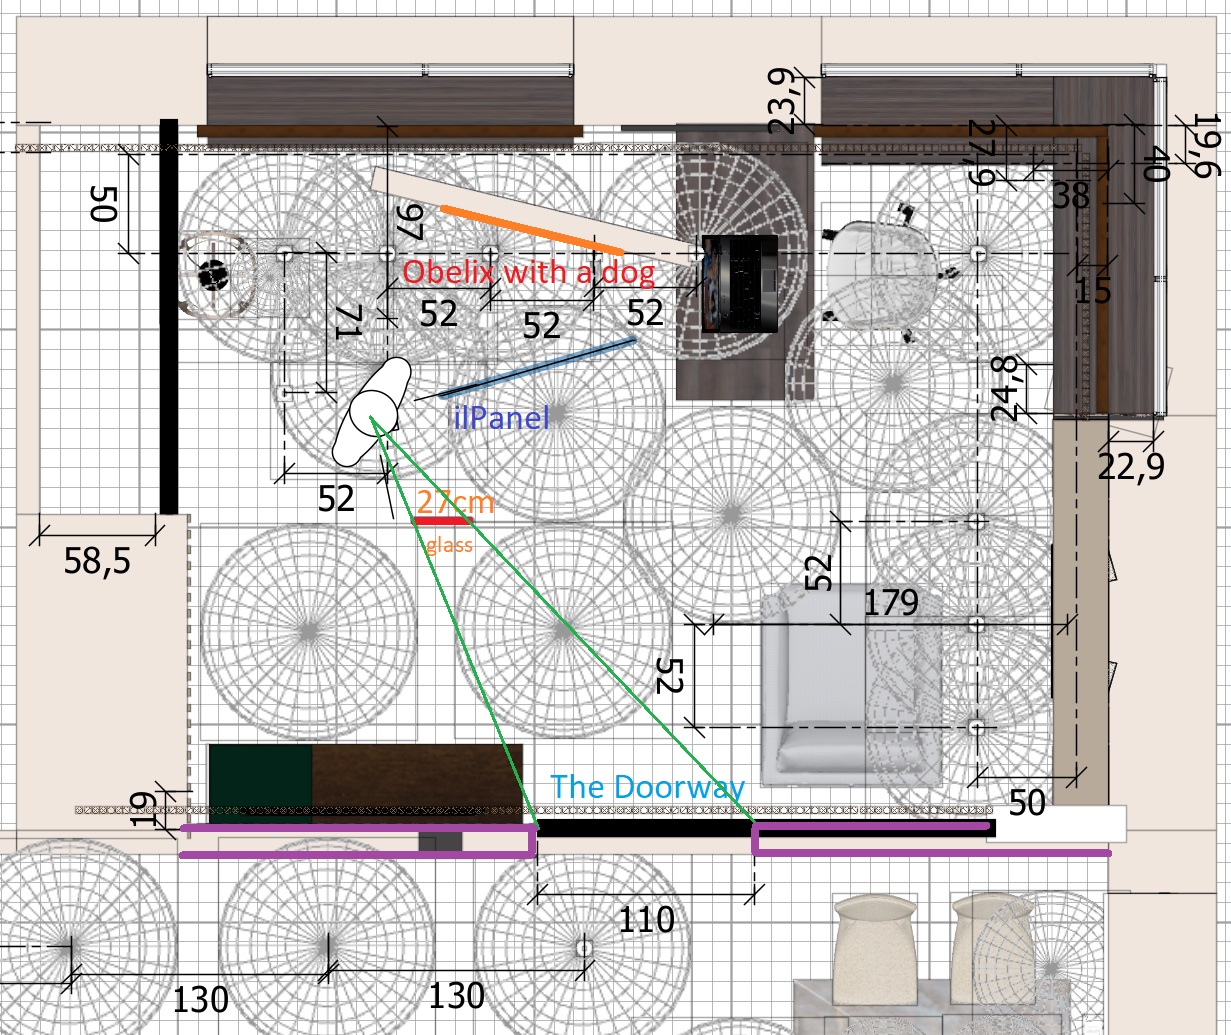
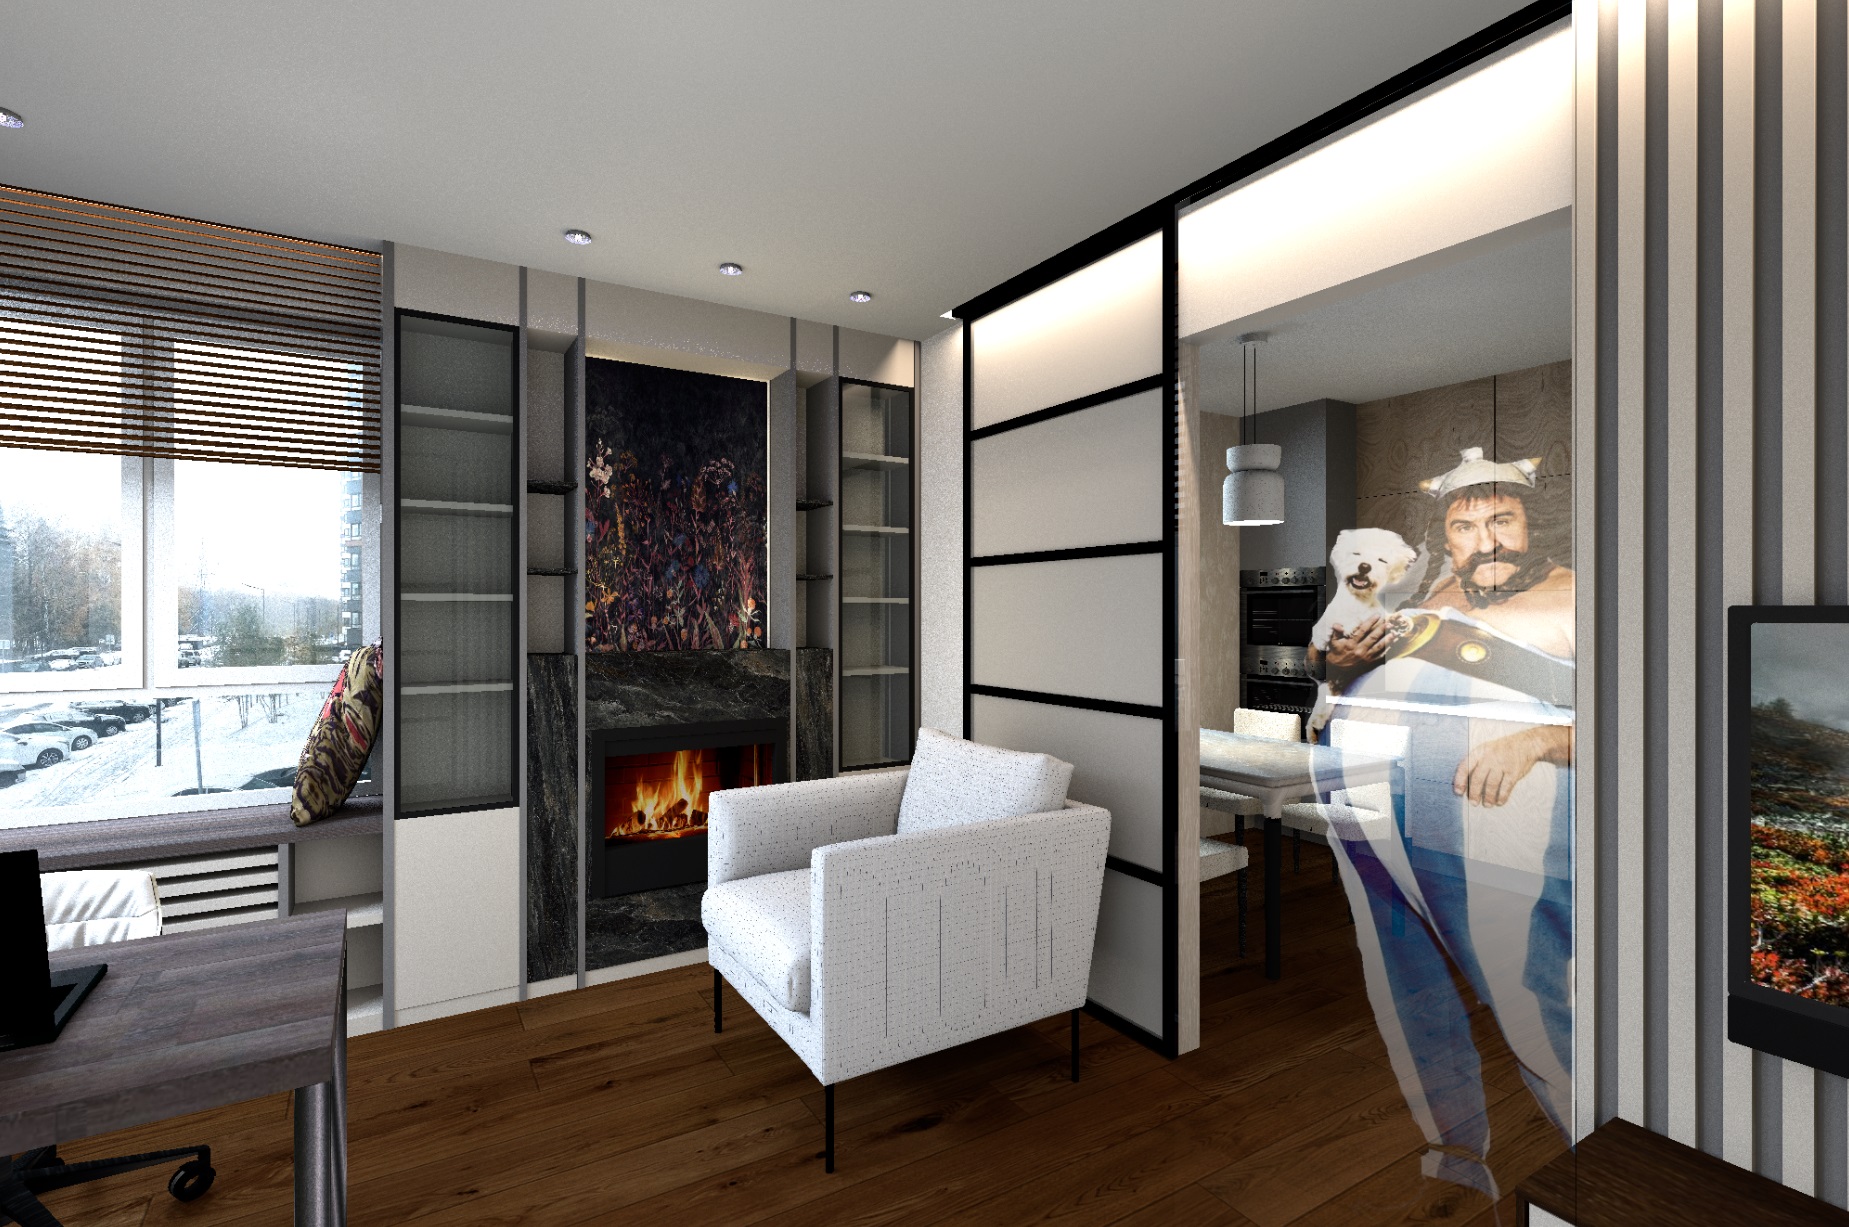
I invited Obelix and his dog to visit. I took his photo first. In Paint, I carefully smeared everything around him and the dog in black. Why black? Because only the black color is not reflected in the glass in any way. Anything lighter than black is visible in the reflection, and black works as transparent. And the lighter the color in the photo, the more opaque the effect will be. The white dog will be the most opaque. And Obelix's mustache is transparent. Now we need to put everything in its place. First, I put a viewer with an eye height of 140 cm, put up a picture of the room. Obelix will appear from the doorway. A 27 cm wide glass was placed between the camera and the doorway, the edges were precisely aligned with the edges of the doorway so that the glass was masked (view from the viewer's eyes). I put the glass parallel to the walls. He also put it up on top of the doorway. So it's almost invisible. The minimum glass thickness is 1 mm. To expose the transparent glass accurately, there is a way. First, you need to make a large glass, then create a box of the same thickness of 1mm and combine it with the glass at the top. Expose the box, pull its dimensions to the desired size, give the desired height and excess. Then repeat all its parameters on the glass, combine with the box. And make the box invisible, leaving only the glass. Now, although the glass is not visible, it stands exactly in its place. Well, put up a group of two boxes for the Obelix. The bottom box has a height of 190 cm, and an Obelix image is stretched over it. The top is an additional one from a lower height box, under the ceiling. The background color on it is black. These two boxes need to be grouped and find a position for them in the room so that there is a correct reflection in the glass. The image should be illuminated with an invisible panel, the power is 20%, it is important to position it so that it does not illuminate the walls. The plan shows where everything is. the result was this picture. I like that all the minor flaws of the figure are well hidden due to the transparency of the reflection. And through the figure you can see all the details of the interior from behind. After all, the main thing in the picture is the interior, not the Guest)). the method is certainly not easy, but you do not need to look for a high-quality model that will then take forever to load. And you can choose a very interesting photo that will look much cuter and more fun.
Serbia
Joined: Nov 15, 2023
Post Count: 17
Status:
Offline
Re: Apartment project with lighting by invisible hemispheres. I continue advertising
Awesome and very useful thoughts, thanks. But, Obelisk and the dog have like 40% transparency on the final image. Also, can you with this made a shadow for them ?
For me, I would probably insert a picture after rendering using Photoshop. But, your technique is a professional approach.
I first prepared a photo: make the background transparent and resize it to the actual left over image (remove excess space around the subject itself). The removal at the bottom is important so the person stands on the ground and doesn't float.
Size the box so the front has the pixel dimensions of the image. Set the texture of the front to the image you prepared. Make all other sides invisible. Check "keep proportions" and resize the box to a 1.65 height giving a perfectly proportioned model. After export/import there's a model with only a single face with the picture left which you can use in your project.
This results in a model size of 200kB which is about the size of the image-file itself. (The single face of the box (obj+mtl) is just 420 bytes.)
It does take some work to prepare the image but you can use any position for which you can find a picture. You're in luck if you can find pictures where the background is already transparent. Saves a lot work.
Want a celebrity in your home? Find a photo you like!
ETA: A very important fact I forgot: The model produces a real shadow when lights are shining from the back!
----------------------------------------
[Edit 1 times,
last edit by Keet at Jan 19, 2024, 11:13:22 AM]
Russia
Joined: Aug 13, 2022
Post Count: 240
Status:
Offline
Re: Apartment project with lighting by invisible hemispheres. I continue advertising
Tutmozis thank you! I wanted to solve this problem only with the help of SH3D tools, I decided to go the hard way)). Using the right programs like Photoshop for shapes is of course a logical way out, I do not argue, and much more productive.
Keet thanks for the idea! Everything is working out fine, I made a transparent background for the first time and am delighted with the new skills)). Very useful communication. I don't know yet how to put all these movie stars in a chair and on a sofa, but I need to come up with something)). And sometimes the images in the interior are very overexposed and I don't know how to fix it. But it's still great that you can put a person anywhere. And there is a shadow!! Not like my hologram))