Russia
Joined: Aug 13, 2022
Post Count: 233
Status:
Offline
Re: Apartment project with lighting by invisible hemispheres. I continue advertising
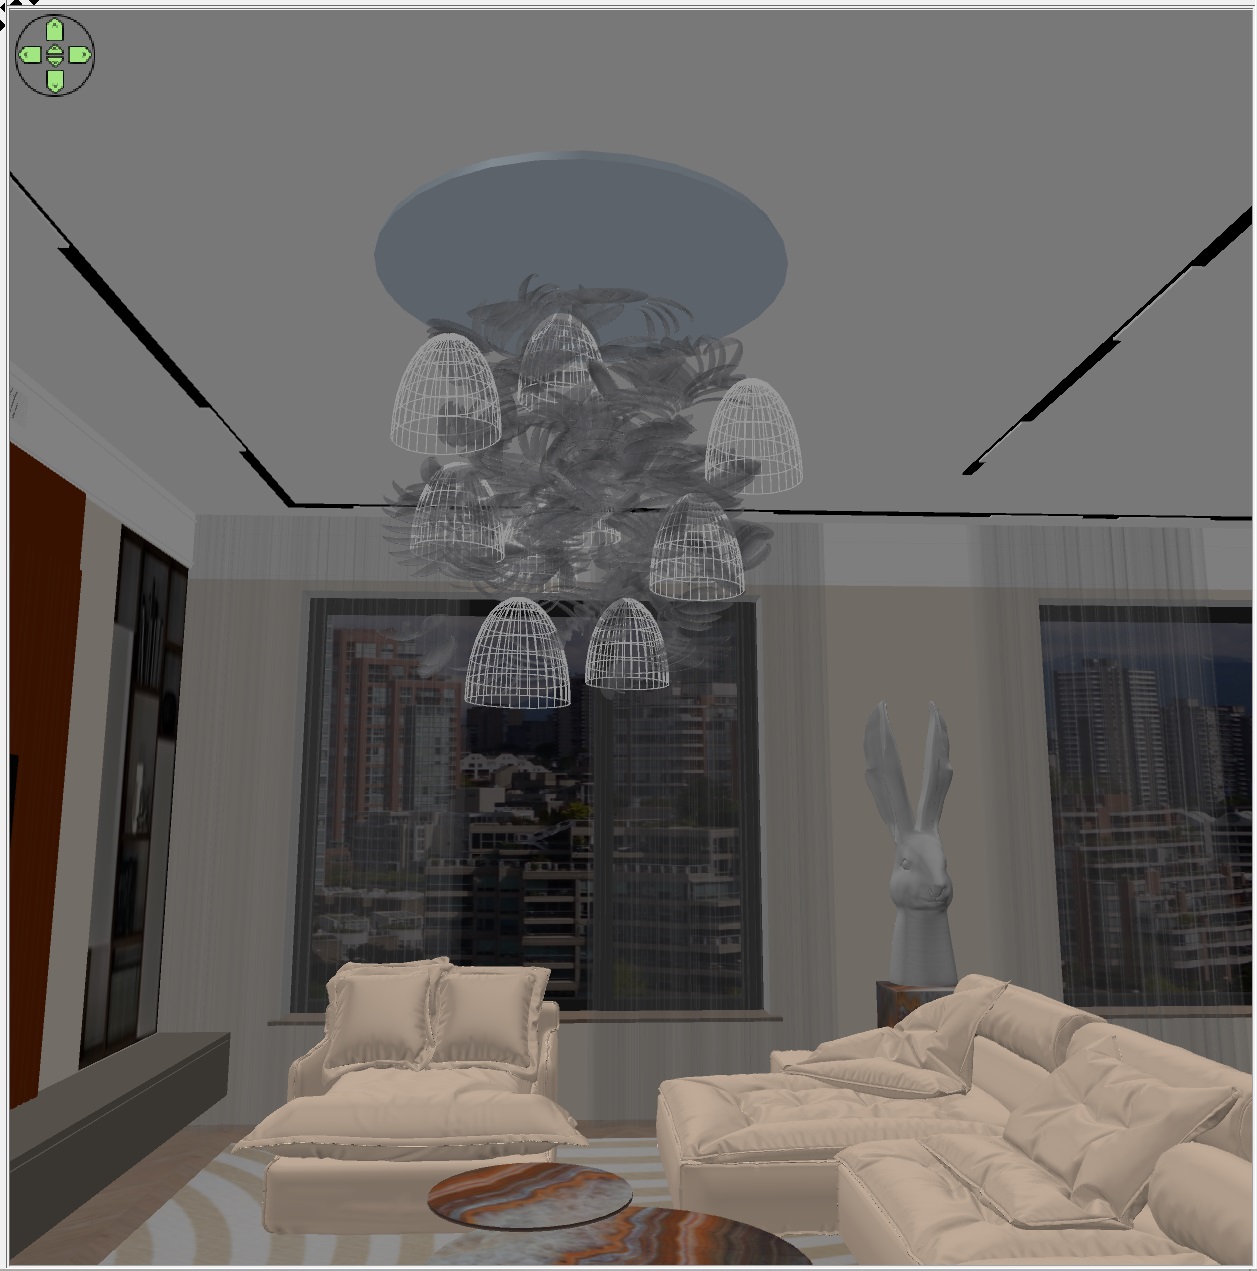
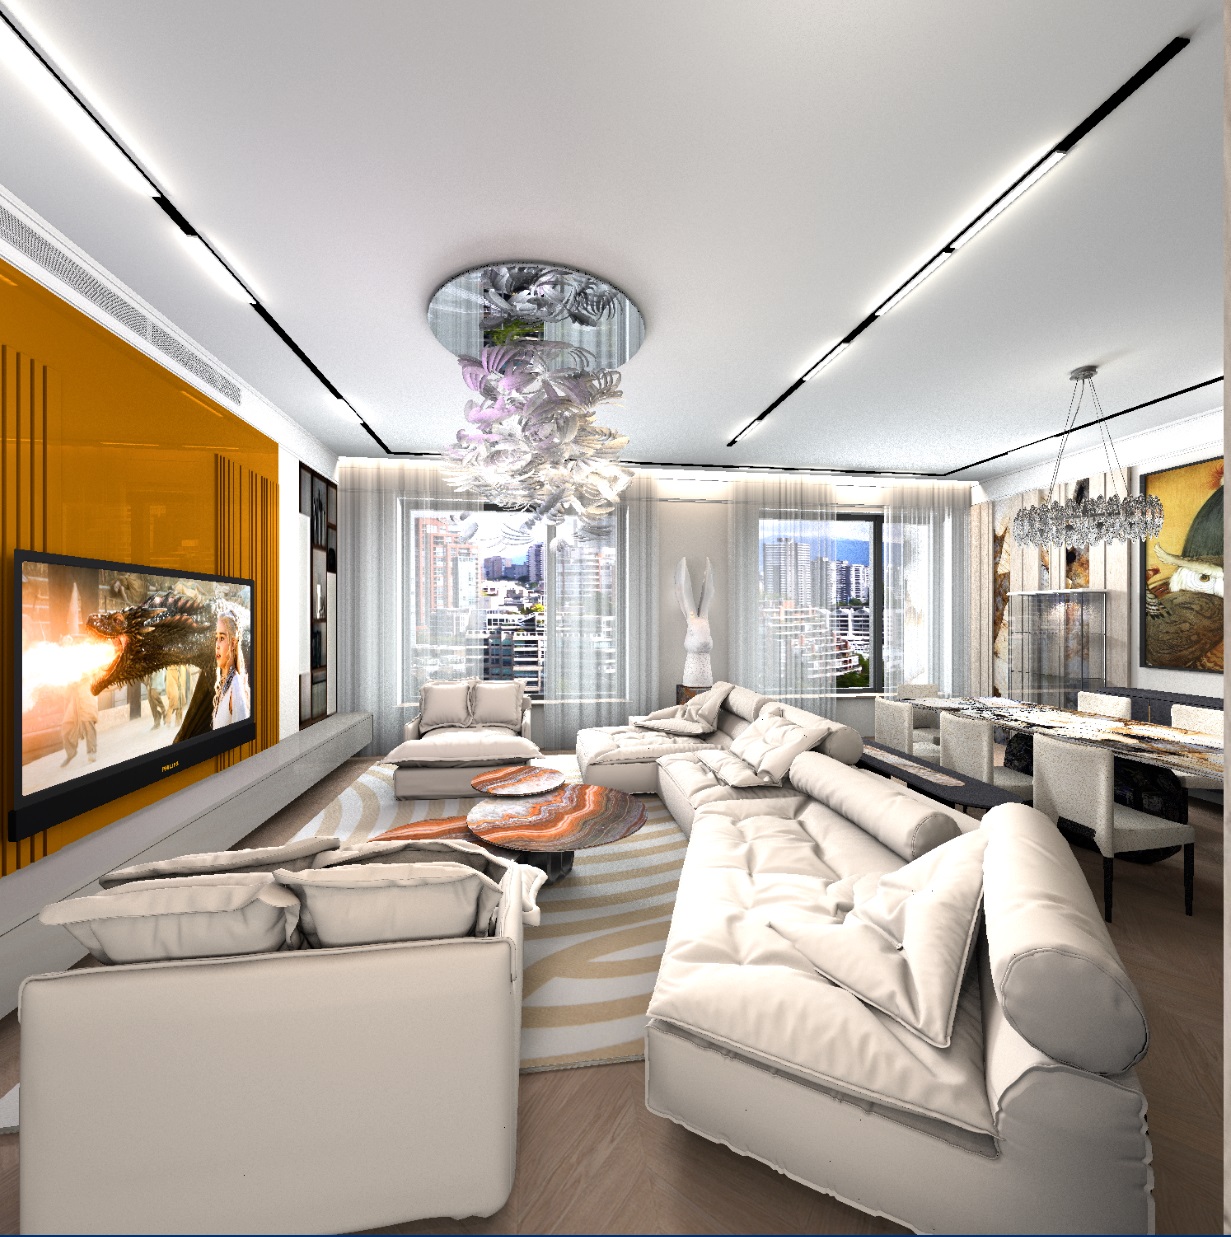
It's calmer without people. I modeled an interesting chandelier for myself. I took a model of opaque curved plates and exported them to OBJ. In the MTL file, I changed the transparency to d 0.5. You can also make a more transparent model d 0.1-0.3, there will be a more airy effect. I made a base out of a cylinder, exported it to OBJ, registered all the groups with the mirror prefix in the OBJ file, and got the base of the chandelier in chrome. Around the perimeter and inside a large group of petals (I placed them in the form of a large cloud), I placed 10 small hemispheres of 8% facing down. Different colors - white, blue, orange, purple. I have assigned a white skin texture for the petals (you cannot assign a color, you will get transparent glass). And it turned out to be a chandelier with small pendants made of frosted white glass. Translucent material is needed to remove black shadows, which will definitely be there if the material is opaque. The result is a translucent group, illuminated from the inside. You can do better.
Russia
Joined: Aug 13, 2022
Post Count: 233
Status:
Offline
Re: Apartment project with lighting by invisible hemispheres. I continue advertising
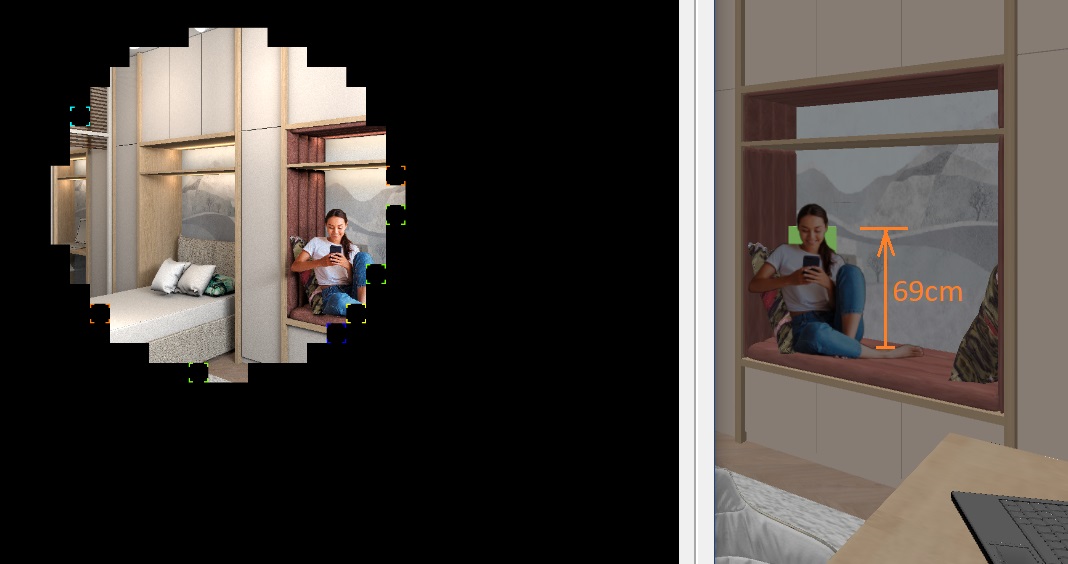
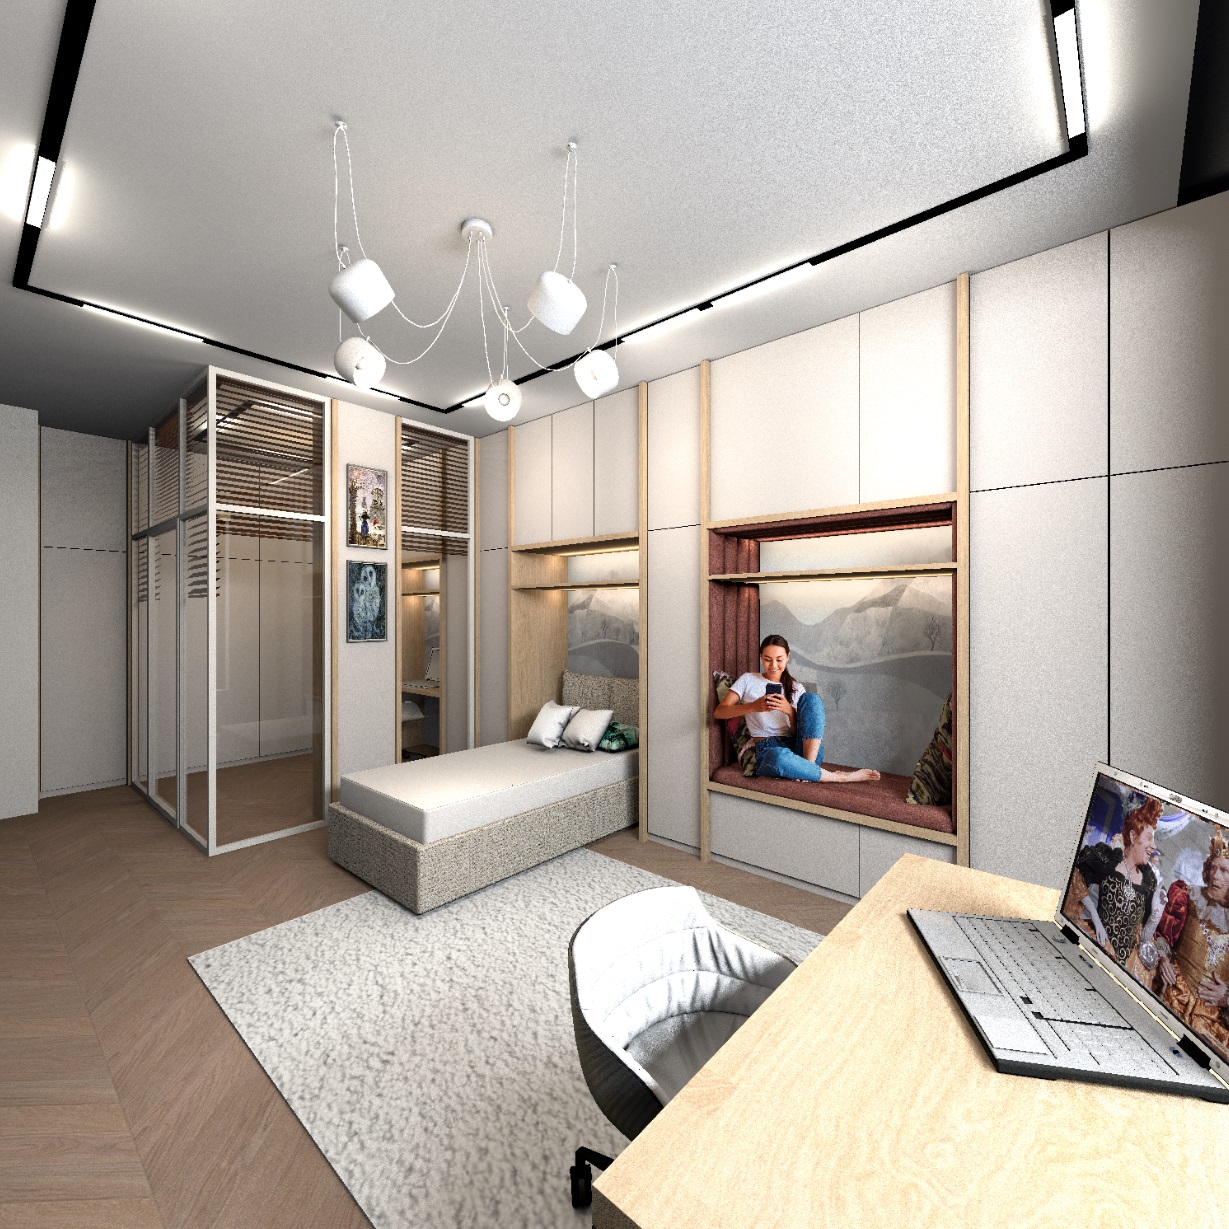
I'm currently working on a room for a teenage girl. In the furniture part there is a niche with upholstered upholstery so that you can sit there with a girlfriend and discuss guys. I decided to put a girl with a smartphone there. How do I make sure that the human figure sits in its place and is the right size? I propose a one hundred percent algorithm. Everything is in order. 1. You have selected the desired photo, the girl is sitting with her feet on the couch, the light is on her left side, everything is as we need, the window is also on this side. 2. The photo should be cropped as much as possible along the outer edge, in Paint or in another program, set the height of this field to 4000 pixels. 3. In Photoshop, you need to carefully clean the entire background with a hard eraser, you can not use a magic wand. After that, select a transparent background with a magic wand and use Photoshop tools to cover the outer edge of the photo with a thin contour 3 pixels wide, the contour color is flesh color. This outline will hide the unnecessary translucent pixels that give a white stripe in YafaRay. With this outline, everything will be without a white edge when rendering. 4. Now is the time to think. Look at the photo and determine where the person in the photo has a fulcrum. If a person is sitting and his foot touches the floor, then the fulcrum is at floor level.If a person is sitting and both feet are on this surface, then the fulcrum is at the seat level. 5. If the feet of the person in the photo do not touch the floor, then sit on the floor. Try to take exactly the same position, tilt your head towards your smartphone, or vice versa, lean back and lean against the wall. Your pose should be very similar to the photo. The position of the hands is not important, the position of the body and head is important. Carefully measure the distance from the fulcrum to the level of your eyes with a measuring tape measure. This is the most important information, do everything without mistakes. 6. With my height of 176cm, I got a size from sitting to my eyes of 75 cm. The girl in the photo is of course shorter than me, so I assumed that I needed a size 69cm, or even smaller. 7. If the feet in the photo touch the floor, you need to sit on a chair and measure from the floor to the eyes. 8. Now you need to make a box with the size as in the saved PNG file after Photoshop. My photo is 4000 high and 4368 wide. You need to create a box with these dimensions and a thickness of 10cm. Check the Keep proportions box and reduce the height of the box to 90cm. All other sizes will decrease proportionally too. Place the photo on the front side, make the other sides of the box invisible. Make the excess approximately like the seating in your project. In my project it is 58-60 cm. 9. Now make a thin bright green box 69cm high and carefully place it on the seat. It should be exactly in the place where the girl's head will be (if viewed from above). It's like there's going to be a spatial model. But in fact it will be a flat photo and it will be shifted forward, otherwise the hand will be cut because of the pillow. 10. Now you need to place the photo exactly on the seat. Rather, it is necessary to touch the edge of the seat photo, or even go down a little by 2cm, as if the person pushed through the upholstery and sat deeper. If you did not guess correctly and the top of the bright green template does not match at eye level, then keeping the proportions (!!!) carefully change the size of the box without changing the height above the floor level. The proportions should be the same as they were in the beginning! The eyes in the photo should match the top of the template. I did a little less, because it's a teenager. the box with the photo should be placed perpendicular to the viewer's view, the elbow of the right hand will slightly protrude beyond the plane of the niche, as it will actually be. A bonus on the render will be the shadow of this hand on the furniture facade. This method allows you to accurately create an image of a person in the right proportions, it will look very natural. He will not be a giant or a dwarf. I will be glad if someone makes their project in SH3D with such a human figure and shows it to everyone. It's not as difficult as it seems. You just need to do everything point by point. I'll be waiting. And of course, all the lighting in the room is made by invisible hemispheres of 1%, there are 20-25 of them here.
Netherlands
Joined: Apr 8, 2022
Post Count: 789
Status:
Offline
Re: Apartment project with lighting by invisible hemispheres. I continue advertising
3. In Photoshop, you need to carefully clean the entire background with a hard eraser, you can not use a magic wand. After that, select a transparent background with a magic wand and use Photoshop tools to cover the outer edge of the photo with a thin contour 3 pixels wide, the contour color is flesh color. This outline will hide the unnecessary translucent pixels that give a white stripe in YafaRay. With this outline, everything will be without a white edge when rendering.
Thank you for this clear explanation on how to get the best result using photos. But it raises some questions for me.
I assume that the thin contour is around the straight sides of the photo. As I understand it, it is just so that the outline is not transparent because that causes the white line with YafaRay. Right?
Why 3 pixels wide for the contour line? Shouldn't 1 pixel be enough to avoid a transparent outline?
Is there any particular reason for the flesh color? Or could any color resembling the background do the same?
How do you keep the outline from being visible in the end result? Just by color?
Russia
Joined: Aug 13, 2022
Post Count: 233
Status:
Offline
Re: Apartment project with lighting by invisible hemispheres. I continue advertising
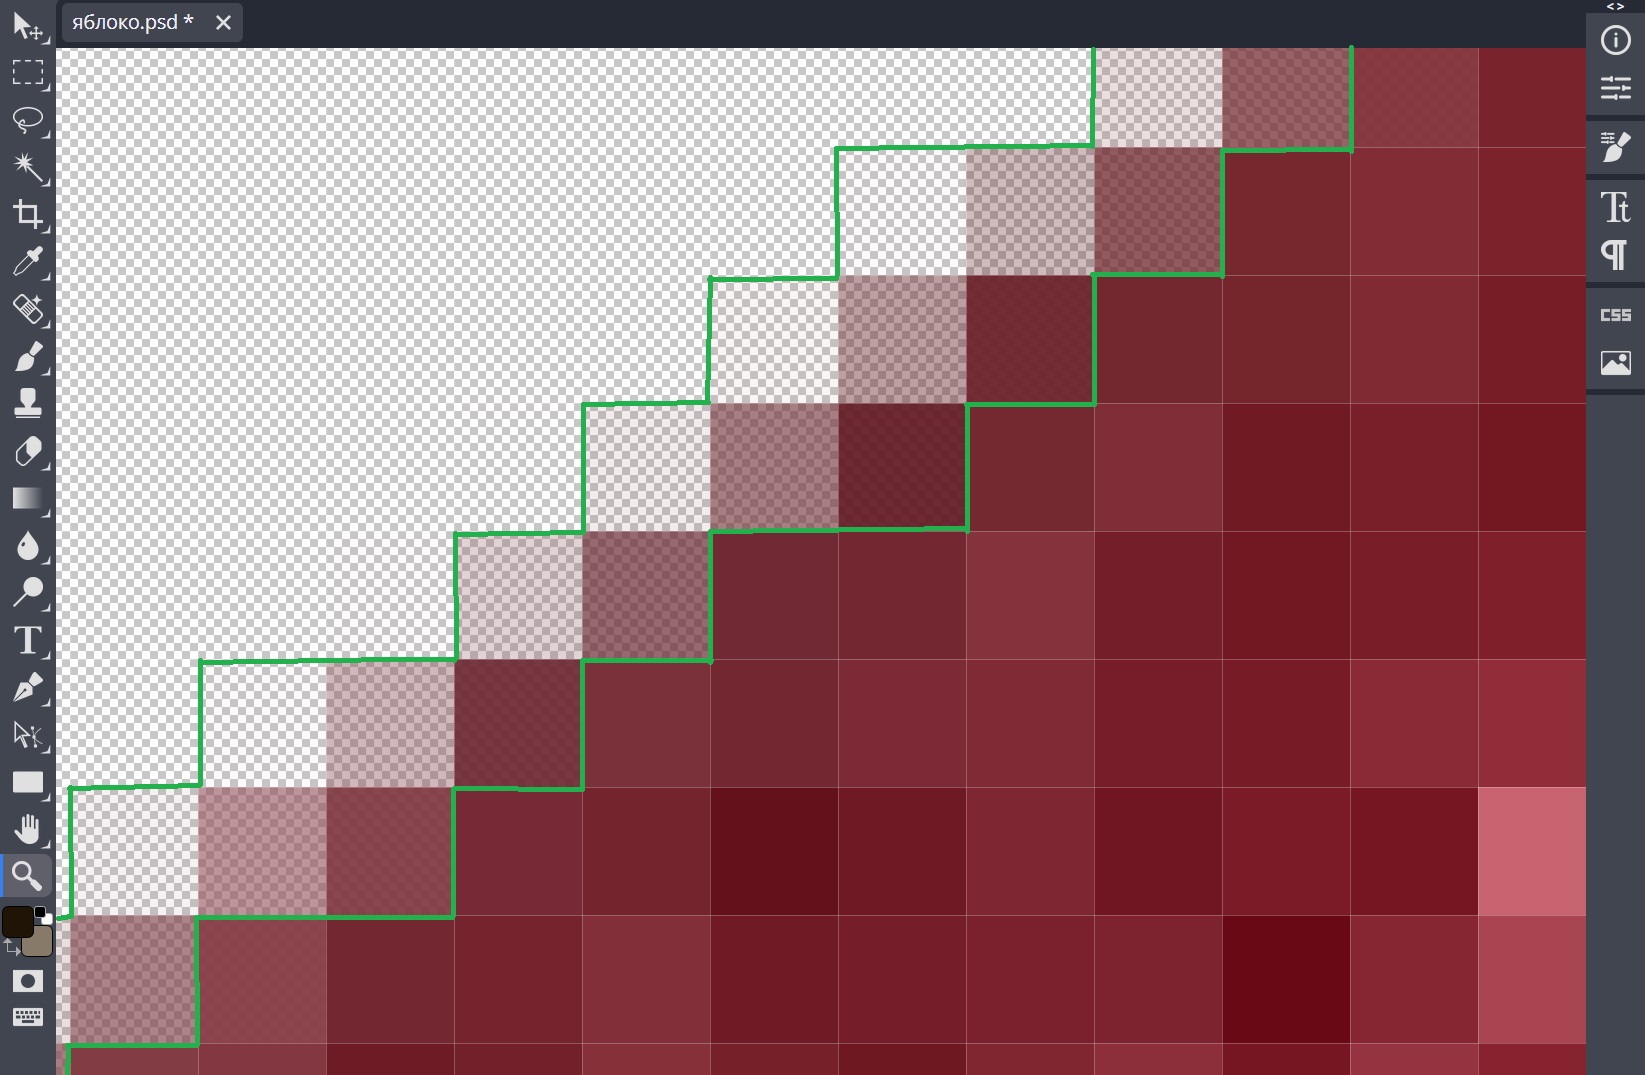
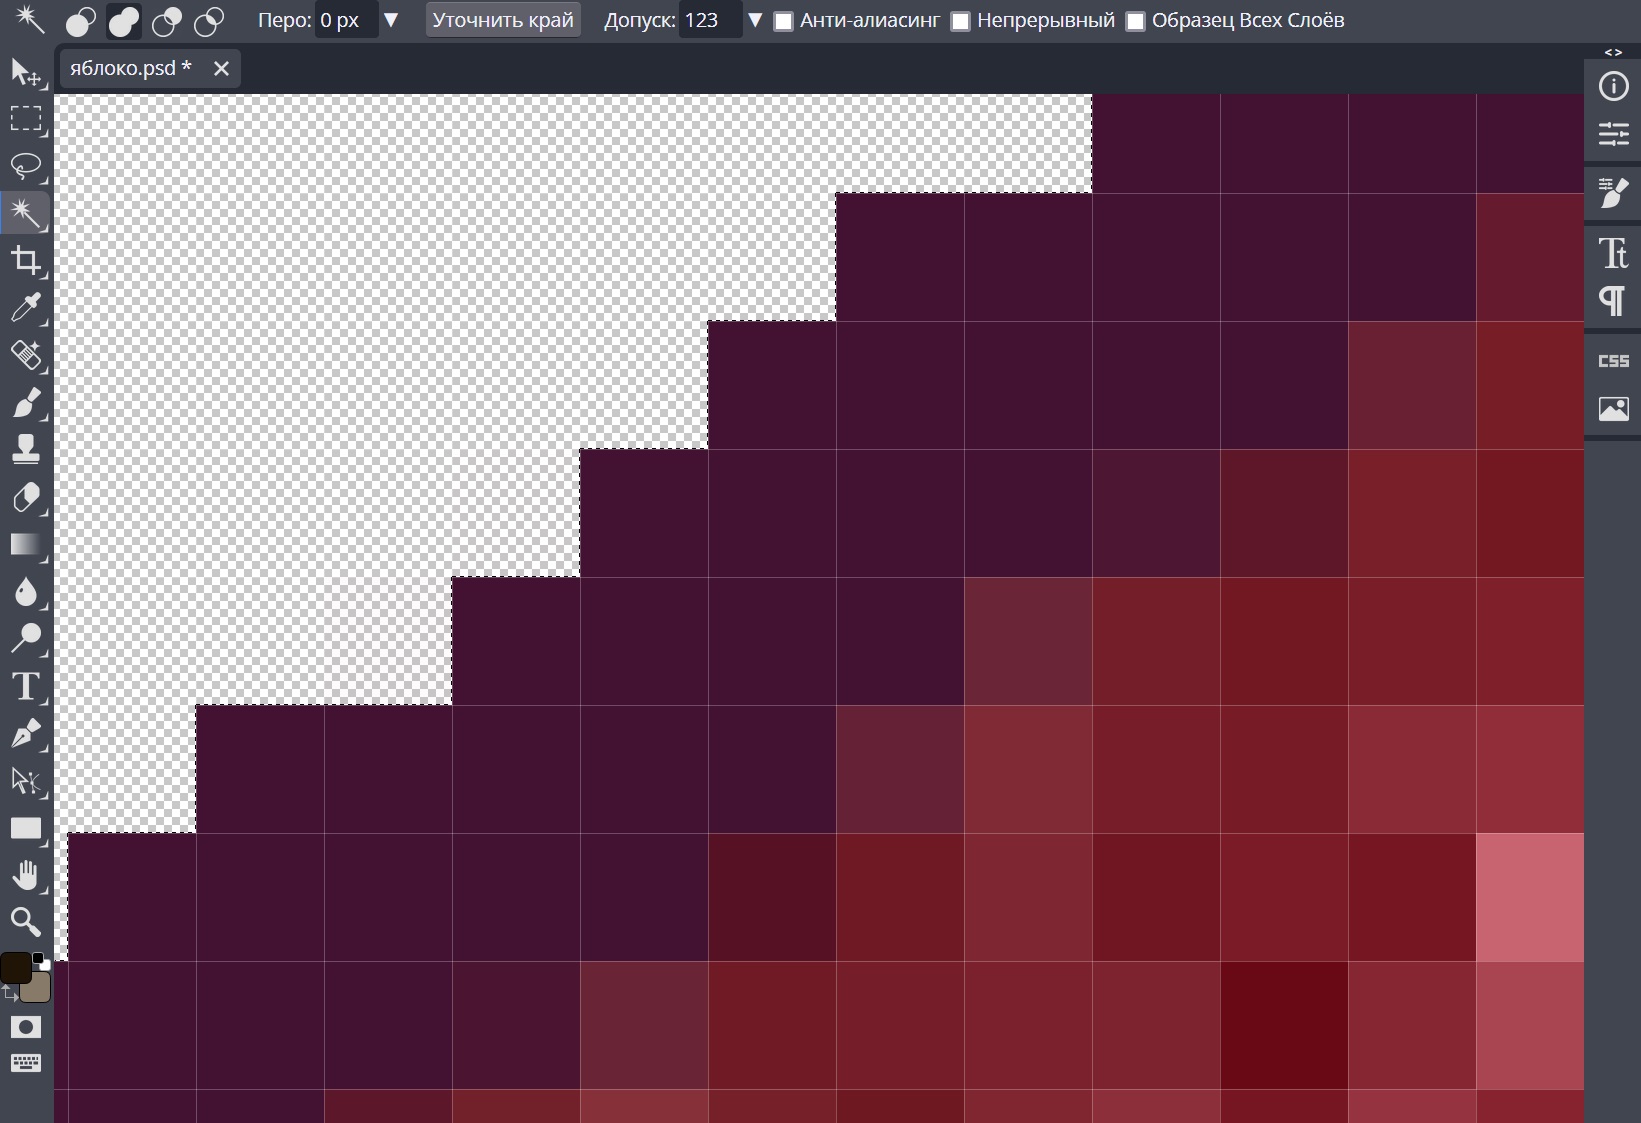
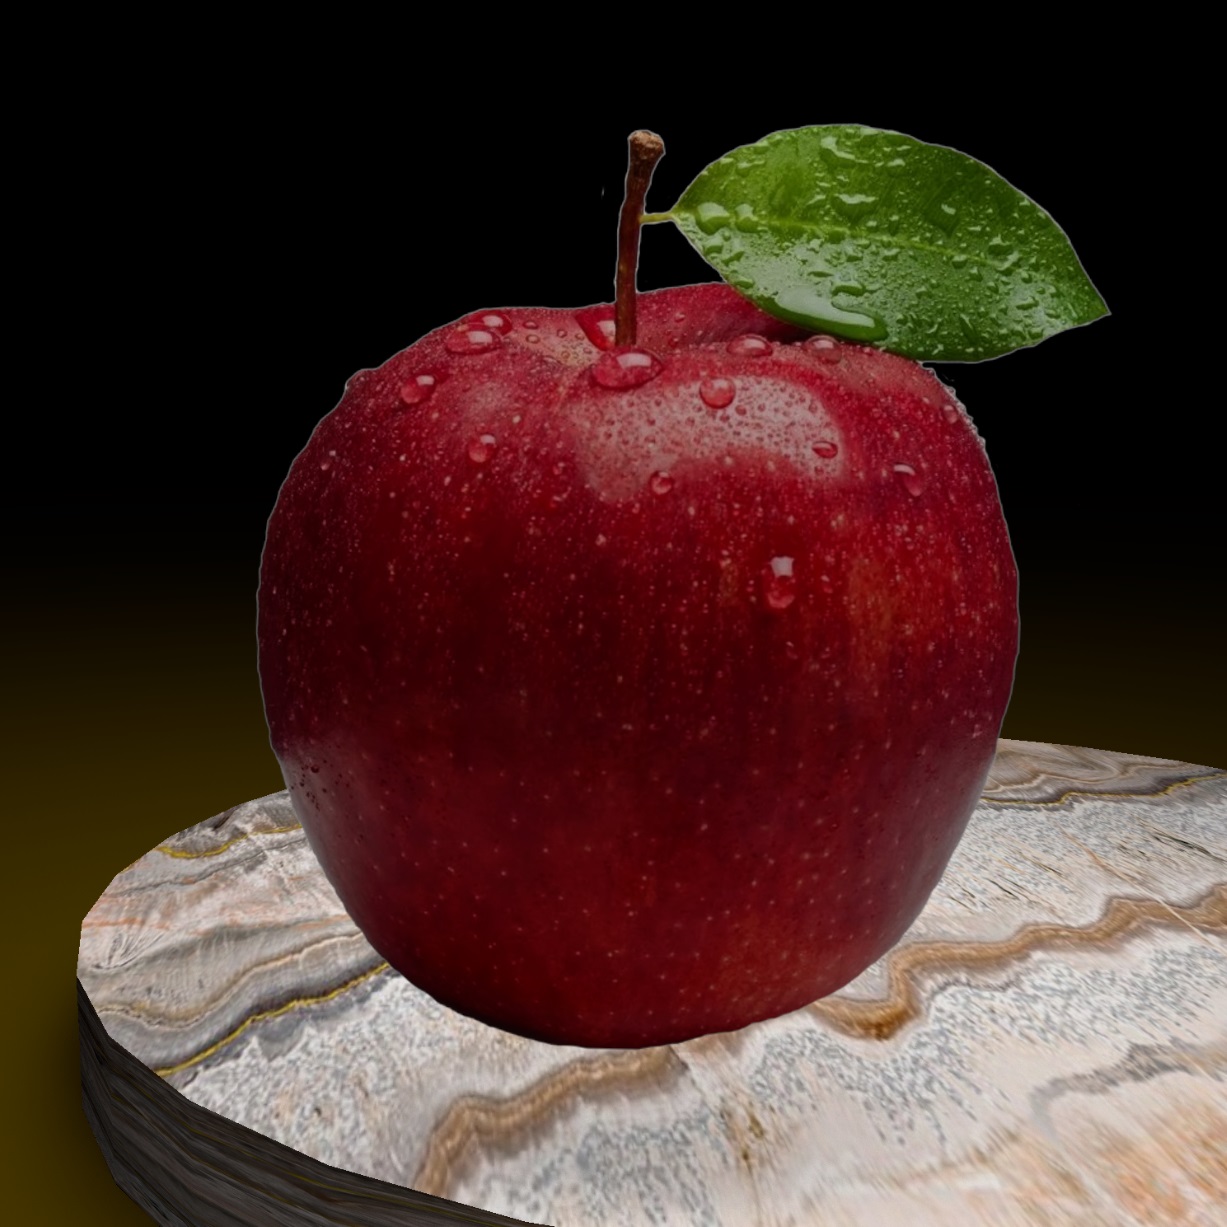
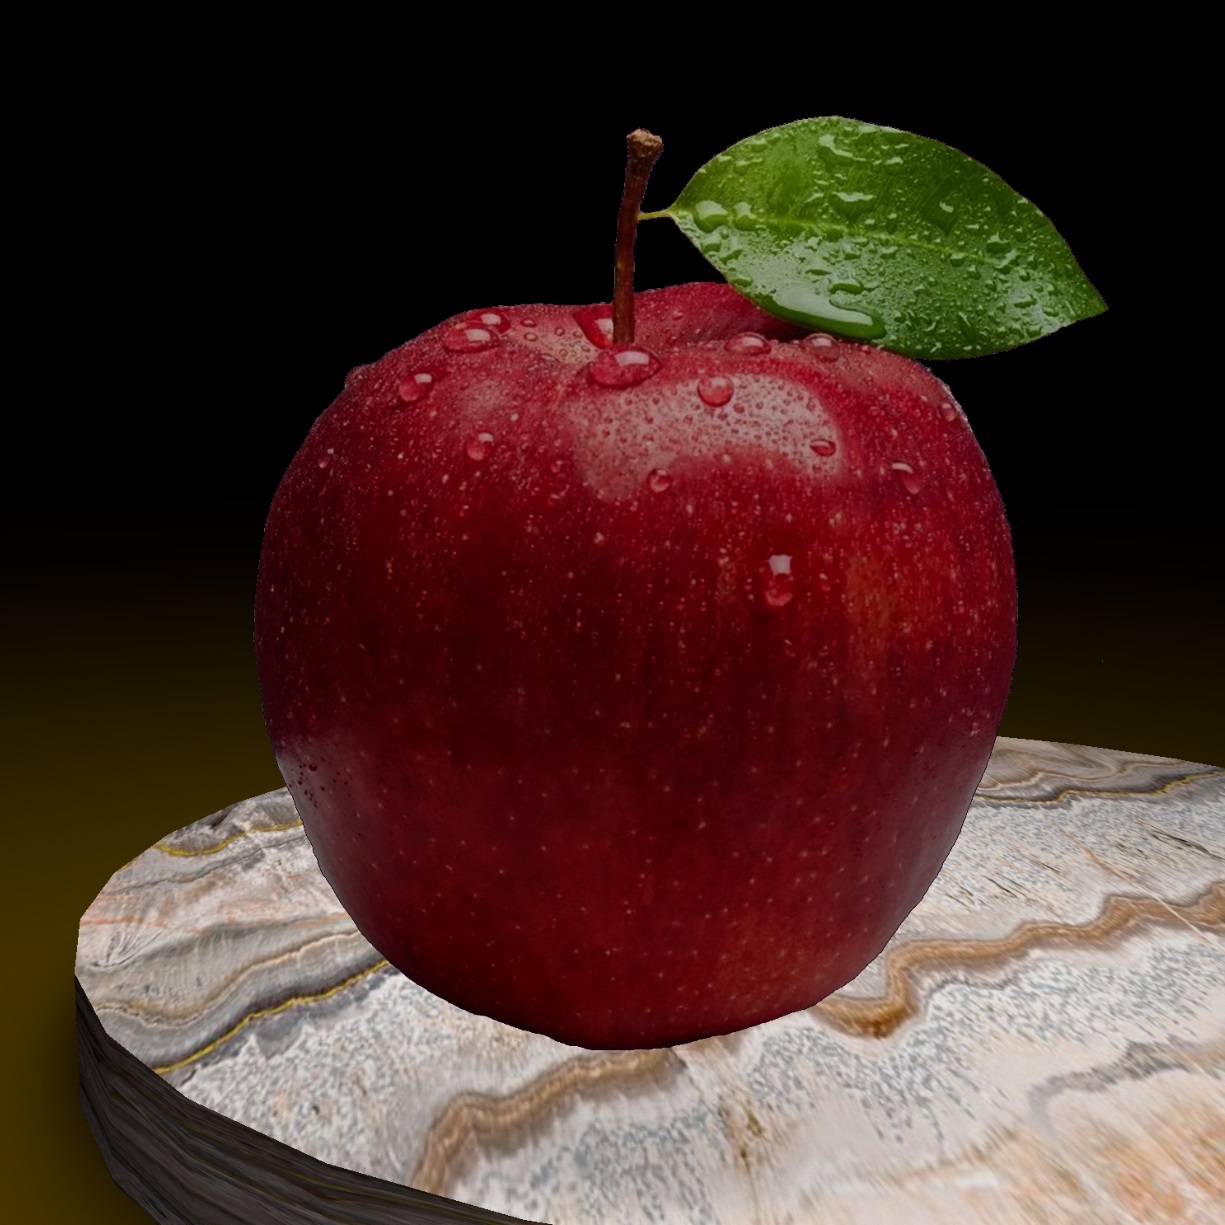
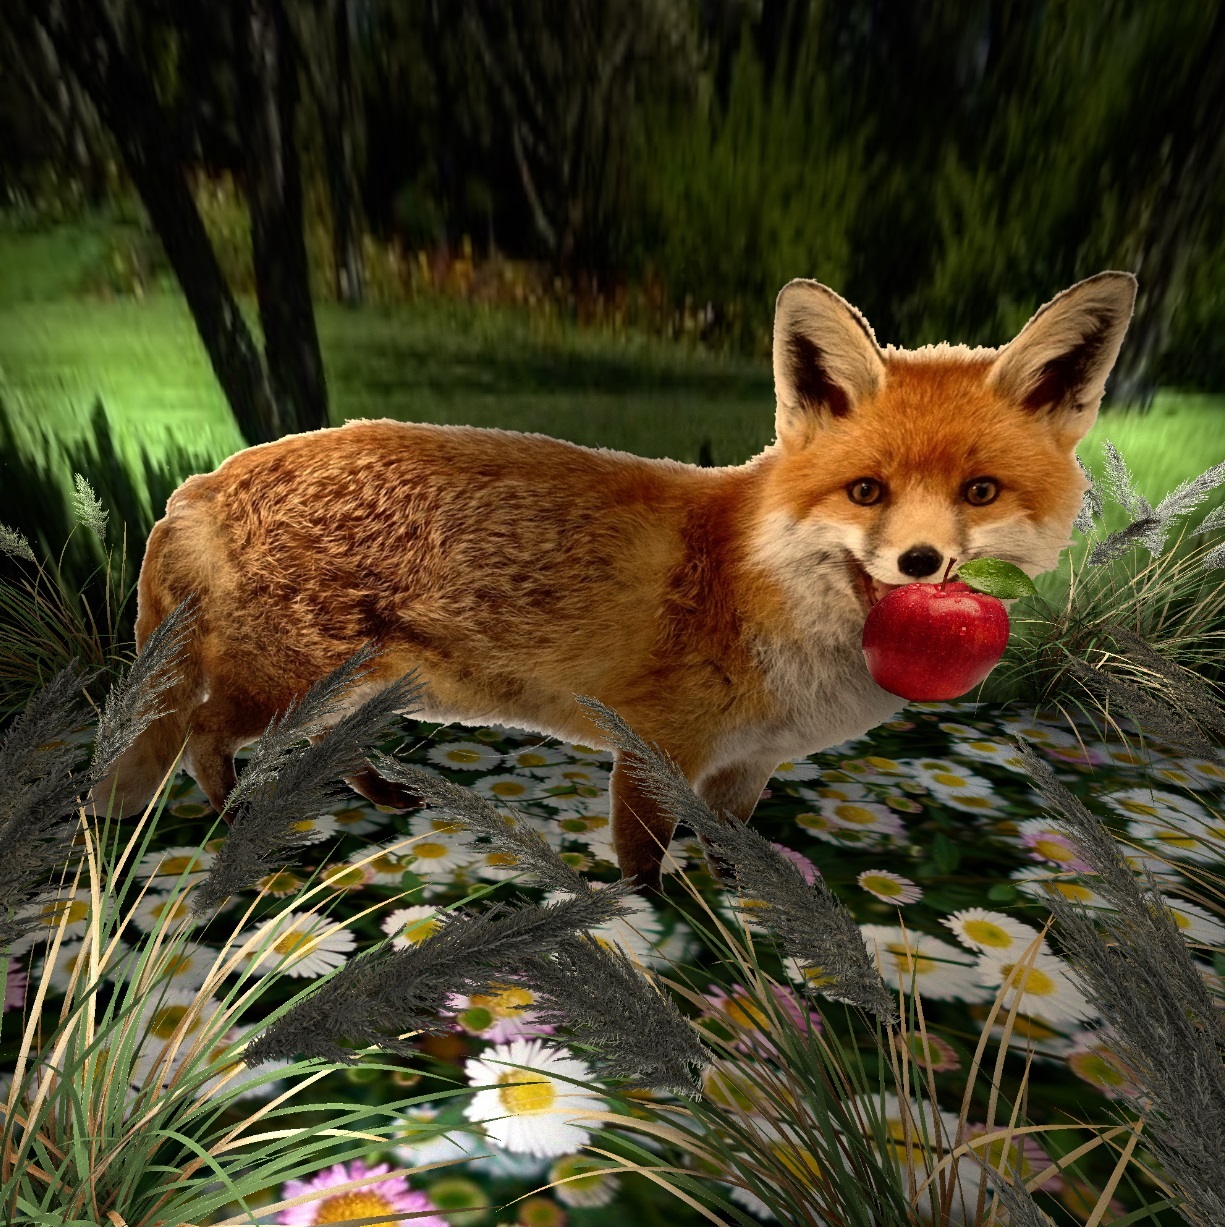
Thank you Keet for your interest and questions. I'll try to answer, I'm not sure I understood everything correctly with straight lines.. In the following pictures, I will show what is on the border of the transparent background after processing with a hard eraser in Photoshop. There's a strip of translucent pixels, I've circled them in green. This is a layer of 2 pixels wide. If you cover them with 1 pixel on top, then a translucent strip will remain, you need to cover them with a margin and completely. Therefore, 3 pixels is better. In the picture, I showed what happens after creating a 3-pixel contour. Everything is covered with flimsy pixels. Therefore, Yafaray does not get white outlines around the perimeter of the photo. Once again, using the example of an apple, I showed how a white contour is obtained if you do not cover the translucent border of the photo with an additional contour. And the very last picture where everything is covered and there is no white outline in Yafaray. It's a simple way, but it works very well. I also realized that it is necessary to enlarge the original photo to a large size of 4000 X before processing in Photoshop... It turns out a very thin problematic border around the photo, which is easy to hide with a contour. With smaller photos, it turns out much worse, the contour in Photoshop works worse. The color of the contour in Photoshop can be average in color, you can completely remove it, but I did not understand from all these complex forums how easy it is to do, I got confused and gave up. My method is primitive, but it works well.
due to the fact that the large size of the original photo is used, the border on the external shape of the image is very thin and the color of the contour in Photoshop does not matter very much. it is very thin. But it is better to take a neutral color from the picture itself. I don't even know how to make different colors in different areas)))
Russia
Joined: Aug 13, 2022
Post Count: 233
Status:
Offline
Re: Apartment project with lighting by invisible hemispheres. I continue advertising
""""""I assume that the thin contour is around the straight sides of the photo. As I understand it, it is just so that the outline is not transparent because that causes the white line with YafaRay. Right?"""""
if you are talking about the outer rectangular border of the field of the processed photo, then it remains without a contour. I am using a 3 pixel contour setting with an EXTERNAL offset, the 3 pixel contour is shifted inside the photo from the selection line. And the outer rectangular frame remains without a contour, because the contour shifts into the void, outward from the field. Is that what you were asking?
Netherlands
Joined: Apr 8, 2022
Post Count: 789
Status:
Offline
Re: Apartment project with lighting by invisible hemispheres. I continue advertising
if you are talking about the outer rectangular border of the field of the processed photo, then it remains without a contour. I am using a 3 pixel contour setting with an EXTERNAL offset, the 3 pixel contour is shifted inside the photo from the selection line.
Yes, I hoped that the contour line was around the outer edge of the photo but now I understand it's around the non-transparent part (person) itself. A border between the transparent and non-transparent parts of the image. I'll have to figure out how to do that in GIMP.
That also clears up why the 3-pixel border: a 1-pixel curved border is not a closed boundary as you explained.
Russia
Joined: Aug 13, 2022
Post Count: 233
Status:
Offline
Re: Apartment project with lighting by invisible hemispheres. I continue advertising
and once again I want to clarify. If you are using Sunflow, then you do not need to make colored strokes. Unlike YafaRay, this trace does not show anything on translucent pixels. Only YafaRay processes these pixels in a white stripe.
Russia
Joined: Aug 13, 2022
Post Count: 233
Status:
Offline
Re: Apartment project with lighting by invisible hemispheres. I continue advertising
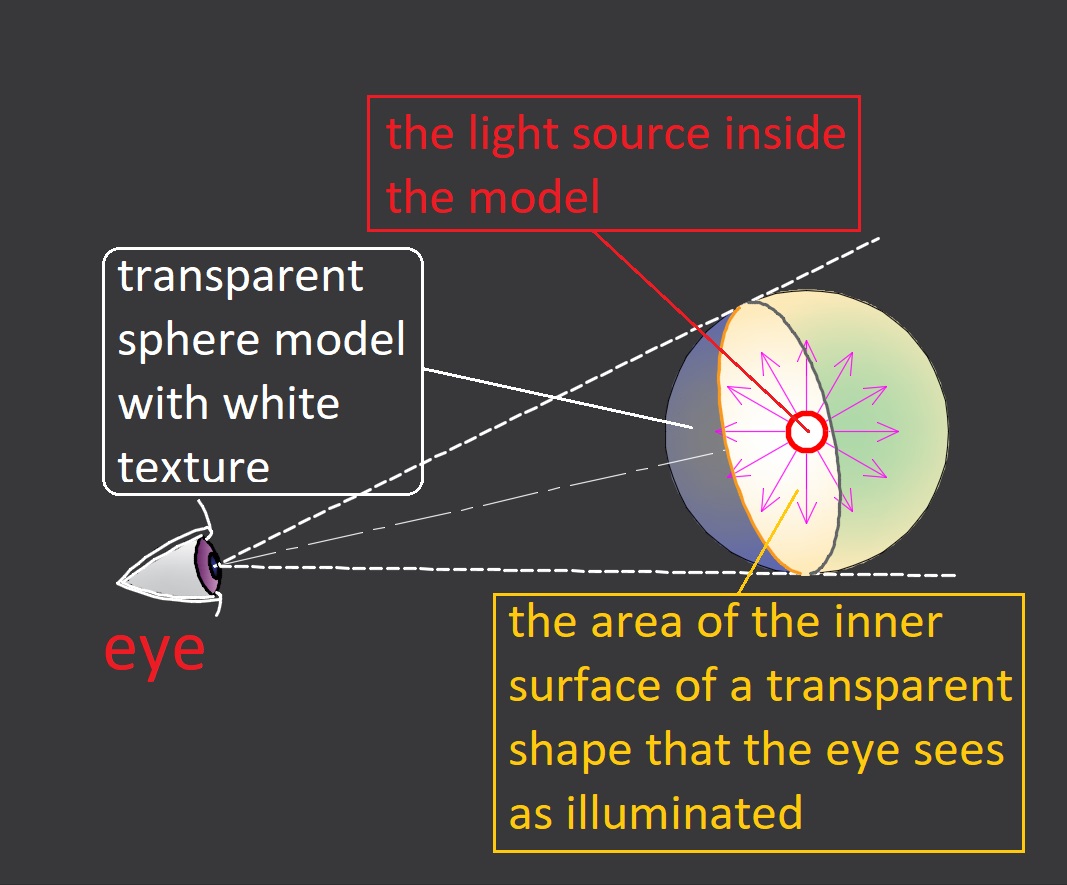
I continue to walk along the paths of my fabulous forest and enjoy the solitude. No one bothers to study nature. This time I am interested in transparent and snow-white shapes. Everyone knows that it is very difficult to show white in SH3D, it turns out to be gray and dirty, unlike white pillows and sheets in the bedroom after washing with chlorine. I started experimenting with translucent groups, trying to smooth out the effect of black shadows in deep cracks, turn a pillow into a lamp. This direction is quite promising, but as it turned out, it is poorly suited for such complex models as textile white pillows. Modeling masters are in no way similar to master tailors. Inside such forms there are a huge number of forgotten curved patches, some ribbons, curved strips, there are huge gaps. They are not visible from the outside, but everything appears in the light and it is impossible to get a neat white pillow. Therefore, my advice is not to do stupid things and just add local lighting in places of white surfaces. It is difficult for a complete picture of the light in the room, but it is still effective in the end. You can get a pure white bright textile color. It is much more interesting to work with lamps and make them shine through white milky glasses. This effect is easily obtained by adding the MTL file to the desired groups of future glasses prefix d 0.1-0.8. And assign a texture of the desired shade for these groups (not a color!). Now I want to tell you (or rather, just shout loudly in my empty forest) important thoughts. if you put a bright light source in any transparent shape with a designated texture, then magically it will light up like a real lamp. But in fact, this is the greatest illusion!! To begin with, I will show you in the diagram what the human eye sees when looking at a transparent ball To begin with, I will show you in the diagram what the human eye sees when looking at a transparent ball with a bright light bulb inside. He sees the BRIGHTLY LIT INNER surface of the ball, which is located behind the light bulb, within the boundaries along the outer edge of the figure. The surface that is located in front of the light bulb remains transparent and is NOT ILLUMINATED. It's just that you can view the bright white surface through the transparent part of the ball. But it seems to you that it burns like a fireball. But this is an illusion. If you place a bright light source on the OUTSIDE of the ball between the eye and this ball, then there is a chance to get a bright white surface through which the back illuminated area of the inner surface of the ball WILL NOT BE VISIBLE. Try to hear this important gibberish. Because now you're almost the Lord of the rings. Or almost Harry Potter with a wand. Here is the diagram.
I cite as an example a bedroom that has pendant lights above the bedside tables made of white translucent glass. From this point, the hemispheres are very weak from the viewer's side, so the white texture of the lamps looks gray and cloudy, not white and bright in any way.