Netherlands
Joined: Sep 26, 2009
Post Count: 3952
Status:
Offline
Re: Generate roof plugin
After several tries, I find that the problem lies in the fact that not all walls have the same height. In the L-shaped building the walls have different heights. In the rectangular building, the same problem occurs.
If you make ALL walls the same height, the Roof Generator works correctly.
Also, there are a few "strange" triangles visible at the "bottom" of the L-building. These are caused by the fact that - your walls don't connect properly, and - they don't align properly.
Send me your email addess, and I will mail you the file with corrections.
H
----------------------------------------
Hans
new website - under constuction hansdirkse.info
----------------------------------------
[Edit 1 times,
last edit by hansmex at Aug 30, 2023, 4:13:17 PM]
Netherlands
Joined: Apr 8, 2022
Post Count: 790
Status:
Offline
Re: Generate roof plugin
A quick look shows several inconsistencies:
Check you preference settings for new levels because the Roof Generator generates a level 'Roof-gen' with elevation 365. If you have that set in your preferences (wall-height+floor-thickness=365) than that is the cause. (Dorin can determine if it's because you have a level height of 1 on level 0 that could cause the Roof Generator to use a default.)
Your level 0 is 1 high, should be 300 with walls 300 high.
Change the Roof-gen level elevation to 300 and the probem is fixed. (double click on the level tab.)
@Hans: good find, I missed the different wall heights.
----------------------------------------
[Edit 1 times,
last edit by Keet at Aug 30, 2023, 4:06:55 PM]
Romania
Joined: Apr 24, 2014
Post Count: 555
Status:
Offline
Re: Generate roof plugin
1. Suggestion: Make some clean in your plugin folder. You have at least 4 copy of this plugin file. One it is enough. - Recommendation: delete (move) ALL and keep (reinstall) the last (4.0). - NOTE: This will not solve your problem. 2. Analise: - You have different high walls at the same level (300 at living and 365 at garage); - Roof-gen level elevation is at 365 like the highest wall; - The roof elevation is at 0 and belong to Roof-gen level; - So the roof will appear in 3D at Roof-gen elevation + roof elevation. 3. Solution: - If you keep the actual design you will have to set the Roof-gen level elevation at 300 and the roof will be in the correct position. 4. Explanation: - The roof generator try to put the roof above the higher wall in the plan BUT it can't guess your mind.
---------------------------------------- A computer program does what you tell it to do, not what you want it to do. Murphy's Law (Greer's Third Law) When all else fails, read the instructions.Murphy's Law
Romania
Joined: Apr 24, 2014
Post Count: 555
Status:
Offline
Re: Generate roof plugin
@Frazc I'm glad you solve it but this
it was the tallest object/furniture!
not sound good for me. I'm not a programmer but I'm in doubt I've permit such condition. Could you explain us how you discover this? Please! For us it is useful to know.
---------------------------------------- A computer program does what you tell it to do, not what you want it to do. Murphy's Law (Greer's Third Law) When all else fails, read the instructions.Murphy's Law
Romania
Joined: Apr 24, 2014
Post Count: 555
Status:
Offline
Re: Generate roof plugin
@JonnyD GRT thanks you for the appreciations!
---------------------------------------- A computer program does what you tell it to do, not what you want it to do. Murphy's Law (Greer's Third Law) When all else fails, read the instructions.Murphy's Law
United States
Joined: Sep 18, 2023
Post Count: 1
Status:
Offline
Re: Generate roof plugin
Thanks for the tips It is crucial to get the hang of any new plugin before diving in. Your step-by-step guide for using the Roof generator in Sweet Home 3D is spot-on open a new file draw a room select it go to Tools -> Generate roof and start working on the roof. Your emphasis on strict adherence to these steps and having at least one room selected is appreciated. Your support and willingness to help are fantastic and I look forward to assisting you or others in the future..
Romania
Joined: Apr 24, 2014
Post Count: 555
Status:
Offline
Re: Generate roof plugin
Because you've been good and only given us two beers (so we don't get drunk), Santa Claus ( aka GRT) is giving you this new GenerateRoof version 4.5 for Christmas. It is also available for download from Source Forge or via Plugin Manager. At the same time, you could (should) also download the Roof windows library (or from here ) made especially for this plugin.
Depends on installed version of SweetHome3D >= 7.2 which can be downloaded from this site. This plugin uses the Straight Skeleton algorithm implementation [Felkel's, Obdrzalek - 1998] in Java, modified to build weighted skeletons by "twak" (Kelly, Tom and Wonka, Peter) as part of a research project. Thanks to Daniels118, the professional partner in this team, who made it work under SH3D.
Now, because there might be both experienced and new users, I will present the features of this plugin in full, at the risk of boring some of you. This presentation is also available in PDF format or from here .
The purpose of this plugin is to generate, modify and insert a roof object into the house plan. The roof could be hipped, gambled or combinations of these two.
How it is designed to work: 1. From a room (or rooms) selected as the roof projection. 2. From a previously created selected roof.
WARNING: If something (room(s) OR roof) is not selected, the Tools → Generate roof... option will be grayed out.
Features: 1.1 Single room roof generation (roof projection). To do this, follow the steps below: 1.1.1 Draw a house (walls) (not required) and then a room (required) around these walls. 1.1.2 Select the room, then go to Tools→Generate roof... <picture 01>
1.1.3 Something like the following will appear (without red marks) <picture 02>
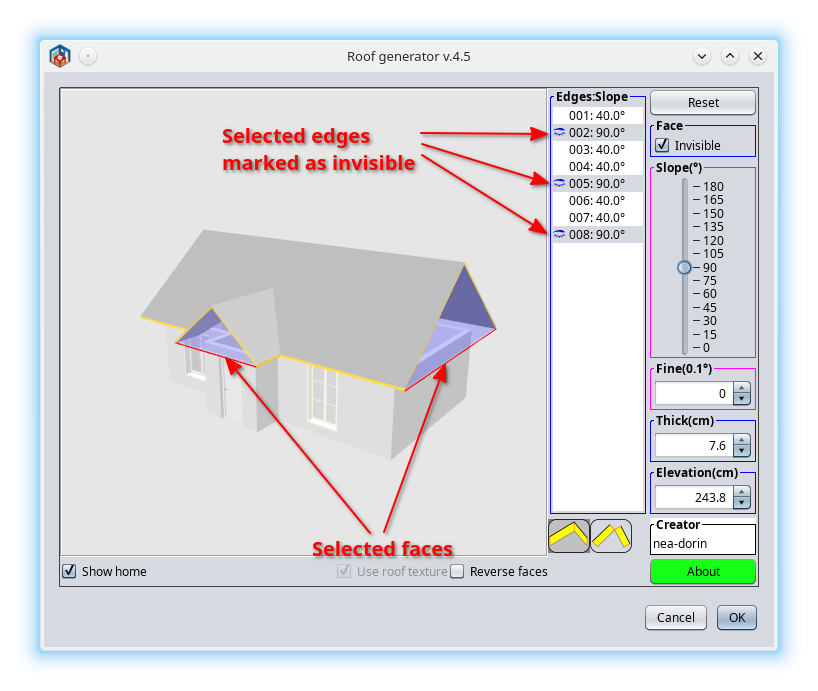
Some unnecessary explanations of red markers: 1. Preview - Here you can see the roof and the house (if checked). - You can select one or more faces with the mouse. - Ctrl+click to select different faces. - Shift+click to select a range of faces. 2. Edges list and their slope. - When marked as invisible, a blue icon appears, like a closed eye. - You can also select faces from here. 3. Invisible checkbox for setting the faces invisibility. - When checked, the selected face will be invisible. 4. Slope angle of faces. - The default value is set to 40°. - The range is between 1~179°. - During focusing, the angle can be set using the arrow keys. 5. Fine slope angle. - The default value is set to 0°. - The range is -0.9~0.9° with a step of 0.1°. 6. Roof thickness. - The default value is set to 7.6 cm (3"). - When applying the vertical edge (11), the range is between 2.5~40.6 cm (1"~16"). - When an orthogonal edge (12) is applied, the range is 2.5~12.7 cm (1"~5"). 7. Elevation of roof 8. Show home checkbox. - When checked, only walls, doors/windows, roofs and roof windows are displayed. 9. Use roof texture check box. - When editing an existing roof, provide the option to view their laid textures. - The edges will remain orange to distinguish them from other existing roofs. 10. Reverse faces check box - When ticked, changes the inner face to the upper face Border orientation: 11. vertical 12. orthogonal 13. Creator name (can be blank). 14. Reset button. Sets all values to their default value. 15. About button. Press it and you will see what it is about.
You also have an entry under the Menu Help button “Roof generator help”.
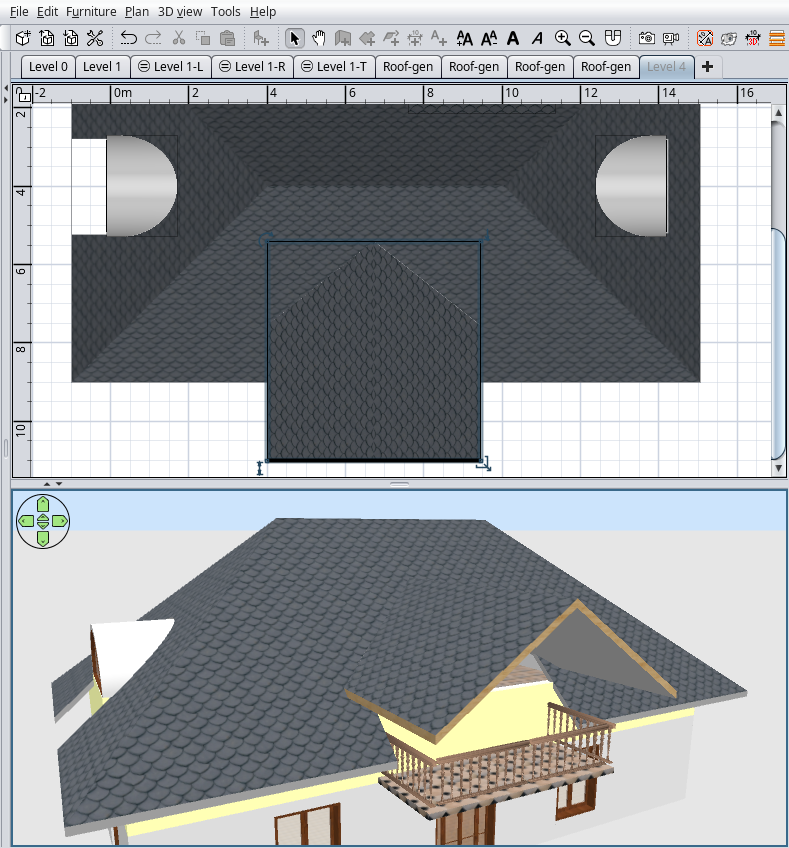
1.1.4 Here you can modify the roof according to your needs (dreams). I’ve made a gabled roof for explanation. <picture 03>
1.1.5 Click OK to insert it into the plan and set the texture as for any other furniture. It might look like in the following picture. You might notice the texture of the borders following the orientation of the borders. <picture 04>
1.2 Generating a roof from rooms (roof projection with holes). NOTE 1: The largest room (roof projection) represents the outside of the roof, the rest, if selected and located inside the main room, will be considered holes in the roof projection. NOTE 2: There is a big difference between "holes in the roof projection" and "holes in the front of the roof". The former is like a courtyard surrounded by buildings under the same roof, the latter is for inserting roof windows in front of the roof (we'll talk more about this).
1.2.1 We start roughly as in 1.1.1, but add a few smaller rooms as courtyards. Select interior rooms AND exterior rooms. HINT: Draw the larger room first and then the smaller ones. It is easier to select the rooms you need. <picture 05>
1.2.2.2 After generating the roof, modifying and setting the texture might look like this: <picture 06>
2.1 Modification of an existing roof 2.1.1 Open a file with the previously created roof(s) and select a roof. <picture 07-0>
2.1.2 Tools→Generate roof... You can now edit the selected roof. Here we have unchecked "Use roof texture" to make it more visible. Otherwise only the edges (orange) will remain as indicator. <picture 07-1>
2.1.3. After modifications, the new roof will replace the old one. The texture for the old visible faces will be maintained. For the new visible faces you will have to set it. <picture 08>
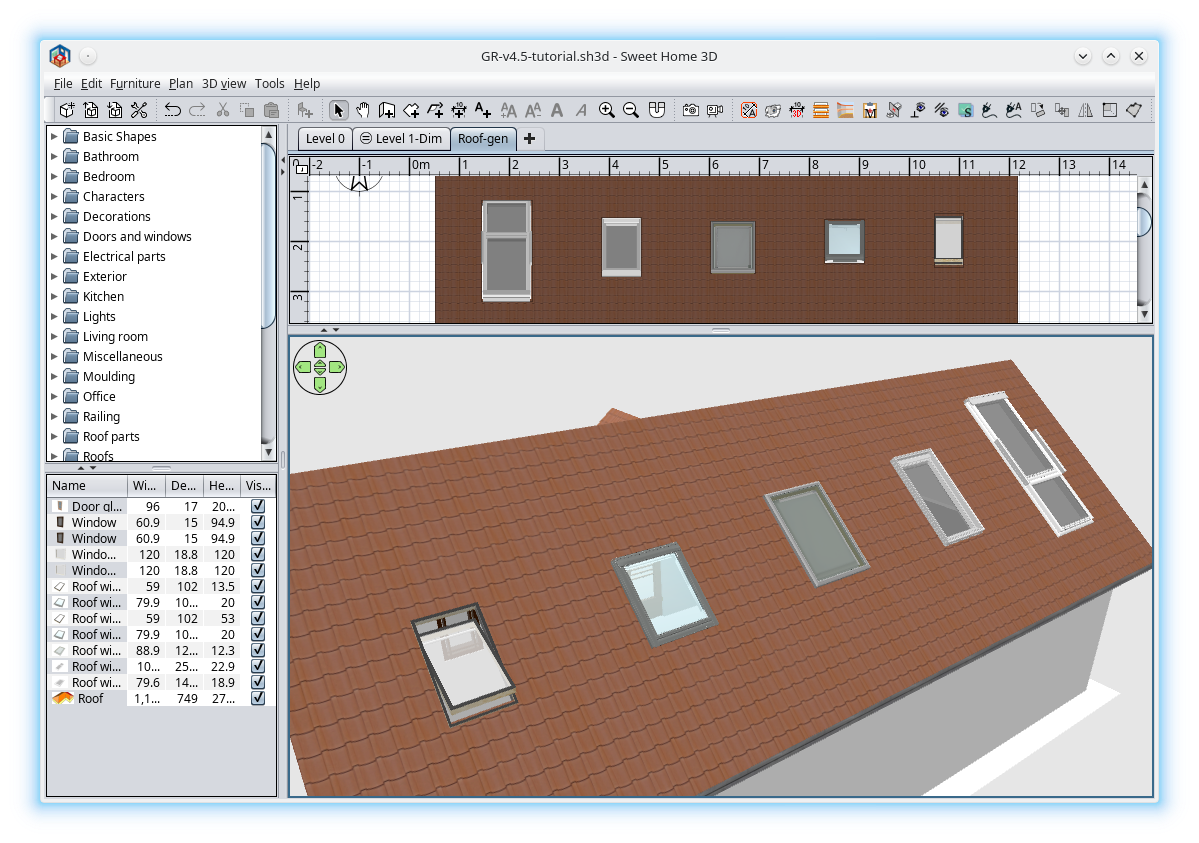
2.2 Add roof windows 2.2.1 Enter in the plan (from the special roof window library) and set the roof window(s) to the desired position. The angle, rotation and elevation will be set automatically by the plugin. NOTE: The window must be located entirely on ONE side of the roof. Otherwise it will not be computed. <picture 09-0> or <picture 09-1>
2.2.2 Select the roof and regenerate it without any other modifications. The rectangular holes for the windows will be created. If you change the position of the roof window(s) again, you will have to regenerate the roof. <picture 10-0> or <picture 10-1>
The borders around the holes will always be orthogonal. <picture 11>
3. Use of orthogonal borders NOTE: I added this to make the roofs look more like the real thing. 3.1 When choosing this type of border, the roof will have some space between the faces. This also happens in the real world and for this, people use some ridge tiles to seal the roof. Something like this: <picture 12>
3.2 If you make the faces invisible in Modify Materials and keep the borders visible, you can use the borders as a template to make the roof out of tile objects. After that, you could make the edges and inner faces invisible or delete the whole roof. <picture 13>
3.3 Using the reverse face checkbox You can combine two overlapping roofs to get something like this: <picture 14>
As you can see above it's a roof with orthogonal borders and individual faces on top, and underneath it's a roof with vertical borders, BUT the inner faces are individually textured.
To do this: - Copy/paste a created roof in the same place; - Select the new roof, raise it a little (12 cm) and run Generate roof... - Check "Reverse faces" and OK.
4. Furniture library for roof windows At the time of writing this mini tutorial, the roof window library has 6 objects (two from the SH3D furniture library (modified) and the rest from the 3D Warehouse).
This library is a bit special: - this object IS NOT AN ordinary window, it is like any other furniture. - they have two specific properties: -- roof_window = true -- roof_window_deep = 12 (or other value depending on the specific object). This is the depth at which the roof window should be inserted on the roof. It is used to differentiate these objects from others; -- You can add these properties to any object you want (including a piano), BUT only rectangular holes will be made in the front of the corresponding roof. - Also, these roof windows must have a certain orientation to be calculated correctly: -- they are horizontal, with the outside face up and the top down position. This orientation is used to correct the position of the roof windows to be flush with the corresponding face and parallel to the roof edge.
That's all! Daniele & Dorin (GRT)
---------------------------------------- A computer program does what you tell it to do, not what you want it to do. Murphy's Law (Greer's Third Law) When all else fails, read the instructions.Murphy's Law
Netherlands
Joined: Apr 8, 2022
Post Count: 790
Status:
Offline
Re: Generate roof plugin
Incredible! This is becoming almost an application on it's own. I specifically like it that the border textures now align correctly. Until now I had to edit the roof object to create a separate material for each border so I could adjust it's alignment. Many users will like the window option as there were multiple forum questions in the last year about that.