Sweet Home 3D 5.0 was released on July 19, 2015.
For this new major version, the design of the splash screen was updated…

…and many new features described in version history were added. Here are the most interesting ones:
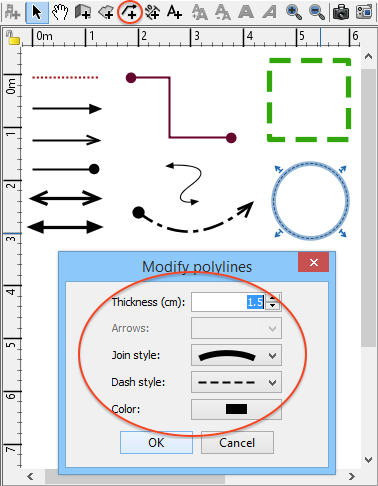
Drawing polylines
The new Plan > Create polylines menu item and its toolbar icon allows you to draw polylines and polygons. These lines appear only in the plan and should help to improve its documentation. Each polyline can be customized afterwards with its modification pane that lets you choose its thickness, the type of arrows at each of its ends, the kind of drawing used to join multiple lines, its dash style and its color. The last choice proposed in the Join style drop down list lets you even draw curves rather than straight lines.
Adding baseboards
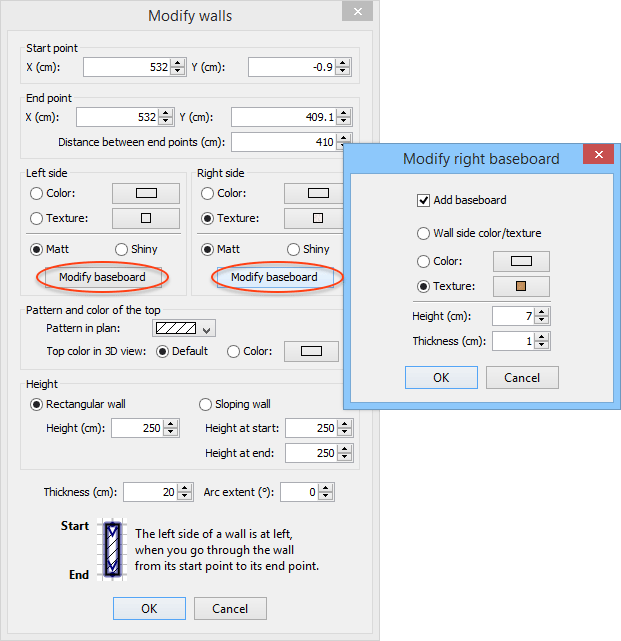
It’s now possible to add baseboards directly along walls. Just click on the Add baseboard check box that appears in the room modification pane or in the new baseboard pane bound to each side of a wall.
Baseboards can be added along straight or round walls and will be automatically cut by doors and windows that intersect a wall. You may choose their height, their thickness, their color/texture or use the same one as the color/texture used for their wall side.
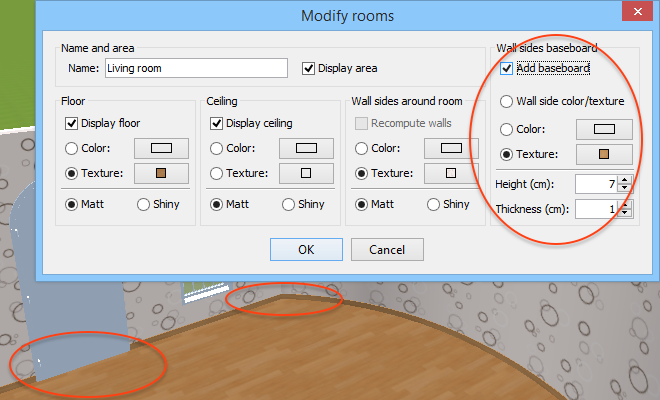
The room modification pane allows to change the baseboards on walls around the room, whereas the wall modification pane allows to add (or afterwards remove) baseboards on wall sides and possibly customize them for each wall.
Levels visibility and order
All the objects of a level may be hidden by unselecting the new Viewable checkbox in their level pane, or with the new Plan > Make level unviewable menu item. This should allow you to easily test some arrangements by adding different furniture in two separate levels that you’ll display alternately. When a level is not viewable, the objects it contains are simply not displayed in the furniture list, the plan and the 3D view, and its tab is written with a lighter color.
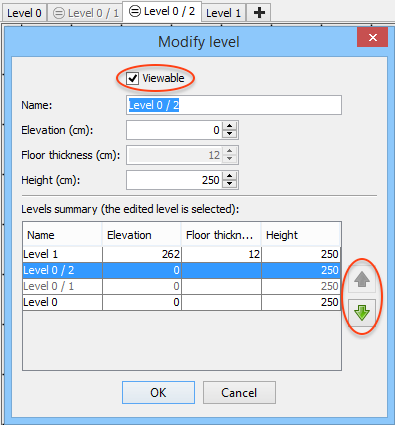
The order of the levels at the same elevation can also be changed with up dans down buttons that appear at the right of the Levels summary list (now ordered from top elevation to bottom). As objects belonging to levels with a greater index that the one of the selected level won’t be displayed, this should allow you to organize the objects of your plan similarly to layers in other graphics software. To help you distinguish a level at the same elevation as a previous one, its tab now displays in front of its name a new icon showing an equal sign surrounded with a circle.
As layers were a feature awaited for a long time by many users, I guess some of you will use it often and a Plan > Add level at same elevation menu item was added to help you create faster a new level at the same elevation as the selected one. Note that the shortcut of this menu Ctrl+Shift+N (cmd+shift+N under Mac OS X) which is generally used for layers in other software, and the shortcut of the Plan > Add level menu item was changed to Ctrl+Alt+N (cmd+alt+N under Mac OS X).
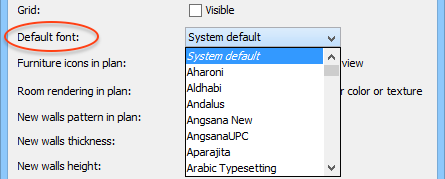
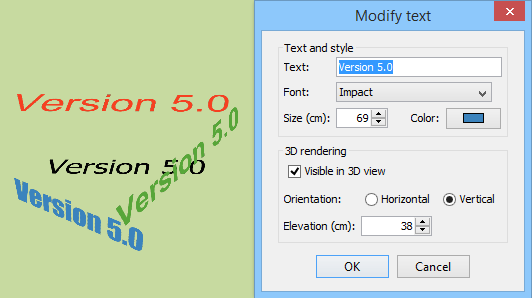
Text style
From this version, you can choose in the preferences pane the font that will be used by default for texts shown in the plan (names, areas, dimensions,…).
You may also customize free texts to change their font and color, or even request them to be displayed in the 3D view at a given elevation.
Groups management
It’s now possible to select one or more pieces in furniture groups to modify them without the obligation to ungroup them first. In the plan, you can select an object of a group by clicking first on its group, then on the object, and if the item is in a subgroup, clicking again until you reach it. Multiple selection of group objects can be done if you press the Shift key. In the furniture list, just expand the group, and select the row where the object appears.
It’s also possible to delete some objects from a group and add some to a group with the new Edition > Paste to group and Furniture > Add to group menu items. Paste to group will add the items stored in the clipboard, whereas Add to group will add the furniture selected in the catalog to the selected group in the plan.
To help you distinguish in the plan a selected object that belongs to a group, its group is itself overpainted with a rounded rectangle filed with half transparent selection color, as shown in the following image.

Other features
To finish, here are a few following features that should help you to be more efficient with Sweet Home 3D:
- To make it easier to copy the style (i.e. colors, textures…) of an item, the new Edition > Paste style menu item was added to modify the style of the selected items from the item copied in the clipboard (i.e. a piece of furniture, a wall, a room or a text).
- When a room is selected, the contextual menu of the plan now proposes the two Add point to room and Delete point from room menu items. The added or deleted point will be at the position where the mouse pointer was located when the contextual menu appeared.
- After an image is chosen in the background image and texture import wizards, their size is now read first to check if it’s very large and could reduce the performances of the program. If it’s the case, a proposal to reduce its size automatically is displayed.
- To avoid some confusion about whether a furniture or textures library import completed correctly or not, an information message is now displayed once the library is imported.
- Default translations now include Dutch and Traditional Chinese. In case you used previously a SH3L language library for these languages, you should remove it to display the words of the new version in the user interface: display About Sweet Home 3D dialog box, click on Libraries button then on Dutch-4.6.sh3l or Taiwan-4.6.sh3l file to make it appear on your desktop, and finally delete the SH3L file.
Many thanks to Gerwin Harmsen, Rob van den Berg, 李新廠 (Lee Shin-Chun), as well as to all the other translators and the beta testers for their contribution and support!