


Sweet Home 3D 使用者指南
- 介紹
- 安裝
- 使用者介面
- 開始新家
- 導入房屋藍圖
- 繪製牆壁
- 編輯牆
- 增添門窗和家具
- 客廳
- 新增等級
- 編輯 3D 視圖
- 建立3D視圖照片
- 製作3D視頻
- 匯出為 OBJ 格式
- 導入3D模型
- 圖紙尺寸
- 新增文字
- 列印
- 新增插件
開始之前
 介紹
介紹
Sweet Home 3D is a free interior design application that helps you place your furniture on a house 2D plan, with a 3D preview.
Available at https://www.sweethome3d.com/, this program is aimed at people who want to design their interior quickly, whether they are moving or they just want to redesign their existing home. Numerous visual guides help you draw the plan of your home and layout furniture. You may draw the walls of your rooms upon the image of an existing plan, and then, drag and drop furniture onto the plan from a catalog organized by categories. Each change in the 2D plan is simultaneously updated in the 3D view, to show you a realistic rendering of your layout.
This users guide shows you how to create a home with Sweet Home 3D version 7.5. After describing its user interface, you’ll learn how to draw the walls of your home, and how to layout the furniture. The example created in this tutorial is available at https://www.sweethome3d.com/examples/userGuideExample.sh3d (3.2 MB).

For more information, you may also view Sweet Home 3D video tutorials, use Sweet Home 3D help accessible from the Help button found in the tool bar of Sweet Home 3D windows, and learn more advanced tips.

安裝
(版本 7.5.17 – 291 MB)
Sweet Home 3D may be run on Windows, macOS, Linux, iOS and Android, and is translated in 29 different languages.
Depending on your system, use the following instructions to download Sweet Home 3D and install it:
| Windows: | Download https://sourceforge.net/projects/sweethome3d/files/SweetHome3D/SweetHome3D-7.5/SweetHome3D-7.5-windows.exe/download (84.9 MB), run the downloaded installation program, and follow the instructions from the setup wizard. |
| macOS: | Download https://sourceforge.net/projects/sweethome3d/files/SweetHome3D/SweetHome3D-7.5/SweetHome3D-7.5-macosx.dmg/download (83.6 MB), double-click on the downloaded file and run Sweet Home 3D application found in the opened folder. To install Sweet Home 3D, drag and drop the application in the folder of your choice. |
| Linux: | Download https://sourceforge.net/projects/sweethome3d/files/SweetHome3D/SweetHome3D-7.5/SweetHome3D-7.5-linux-x64.tgz/download (71.7 MB), uncompress the downloaded file and run SweetHome3D application found in the uncompressed directory. To install Sweet Home 3D, move the uncompressed directory to one of your choice. |
| iOS / Android: | Download Sweet Home 3D Mobile from Apple’s App Store and Google Play. |
You may also edit your homes with Sweet Home 3D Online on any device supporting WebGL. The features of this version are similar to the ones of the downloadable version except that your homes will be automatically saved on the server of this web site once you registered. The Online version doesn’t have any menu bar, but all the menu items of the downloadable version are reachable from its contextual menus or the tool bar, except 3D models importation, as well as photos and videos creation.
使用者介面
Each Sweet Home 3D window edits the interior design of a home and is divided in four resizable panes, with a tool bar at its top, as shown in figure 2 (for the Mobile version, see also this page).

1
The furniture catalog
This catalog, organized by categories, contains all the furniture and objects you may add to your home design. You can display the furniture of a category by clicking on the triangle beside its name.
2
家居用品清單
此清單包含您家中的家具,其中可能顯示家具的名稱、尺寸和其他特徵。您可以點選各列標題進行排序。
3
房屋平面圖
此面板以俯視圖的形式顯示您的房屋,房屋位於網格之上,並被規則包圍。您可以在此面板中使用滑鼠繪製房屋的牆壁,並在牆壁上放置家具。
4
房屋3D視圖
此面板以三維形式顯示您的房屋。您可以從俯視圖或虛擬訪客視角查看您的房屋。

每個窗格都可以擁有焦點(即接收鍵盤輸入),某些操作取決於目前獲得焦點的窗格,可透過其周圍的彩色矩形來識別;例如,圖 2中的戶型圖獲得了焦點。若要將焦點轉移到另一個窗格,請使用Tab鍵和Shift + Tab鍵,或按一下要取得焦點的窗格。

房屋平面圖中所有修改均可撤銷/重做,只需點擊工具列中的「撤銷」和「重做」按鈕即可。請大膽嘗試程式提供的各種操作。
繪製牆體並建立精確的平面圖
 開始新家
開始新家
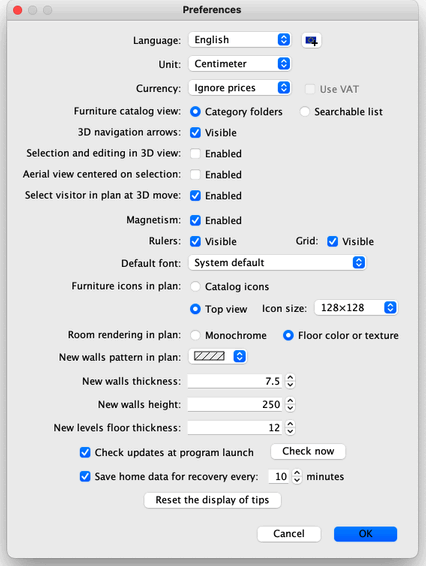
在繼續操作之前,請顯示如圖 3 所示的Sweet Home 3D首選項對話方塊。> macOS 或「檔案」選單下的「偏好設定」選單項>在「其他系統」下的「首選項…」選單項目中,您可以勾選程式中使用的預設單位、牆壁的預設厚度和高度以及其他首選項。

To create a home, simply use the default home created at Sweet Home 3D launch or click on the New home button in the tool bar.
The suggested steps of a home design in Sweet Home 3D are:
- 將您房屋的掃描藍圖匯入為房屋平面圖的背景影像,
- 在此背景圖上繪製牆壁,
- 編輯牆體厚度、顏色和紋理,
- 在您的房屋平面圖中添加門窗並調整其尺寸,以獲得空房的真實效果圖。
- 在您的房屋平面圖中新增家具,調整其尺寸和位置,最終可以使用匯入的 3D 模型。
- 繪製房間圖,並改變房間地板和天花板的顏色或紋理。
- 如果你的房子不只一層,就增加樓層和連接樓層的樓梯,並為每一層重新開始前六個台階。
- 在列印房屋平面圖之前,請繪製尺寸並新增文字說明以記錄。
在這些步驟中,您可能會經常在 3D 視圖中導航,以變更佈局的視角。

By the way, don’t forget to regularly save your project by clicking on the Save home button (except with the Online version where the edited home is automatically saved). A Sweet Home 3D file may be exchanged with other users and may contain imported 3D models not present in the default catalog.
You may also create images of the 3D view at PNG format, compute 3D videos from a virtual path in your home and export the 3D view of your home at OBJ + MTL format.
導入房屋藍圖
This first step is not mandatory but it speeds up the drawing of the walls of an existing home. So try to find the blueprint of your home and scan it if you didn’t do it yet, ensuring the image is correctly rotated. Don’t import a large file in Sweet Home 3D, this image is supposed to be a helper, not some art!
選擇方案>匯入背景圖像…選單將顯示嚮導,幫助您選擇和縮放圖像文件,如圖 4 所示。
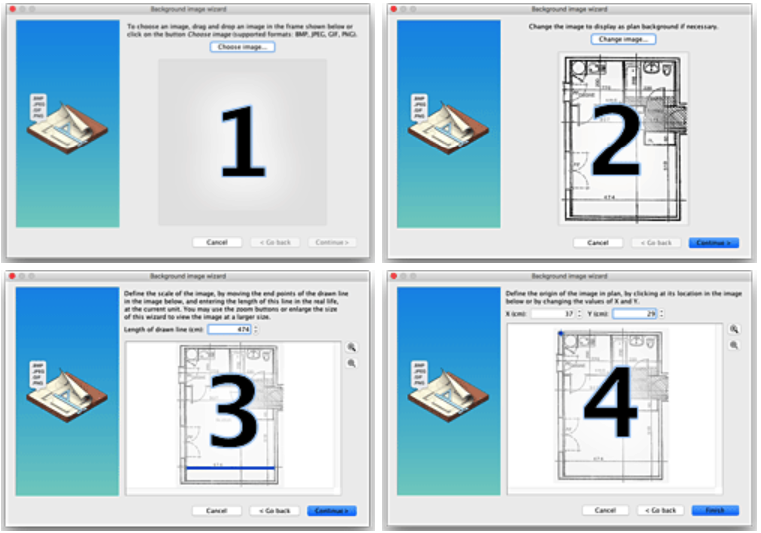
- Click on Choose image and choose your image in the file dialog box. Sweet Home 3D supports BMP, JPEG, GIF or PNG formats. The scanned image used in this tutorial is available at https://www.sweethome3d.com/examples/userGuideBluePrint.jpg
- 圖片載入完成後,點選「繼續」 。
- 透過移動影像中繪製的彩色線條的端點來定義影像的比例,使該線條的長度與已知長度相符。然後在「繪製線條的長度」欄位中輸入該線條的實際長度,然後按一下「繼續」 。
- 在平面圖中確定影像的原點,即影像中與房屋平面圖中的點 (0, 0) 相對應的點。然後按一下“完成” 。
嚮導關閉後,您的影像將以所選比例顯示在房屋平面圖網格的後面,如圖 5 所示。如果您選擇了錯誤的比例或位置,請選擇「平面圖」進行編輯。>從選單中選擇“修改背景圖片” 。
如果您擁有 iOS 設備,但還沒有可以匯入的平面圖,Tape Measure 應用程式可讓您在幾分鐘內輕鬆建立平面圖。只需輕按幾下,即可產生您家的精確平面圖:
- 打開應用程序,將手機對準房間的每個角落。
- 邊走邊點擊標記角落。
- 所有角點標記完畢後,該應用程式會產生一個完美比例的平面圖。
- 將平面圖儲存為手機圖片,然後匯入 Sweet Home 3D 中。如果您在電腦上使用 Sweet Home 3D,請將圖片傳送到電腦,然後從電腦匯入。
請注意,Tape Measure 目前僅適用於 iOS,但 Android 版本即將發布。
繪製牆壁

若要繪製牆壁,請先點選工具列中的「建立牆壁」按鈕。
在房屋平面圖中點選新牆的起點,然後點選或雙擊平面圖中新牆的終點。只要您不雙擊或按Esc鍵,每次點擊都會指示目前牆的對面點和下一面牆的起點。

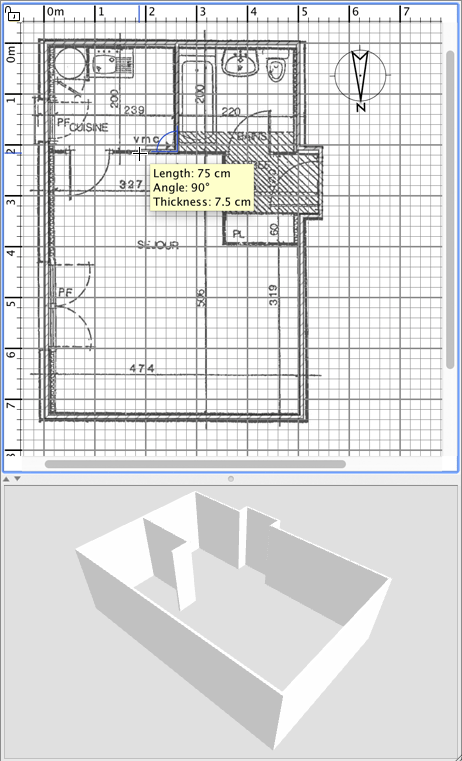
To help you draw walls precisely, use walls tooltip, alignment lines and change the plan scale with Zoom buttons. You may also enter the length and the angle of the wall being created after pressing the enter key (feature not available in Online and Mobile versions).
Don’t take doors and windows into account while drawing walls, because Sweet Home 3D will automatically compute the holes in the walls where you will place openings. As shown in figure 6, walls are simultaneously drawn in the plan and in the 3D view, and you can adjust the point of view in the 3D view at any time, by moving the mouse with its left button pressed.
為了幫助您繪製平行牆,預設情況下,牆面與地面的夾角為 15° 的倍數。您可以透過在首選項對話方塊中停用此功能,或在繪圖過程中按住Alt鍵(Windows 系統)、 cmd鍵(macOS 系統)或Shift + Alt鍵(Linux 系統)來取消此設定。
編輯牆

點擊工具列中的「選擇」按鈕,結束牆體的繪製,並使用在繪製牆體期間停用的工具。
選擇「選擇」模式後,您可以透過點選來選擇戶型圖中的單一物件。您也可以透過繪製選擇框來選擇一個或多個對象,或按住Shift鍵並按一下每個對象。
To move selected walls (and other objects) in the home plan, simply drag and drop them, or use keyboard arrow keys. When one wall is selected in the plan, you can also move its start and end point with the mouse or split it in two walls with Plan > Split wall menu item.
Double-click on a wall or choose Plan > Modify walls… from the menu to modify the current set of selected walls with the wall dialog box.
As shown on figure 7, this dialog box helps you to edit the colors or the textures of left and right sides of the selected walls, and their thickness and their height. If you want to use an image of your own as a texture, click on the Import button and use the texture import wizard that will guide you.

安裝門窗、家具,訂製每個房間
增添門窗和家具

To add furniture to your home, drag and drop furniture from catalog to the home plan or furniture list, as shown on figure 8, or select a piece in the catalog and click on the Add furniture button in the tool bar.
The pieces added to the home are selected and drawn simultaneously in the furniture list, in the home plan and in the 3D view.

First add doors and windows to your home plan to get a realistic view of your empty home. When magnestism is active, a door or a window dropped upon a wall is automatically oriented and resized depending on the orientation and the thickness of that wall.
Then add furniture and adjust their location, angle and size. When magnestism is active, a piece of furniture is automatically rotated so its back face lies along the wall upon which you released the mouse cursor, and a piece dropped on a larger one will be elevated to appear on the top of the latter, if its default elevation is at floor level.
在平面圖中選擇一個部件後,您可以使用出現在所選部件每個角落的四個指示器之一來更改其大小、高度或角度,如圖 9 所示。
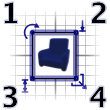
1
旋轉指示器會顯示您可以拖曳以旋轉所選部件的角落。按住Alt鍵可切換旋轉過程中所施加的 15° 磁力。
2
高程指示器顯示您可以拖曳的角落點,以變更所選部件相對於地面的高度。
3
高度指示器顯示您可以拖曳以變更所選部件高度的角落。
4
尺寸指示器會顯示您可以拖曳的角落點,以變更所選部件的寬度和深度。
You may also double-click on a piece of furniture or choose Furniture > Modify… from the menu to modify the current set of selected pieces with the furniture dialog box. As shown on figure 10, this dialog box helps you edit the name of the selected furniture, its rotation angle, its location, its elevation from the floor, its size, its color or its texture, its visibility and whether its 3D model shape should be mirrored. If the selected objects contain one or more lights, this dialog box will let you also edit their power, but this will have an effect only at the two best quality levels in the photo creation pane.
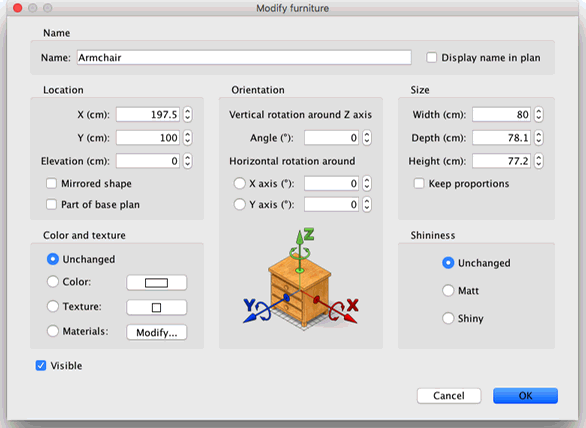
不可見的家具不會在房屋平面圖和 3D 視圖中繪製出來,但它仍然會出現在家具列表中,以便您稍後再次將其顯示出來。
客廳

若要繪製房間,請先點選「建立房間」按鈕。
在家居平面圖中,可以使用以下兩種方式建立新房間或新表面:
- 點擊房間的每個角落,然後在最後一個點雙擊,或在新增最後一個點後按Esc鍵。
- 如圖 12 所示,在現有封閉曲面(即被牆壁包圍的曲面)內的任意位置雙擊。

一個包含半個門檻的房間
先繪製牆壁並添加門,然後再繪製房間。使用這種方法,您可以透過雙擊與家中房間相匹配的表面來更快地創建房間。另請注意,雙擊創建的房間將包含放置在其牆壁上的每扇門的半個門檻。此功能可確保在房間之間的門打開時,各個房間在3D 視圖中正確連接。
房間創建完成後,您可以選擇「平面圖」來修改房間名稱、地板和天花板的顏色或紋理。>從選單中修改房間…如圖 13 所示。

選取一個房間後,您還可以在選擇模式下用滑鼠移動它的每個點,並使用文字下方的指示器更改其區域和名稱的位置。
新增等級
If your home has more than one level or story, you can create the additional levels by choosing Plan > Levels > Add level from the menu or by clicking on the + tab that appears when a home has more than one level. Each level is represented by a tab displayed at the top of the plan view and used to select the level into which new walls, furniture and other objects will be added.
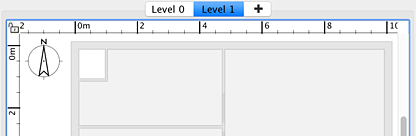
如圖 14 所示,平面圖中底層牆壁和天花板以淺色顯示,以便您更輕鬆地使用牆壁或房間繪製工具。如有需要,您也可以將其他樓層的某些物件複製/貼上到所選樓層。
可以透過雙擊對應標籤或選擇「平面圖」來修改各層的預設標高、高度和樓板厚度。>等級>從選單中選擇“修改等級” 。
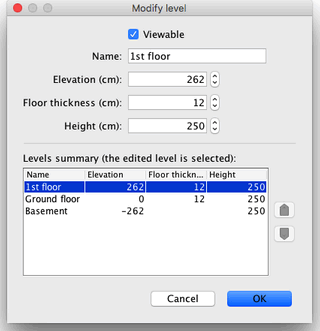
如圖 15 所示,「標高修改」窗格也會顯示一個表格,其中描述了房屋的所有標高,以幫助您根據其他標高選擇合適的數值。若要建立地下標高,請輸入負高程值。標高用於計算已編輯標高的天花板標高。
以 2D 和 3D 形式檢視設計
編輯 3D 視圖
在繪製房屋圖的過程中,您可以隨時變更 3D 視圖中使用的視角。有兩種不同的房屋視圖可供選擇,預設選擇的模式已設定為3D 視圖。>鳥瞰圖選單和其他模式均已設定3D 視圖>虛擬訪問。在兩種模式下,您都可以使用滑鼠或鍵盤方向鍵來改變目前視角,如圖 16 和圖 17 所示。


選擇虛擬參觀模式後,房屋平面圖中會繪製一個俯視視角的虛擬訪客。訪客每次移動,其位置和角度都會在平面圖和三維視圖中同步更新。如圖 18 所示,此虛擬訪客周圍有四個指示器。

- 頭部角度指示器顯示您可以調整的角度,以將參觀者的頭部向上或向下移動。
- 視野指示器顯示目前在 3D 視圖中看到的角度。
- 身體角度指示器顯示您可以改變的角度,使訪客的身體向左或向右移動。
- 視線高度指示器顯示了您可以拖曳以上下方移動訪客視角的點。
您也可以選擇3D 視圖。>從選單中選擇「修改 3D 視圖…」可以變更地面和天空的顏色或紋理、燈光亮度和牆壁透明度,如圖 19 所示。

改變地面和天空顏色後,圖 20 顯示了本教程中設計的房屋的兩個 3D 視圖螢幕截圖。

建立3D視圖照片

Click on the Create photo… tool to create an image of the 3D view with the size and the proportions of your choice, and save it in a file at PNG format (feature not available in Online and Mobile versions).
如圖 24 所示,用於建立照片的面板還可讓您選擇建立影像的品質等級。在「快速」品質等級下,所建立的影像將類似於3D 視圖中的效果;而在「最佳」品質等級下,影像將更加逼真。在兩個最佳品質等級下,您可以透過添加不同功率等級的燈光或更改燈光時間來控制影像的照明。您也可以選擇用於計算影像的渲染引擎,通常YafaRay渲染器的運行速度比SunFlow預設渲染器更快。
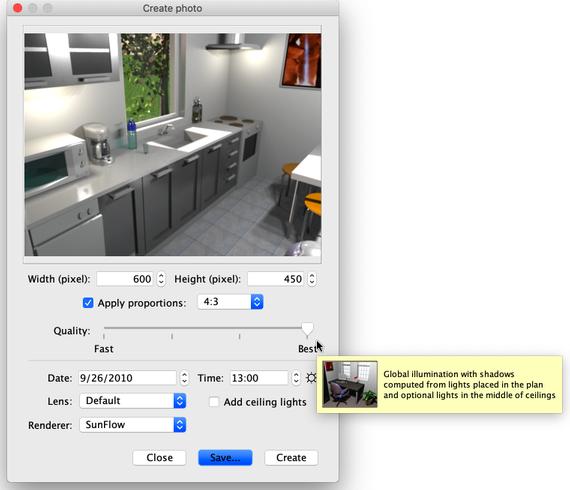
根據您的電腦配置和效能,計算最佳影像品質可能需要很長時間。不過,請注意,在此計算過程中,您仍然可以修改您的家居設定。由於技術原因,一次只能開啟一個「建立照片」面板。
製作3D視頻

Click on the Create video… tool to display the pane used to create a video from a virtual path in the 3D view (feature not available in Online and Mobile versions). As figure 25 shows, this pane lets you choose the format of the video and its quality in a way similar to the photo creation pane.

若要建立視頻,請在 3D 視圖中選擇攝影機的初始位置,然後按一下影片建立面板中的紅色按鈕。接著,在 3D 視圖中移動到攝影機的下一個位置,並再次點擊紅色按鈕。在影片拍攝過程中攝影機需要經過的每個位置重複這些步驟。
每次點擊紅色按鈕,影片建立面板中都會新增一個新點,顯示攝影機的移動路徑。由於 Sweet Home 3D 還會考慮攝影機的垂直高度、兩個旋轉角度和視野範圍,因此您可以創建各種類型的動畫。
當您建立的路徑符合要求後,按一下「建立」按鈕開始計算視訊幀,計算完成後,按一下「儲存…」按鈕將影片儲存為 QuickTime 檔案。您可以使用VLC等播放器查看此視頻,或將其轉碼為其他格式。圖 26 和圖 27 顯示了根據圖 25 所示路徑計算並轉碼為 MPEG-4 格式的兩個影片:
使用回放按鈕大致查看 3D 視圖中攝影機的路徑,因為計算影片可能需要幾分鐘到幾小時,具體取決於您的家庭環境、您選擇的品質和電腦的效能。
進出口
匯出為 OBJ 格式
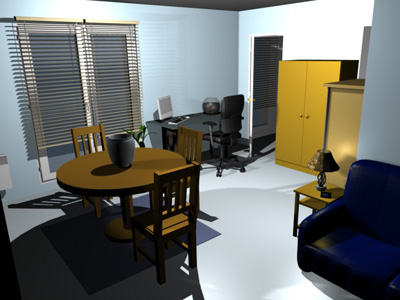
If you want to reuse your home in 3D software like Blender or Art of Illusion to improve its rendering for example, choose 3D view > Export to OBJ format… from the menu and import the generated OBJ file in these software (feature not available in Online and Mobile versions). This menu item will write in the selected OBJ file the description of all the objects displayed in the 3D view, it will create a MTL file describing their color and finally, it will save the images of the textures, you may have used. The figure 28 shows a rendering done in Blender once a few lights were added in the scene.
導入3D模型
If a piece of furniture or an object is missing in the catalog of Sweet Home 3D, you may import a 3D model file, and use it in your home (feature not available in Online version). More than 1600 free models designed by contributors may be downloaded at https://www.sweethome3d.com/freeModels.jsp, but you can also download models from other web sites, or create your own models with software like Blender or Art of Illusion. Sweet Home 3D supports 3D model files at OBJ, DAE, 3DS format, ZIP files containing a file of this type, and KMZ files.
You can also download the full version with over 1,600 3D models, 400 textures already included
Select Furniture > Import furniture… menu item to launch the wizard that will help you to choose and size the 3D model file, as shown in figure 11. Under Windows and macOS, you may also drag and drop a 3D model file in a Sweet Home 3D window to launch this wizard.

- Click on Choose model and choose the 3D model file in the file dialog box. If you dragged and dropped in a window the 3D model file you want to import, it’s automatically selected. Once the model is loaded, click on Continue.
- Orientate the model with arrow buttons in such a way the front view displays the front face of the 3D model, and click on Continue.
- 如有必要,請變更匯入模型的名稱、尺寸、高度、顏色,以及模型是否可移動、是門、窗或樓梯。然後點選“繼續” 。
- Turn the 3D model with the mouse to get the best point of view on the model for the model icon displayed in the furniture catalog, furniture list and home plan. Then click on Finish.
Once the furniture import wizard is closed, the imported model will appear in the furniture catalog and/or home plan and furniture list, depending on the options you chose. You may use it as any 3D model of the default catalog.
The models proposed at the free 3D models page may also be imported by group of models stored in a SH3F file, available in the SweetHome3D-models section at https://downloads.sourceforge.net/sweethome3d/ (feature not available in Online and Mobile versions).
To install a SH3F file, simply double-click on it or select it after choosing the Furniture > Import furniture library item from the menu.
To uninstall a SH3F file, remove it from the furniture plugin folder of Sweet Home 3D, and restart the application. This folder is shown when you click on any SH3F file listed in the Furniture libraries section of the Libraries in use pane. The latter pane is displayed by clicking on the Libraries… button shown at the bottom of Sweet Home 3D About dialog box.
If needed, you may create your own SH3F files with the Furniture Library Editor, available for download at https://sourceforge.net/projects/sweethome3d/files/FurnitureLibraryEditor/FurnitureLibraryEditor-2.2.jar/download (14.4 MB).
其他功能
圖紙尺寸

若要繪製尺寸標註,請先點選「建立尺寸標註」按鈕。
您可以使用以下兩種方式在計劃中建立新維度:
- 點選新尺寸的起點,點選其終點,然後將滑鼠指標移到該起點,再點選第三次,選擇在尺寸線兩端繪製的延伸線的大小。
- 將滑鼠指標移到要測量的家具邊緣、牆壁側面或房間側面,雙擊以接受平面圖中的臨時尺寸繪製,然後在選擇其延伸線尺寸後第三次單擊。
在這兩種情況下,如果您在第二次和第三次單擊之間不移動滑鼠,則新維度將沒有任何延伸線。

新增文字

要在套餐中新增免費短信,請先點擊「新增簡訊」按鈕。
在房屋平面圖中按一下要新增文字的位置,然後在出現的對話方塊中輸入文字。
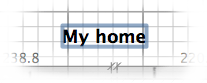

您隨時可使用文字樣式按鈕變更所選文字的大小和樣式。
列印
Once you designed your home, you can print it with File > Print… or File > Print to PDF… menus, and preview the result with File > Print preview… menu. By default, Sweet Home 3D prints the furniture list, the plan and the current 3D view of home, using default paper size, margins and orientation.
Choose File > Page setup… from the menu to modify this default choice (feature not available in Online and Mobile versions), as well as the scale of the printed plan, the header and the footer, as shown in figure 23.

新增插件
The features of Sweet Home 3D may be extended thanks to plug-ins, that you may even develop yourself if you’re able to program in Java (feature not available in Online and Mobile version).
A plug-in is a SH3P file stored in the plug-ins folder of Sweet Home 3D. To install a SH3P file in this folder, simply double-click on this file under Windows and macOS. Under Linux, you’ll have to copy the SH3P file in the subfolder .eteks/sweethome3d/plugins of your user folder if the double-click doesn’t work.
Once the plug-ins is installed, relaunch Sweet Home 3D to let the new menu items and/or the new buttons matching the plug-ins features appear. For example, the Home rotator plug-in adds two items to the Plan menu able to rotate all the items in the home plan clock wise or counter clock wise.