Denmark
Joined: Jul 7, 2013
Post Count: 637
Status:
Offline
Re: Light & textures - rendering examples of this and that.
even if the image transforms well, it somehow gets so blurred that it is totally useless.
It's your fear of high resolution that is blurring your vision!
My sky images are 15000px x 3750 px. I normally go at least twice that size when editing, and then rescale to 15000 x 3750 px ( or sometimes as low as 6000 x 1500 px if there are no gradients present).
The jpg-compression algorithm can be tricked by adding a layover of noise, so that even at the lowest (10%) jpg-quality a 15000 x 3750 image will render an acceptable sky at FoV 30. A 15000 x 3750 low-res jpg @ 10% can weigh as little as 200kb, and still render ok. For sky images, resolution (size) and quality goes hand in hand.
Joined: May 12, 2013
Post Count: 1545
Status:
Offline
Re: Light & textures - rendering examples of this and that.
It's your fear of high resolution that is blurring your vision!
That could very well be, actually. As you know I work with scaled down images for templates and tests even if I am not quite as cheap with my more private projects.
Still, there is something strange. I can transform the image quite well in the Gimp. But when I try to use .svg so a linked image can distort automatically, I get problems. Cannot remember how intimate you are with .svg, but here is the latest attempt using .svg + css3 to test 'automatic' 3d distort in the template (viewBox="0 0 360 94" ). In Firefox, the rectangle and image distorts, but is too blurred.
<!-- In theory this could distort (transform) an image to improve rendering, but it is not supported by several browsers/Inkscape, and when it is supported (Firefox), the image blurs -->
<g transform="translate(30 60)" opacity="1">
<g style="transform-origin: 32px center 0px; transform: matrix3d(1,0,0.00,.00,0.00,1,0.00,0.01,0,0,1,0,0,0,0,1);" >
<rect width="72" height="36" fill="none" stroke="red" stroke-width="1"/>
<image width="72" height="36" xlink:href="mountainx.png" preserveAspectRatio="none"/>
</g>
</g>
When I can spend a couple of hours to concentrate, I will try some more before I post the template. For the record, this is not an attempt at picture perfect, just a quick approach to create a backdrop that can work with a SH3D scene render. ok
Denmark
Joined: Jul 7, 2013
Post Count: 637
Status:
Offline
Re: Light & textures - rendering examples of this and that.
Cannot remember how intimate you are with .svg,
Not at all intimate I'm afraid But I'm quite intimate with Photoshop, and I know for a fact that scaled down images will produce crappy outputs.
Okay... We have talked about this before.
A 1024 px image at maximum jpg-quality will not produce an acceptable sky image, whereas the same image at 6000 px, compressed so much that it's weighing the same (both weighing 150 kb), will produce a far better ( almost a tolerable) sky rendering. Examples: Sky image 1024 px - Filesize = 150 kb:
Same image 5700 px - Filesize = 155 kb:
Size matters (resolution – not filesize), not only for the sky, but for ALL textures, and the higher the resolution – the more compression can be applied – ergo: The filesize is less important than the resolution.
I prefer sky images @ 15000 x 3700 px, and they normally weigh between 800 kb and 2.1 Mb.
Joined: May 12, 2013
Post Count: 1545
Status:
Offline
Re: Light & textures - rendering examples of this and that.
..quite intimate with Photoshop...
Picking a tool is a matter of choice. My preference is Gimp for the raster images, which I link into an .svg file for post editing with a text editor or Inkscape. Doubtless, this could be done with the Gimp alone, or Photoshop, with just as good results. The only reason for the .svg detour, is that items easily can be placed, moved, scaled accurately on the canvas by using numeric co-ordinates. And then each item, a hill, a cloud, can be adjusted individually with the Gimp (or whatever) to acceptable resolution, hue etc. etc. But that is just a personal preference.
We have talked about this before.
Yes we have. And, of course, I agree with what you say. Just did a test using the .svg template (which I will post) exporting to .png. at: 7200×1880, 3600×940 and 1800×470. With 6.0 beta and limited access to memory, 7200×1880 maxed out. 1800×470 rendered quickly. The latter is acceptable for planning purposes, but even I would consider using higher resolutions for a nice render. Which is to say, I agree with what you say even if I probably have a lower threshold for crappy.
Denmark
Joined: Jul 7, 2013
Post Count: 637
Status:
Offline
Re: Light & textures - rendering examples of this and that.
With 6.0 beta and limited access to memory, 7200×1880 maxed out
Yes, that's the problem with the web-start-version.
The only reason for the .svg detour, is that items easily can be placed, moved, scaled accurately on the canvas by using numeric co-ordinates. And then each item, a hill, a cloud, can be adjusted individually with the Gimp (or whatever) to acceptable resolution, hue etc. etc.
Sounds a lot like what I do in Photoshop. I don't think I have fully understood how the .svg numeric coordinates work differently than a Photoshop ( or Gimp) template.
Joined: May 12, 2013
Post Count: 1545
Status:
Offline
Re: Light & textures - rendering examples of this and that.
.. fully understood how the .svg numeric coordinates work differently...
Not much to understand, I think. Approach is the same, I just like the more readable and transferable .svg format for constructing a multi-element background. No idea about Photoshop co-ordinates, but in the example below, sun is placed at x="90" y="60", which on a 360×90 canvas (viewBox) converts to degrees.
Probably like your Photoshop approach, at the end of the day, it is just question of combining elements on a sky texture, for instance: sun.png, clouds.png and mountain.png. Unlike the not-so-open formats of Photoshop and the Gimp, .svg displays with any browser and edits with a text editor / Inkscape / the Gimp / OpenOffice etc. maybe even Photoshop. And it can be scaled to any size without any quality loss other than that which comes with the linked raster images. All this fits into a small (and tidy) file: minitest.svg which looks like this opened in any text editor:
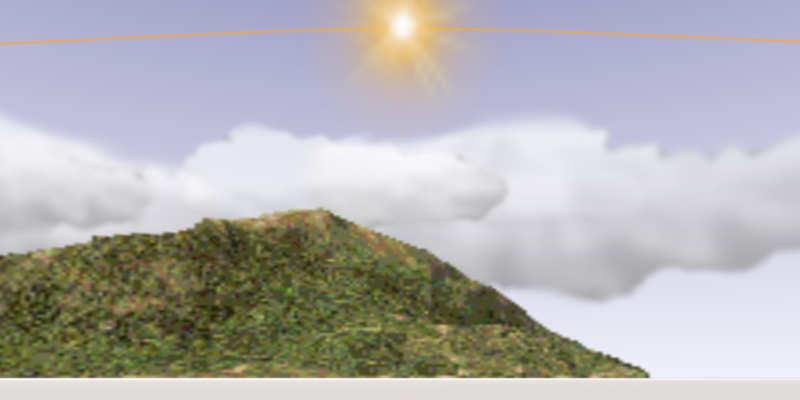
Saved as .jpg (3600×900, high compression) the result is a sky texture for SH3D minitest_horizon.jpg (64KB) which gives this render: Yes, the mountain is crappy: the image linked is low quality at 256×64, compressed to 10,6KB. Which is overdoing it, even for me. On the other hand, the entire mountain can be Base64 embedded in the .svg without taking up more than one line of less than 15000 characters and be used several times in various shapes and sizes:
A mountain is probably not a good example but embedding can be a convenient way to save simple raster elements inside a still small .svg file. But whether you wish to embed or not, using .svg as a 'container' or list of links, means you can exploit the best qualities all formats, combining .png, .jpg and .svg for different elements. .png for transparency / indexed colours, .jpg for smaller 'photographic' files and so on. Preferably of higher quality than the ones used in this example.
The template I actually use is more elaborate with a grid, some embedded images and gradients. Gradients and blurs can be useful for many things, such as blending skyline with ground colour/texture in SH3D or lighting up parts of the sky. But point is for the file to be simple, readable and compatible so SH3D skyline can be edited with a couple of keystrokes with as many image elements as you like in whatever quality: cityscapes, forests, planes, satellites and so on*, at higher quality. But it is also possible to make the template as advanced as you wish: The sun path is an approximation of equinox sun passage on horizon to be moved/transformed for other seasons, transformed upside down so the path reflects actual degrees above horizon. Something I would not know how to do accurately with the Gimp.
Clearly, all editing is quicker with a familiar interface. So no reason not to stay with whatever works. In addition to my liking for open, human readable formats, I suppose this is also a sales pitch for editing xml in general. For instance, I hardly use furniture libraries when it is possible to add cutouts, door/window and lightsource properties directly in Home.xml.
Joined: May 12, 2013
Post Count: 1545
Status:
Offline
Re: Light & textures - rendering examples of this and that.
Forgot to post the file with (low-res) mountains, clouds, sun etc. embedded. Easier to edit. Yes, yes, say nothing, the elements will need higher resolution for nice rendering. But you get my drift. A high-res credo is sensible, here is an example of the opposite: how low is it possible to go.
minitest_embed.svg < 50 KB, initial resolution 1200×300 px, but can scale to anything when importing to Gimp/Photoshop or changing width height in the .svg. SH3D does not import the .svg directly so the image needs to be converted to .png/.jpg before use.
Denmark
Joined: Jul 7, 2013
Post Count: 637
Status:
Offline
Re: Light & textures - rendering examples of this and that.
minitest_embed.svg < 50 KB, initial resolution 1200×300 px, but can scale to anything when importing to Gimp/Photoshop or changing width height in the .svg. SH3D does not import the .svg directly so the image needs to be converted to .png/.jpg before use.
Photoshop can read and generate 3D models, and of course scale 3D models up or down, but textures ( photographic images) can not be up-scaled by any program without loosing quality, whether it's in .svg format or any other format. The way I understand it, using the .svg format has advantages only when using scaleable vector graphics.
.svg displays with any browser and edits with a text editor / Inkscape / the Gimp / OpenOffice etc. maybe even Photoshop
The .svg format is not read by Photoshop, so I use Adobe Illustrator to scale and convert it to .tiff or .psd whenever I get a file in that format, since I only work with photographic images. Personally I struggle with using Gimp, but I put that down to having used Photoshop for nearly two thirds of my life, and me being frustrated when none of my "normal" shortcuts are working.
at the end of the day, it is just question of combining elements on a sky texture
Yes – but we have different reasons for placing these objects exactly where they end up being placed
I still don't see how .svg makes it easier to edit.
Joined: May 12, 2013
Post Count: 1545
Status:
Offline
Re: Light & textures - rendering examples of this and that.
I still don't see how .svg makes it easier to edit.
Oh, easier I do not know. A wise woman once wrote that the key to mastering software is to study and learn the short-cuts. Easier and quicker, I suppose, is always the interface you are used to.
For me there are two issues. Interface and format. While the Gimp is brilliant for raster graphics in general, I never liked the interface for layers. Probably noting wrong with it, I just do not like it. That calls for a format where it is possible to switch between different software to do different things. Using Photoshop or Gimp formats locks you in. Yes you can interchange .psd and .xcf, but unreliably and at the risk of loss.
In addition to being an open format, .svg has a couple of advantages. It opens in browsers, the Gimp, Inkscape and any text editor. But even better, I can open elements (clouds, sun, mountains) individually in the Gimp, while at the same time keeping the .svg (with links) open in a text editor and Inkscape. Especially since I also use .svg elements (sun path, mark satellites) the combination lets me use the best format and best interface for each element. Want to place a cloud behind the mountains? Just swap the two lines in a text editor. Once all elements are in place, I export to high-resolution with Inkscape (or the Gimp will do nicely by importing the .svg at high res).
Is this easier? It is for me. But only because I feel at ease with the functions I preform in each program. Could I do everything in the Gimp? Yes, but it would take me longer. Maybe an awkward way of working, but one I am used to. And a flexible one. SH3D lets you do almost everything from within the interface, but sometimes you need to add a cut-out or change a window sash. Just open Home.xml and fix it. Not that straightforward, maybe, but a lot faster than going via the Furniture Libraries.
But when I posted the template as .svg, it was mostly because it will edit with different pieces of sofware. .png/.jpg would not have preserved layers / different elements. Using Gimp .xcf would require the user to be familiar with the Gimp and so on.
Denmark
Joined: Jul 7, 2013
Post Count: 637
Status:
Offline
Re: Light & textures - rendering examples of this and that.
Enkonyito's “Advanced render settings” gave us a new set of parameters for tweaking the Sunflow renderer, and when IBL-lighting vas introduced shortly after, we got yet another major lighting improvement. And then we got the resizable render window, an invaluable tool for checking our light settings fast and easy. Recently Enkonyito has introduced the panel lights – which have once again lifted SH3D to a new level.
Now Sweet Home 3d v6 is just around the corner. Great things are happening...
I'm going to play with panel lights in this post.
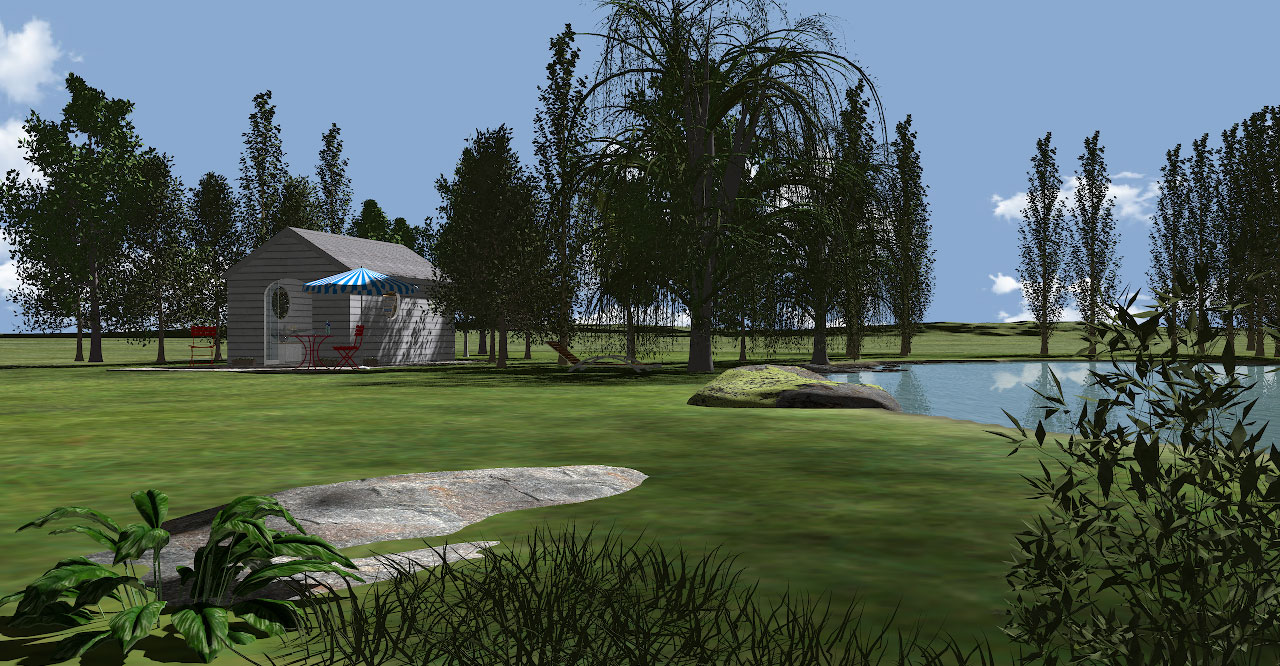
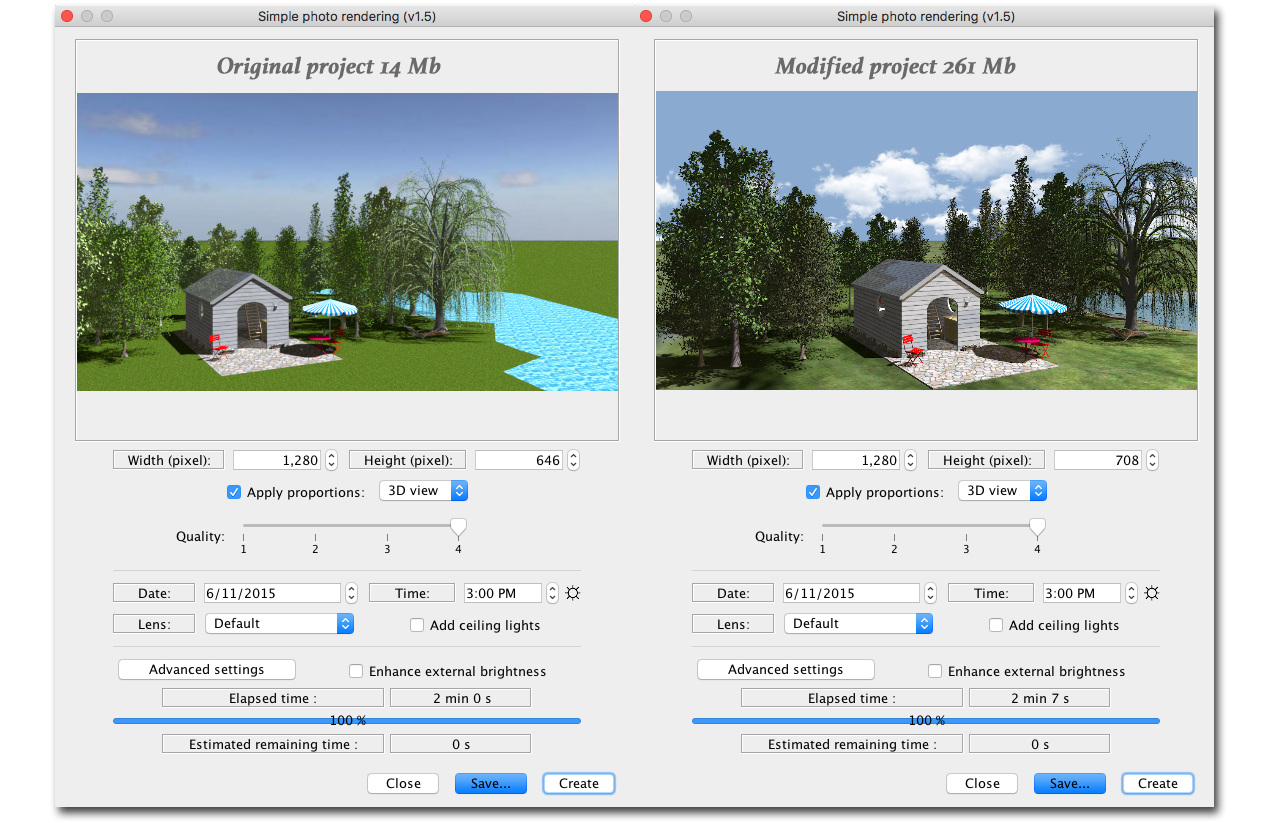
First I will work with SweetHome3DExample9-WoodenShed.sh3d from the gallery – a project file weighing only 13.4 Mb. I have chosen this file because it is very small, yet quite detailed and with a focus on the surroundings. I will only deal with the exterior.
Here is a snapshot of the untouched original project file, rendered with the default render settings for Q4:
The plan is to make some nasty modifications to the project and create a file that is a lot bigger.
The first thing I will do is to delete the water and add a slightly sloped terrain with an immersed pond at the highest point. That will increase the file size with some 100 Mb. Then I will add a ground texture and a sky texture, some gras, stones, plants and so on, plus a terrain to cover the horizon, which will add another 40 Mb. Then I will work on the trees. I will keep them at their current position, but I will add textures to the leaves and get rid of the shininess that's always present in these models. There's a lot of trees, so that probably adds another 30 Mb to the file size. I will also add two new levels: One for the terrain ( at ground level ), and one for things that shall stick up from the terrain, like stones and plants. Then I will elevate the two original levels by what's necessary to make the house level match the height of the terrain. At last I will add a high-res hemisphere to cover the entire construction, but I will keep it invisible until I need it.
After doing all this, the project file is 261.8 Mb : SweetHome3DExample9-WoodenShed-CEC.sh3d This project is made with Version 6 beta 11. It might not render snapshots when opened with older versions.
Everything I have added is marked with a "Z" in front of the name, and will naturally come at the end of a list sorted by name. The "Z"-marked models are my creations. Feel free to grab anything of interest.
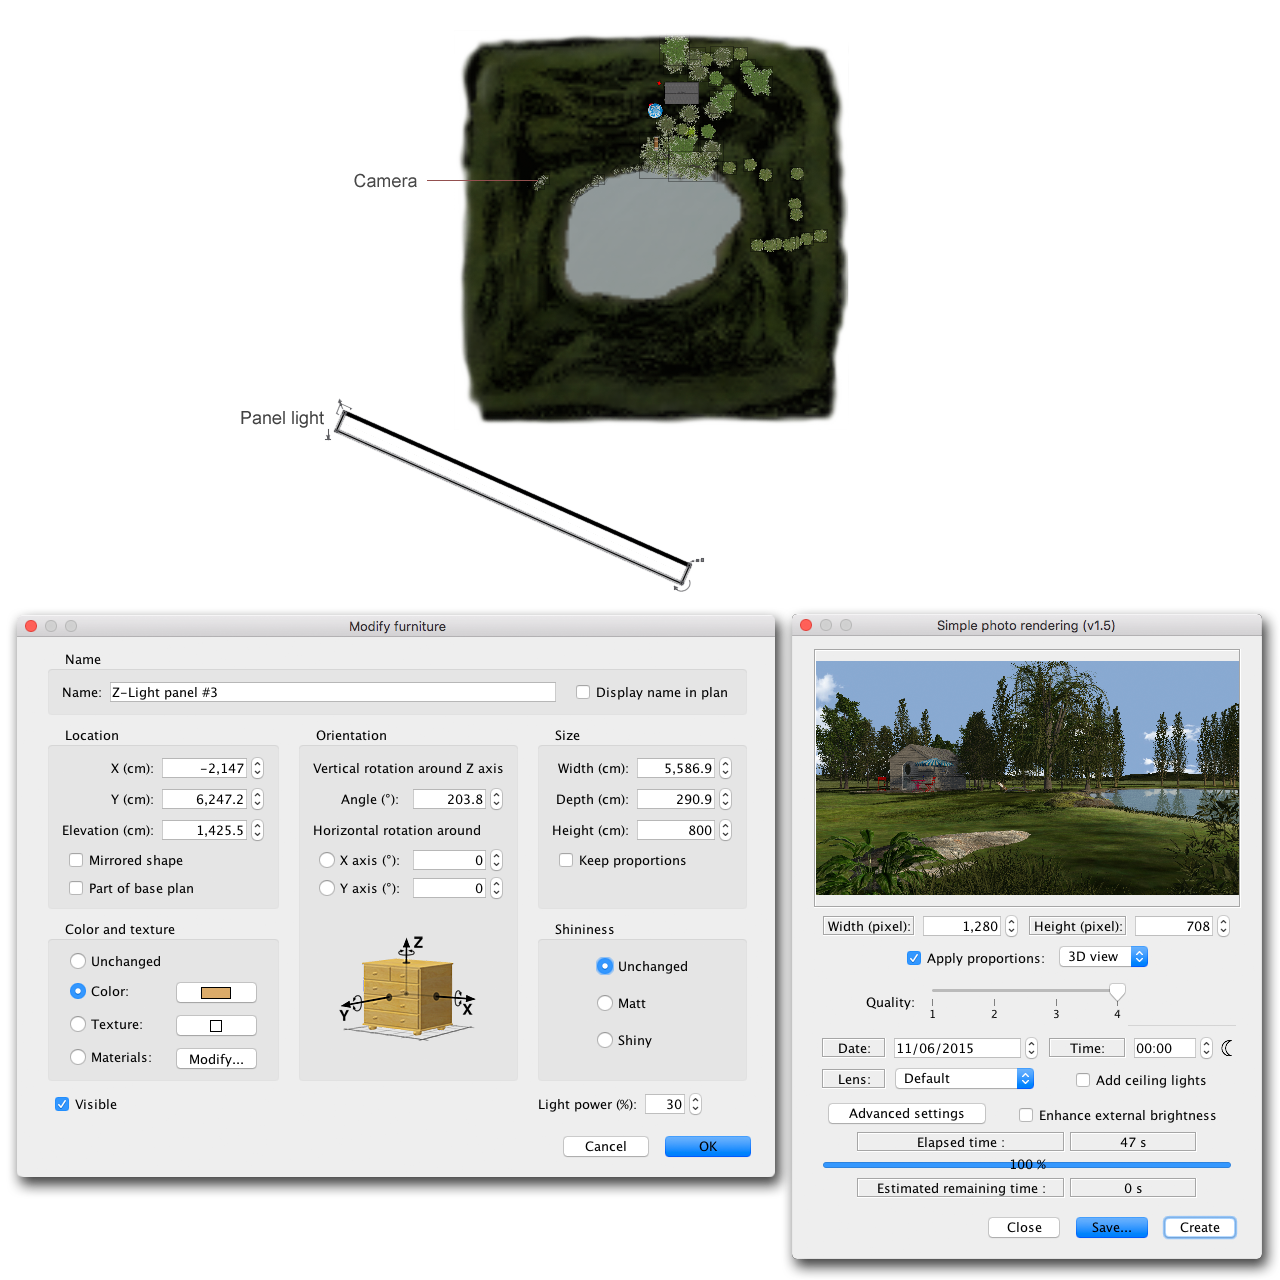
Here is a snapshot of the modified project, shot from the same angle and the same settings as the original:
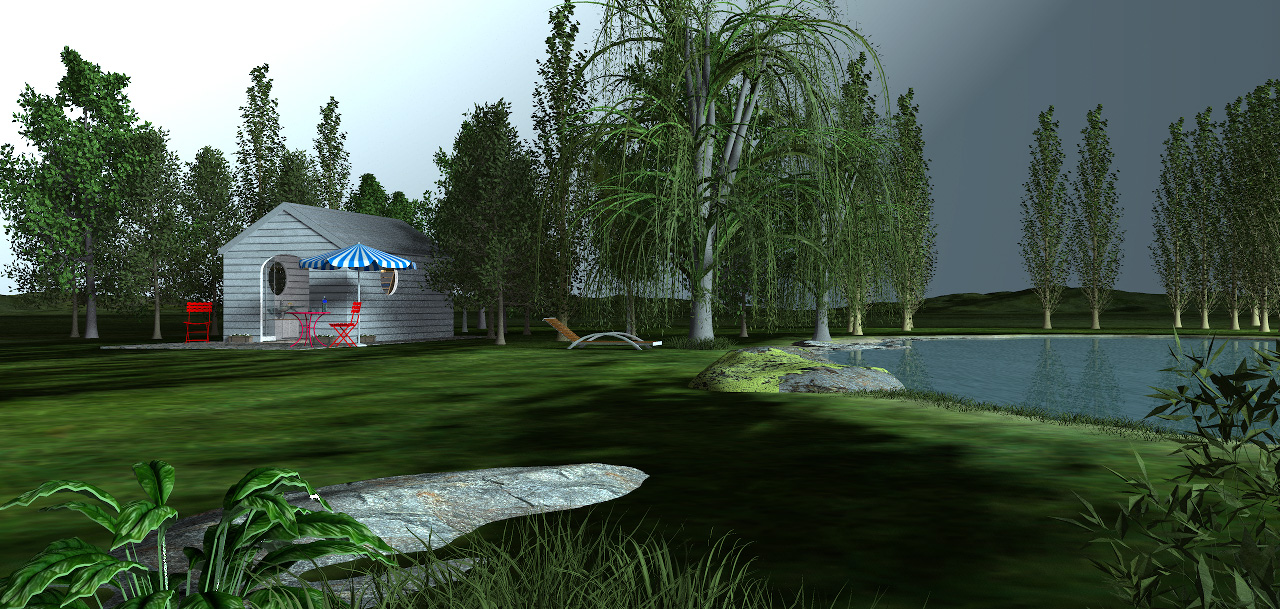
Then it's time to play with lights: First I will add an orange panel light to substitute the sunlight, and set the time to midnight.
Here's the result:
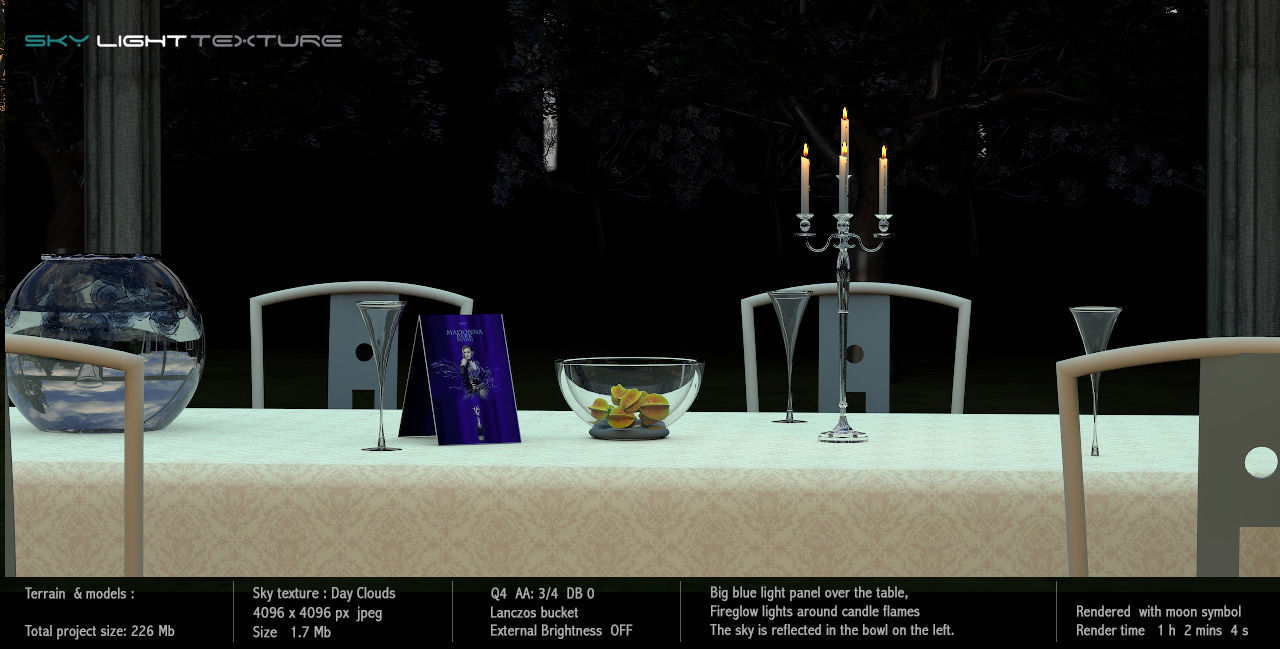
Using a light panel to substitute the sun obviously gives a lot of new lighting options, but what if I place a hemisphere over the entire construction? I can shine a light on it and use it as a sky image...
...and create moods and atmospheres that I sincerely doubt can be created this easily with any other 3D program.
Ahh, yes; what about the rendering time? Well...
NO SUN
One advantage of using light panels for sunlight, is that you don’t have to adjust the compass to change the direction of the sun. Another handy feature is that you can easily mimic the sunlight at any time of day, just by changing the colour and intensity of the panel lights, and rendering with light panels is a lot faster than with the original light sources. (But there’s absolutely no reason to abandon the sphere-lights. They are still invaluable and I use them a lot in my other projects.)
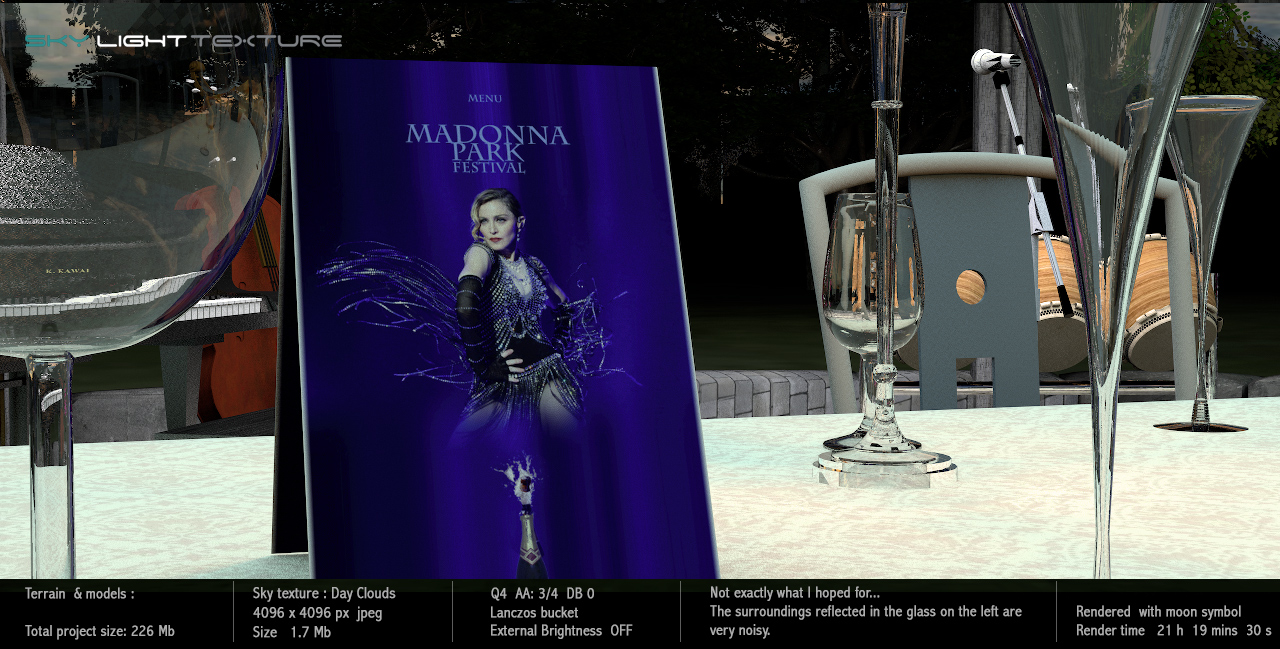
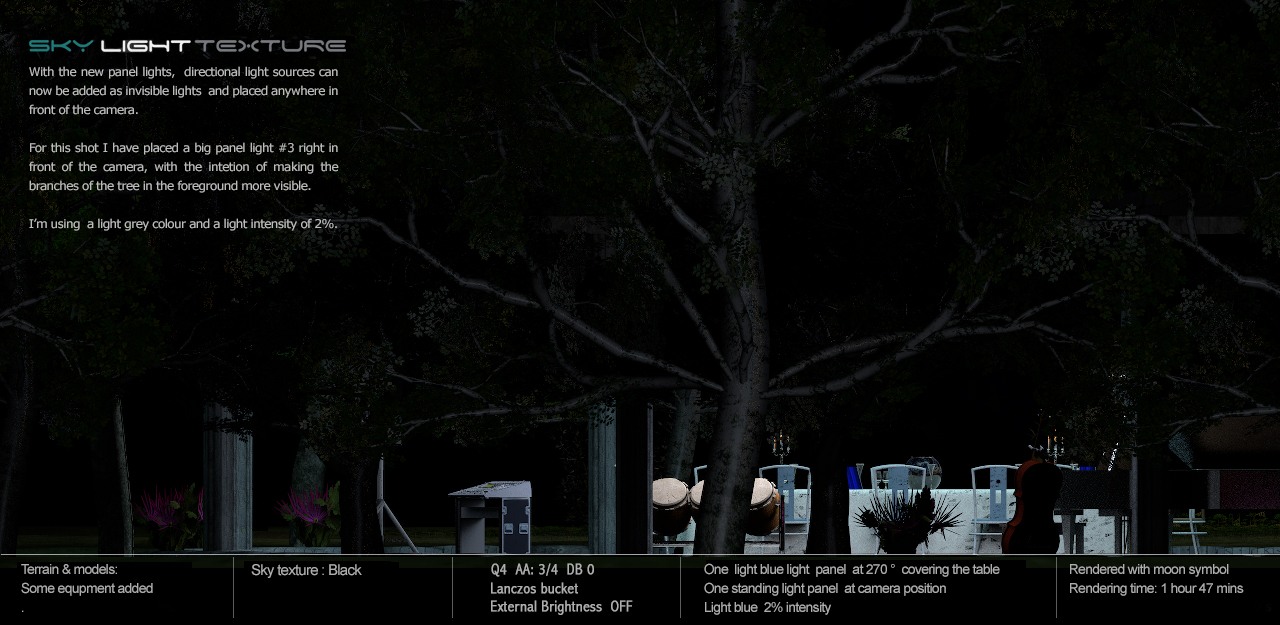
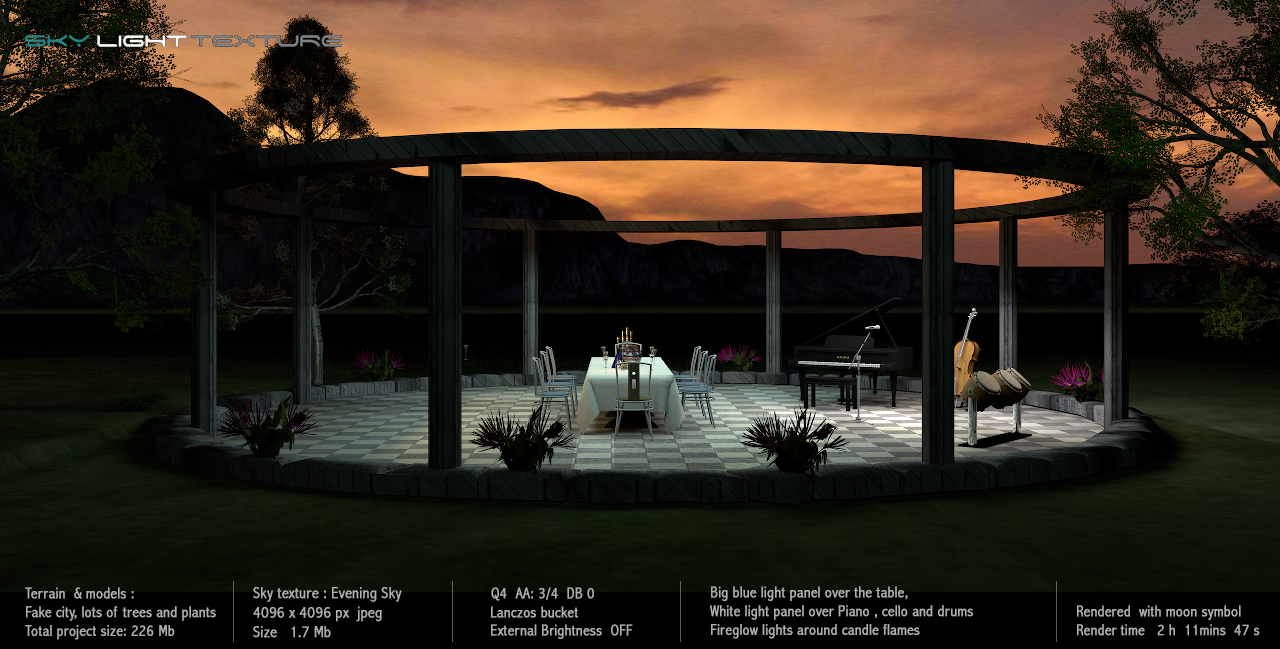
The following snapshots are results of my first experiment with the new light panels. They are all rendered with no sunlight ( moon symbol), and I’m only using light panels.
_____
This is probably common knowledge but let me mention it all the same: Bigger and closer light sources give softer shadows – smaller and farther light sources create sharper shadows. And just as when using light-filters in real life, variations in the light intensity will alter the effect of the colour-settings. It’s useful to have the right filters when blending the new light sources with the sphere lights. The filter temperatures for some of the most used sphere lights that comes with the program can be found here. Make a note of the RGB-values – never use the eyedropper to sample colours from SRGB jpgs.
_____
In part four I will show some examples and write a few words about creating textures.
Cec
----------------------------------------
[Edit 2 times,
last edit by Ceciliabr at Oct 3, 2018, 7:18:15 PM]