Russia
Joined: Aug 13, 2022
Post Count: 568
Status:
Offline
Re: Apartment project with lighting by invisible hemispheres. I continue advertising
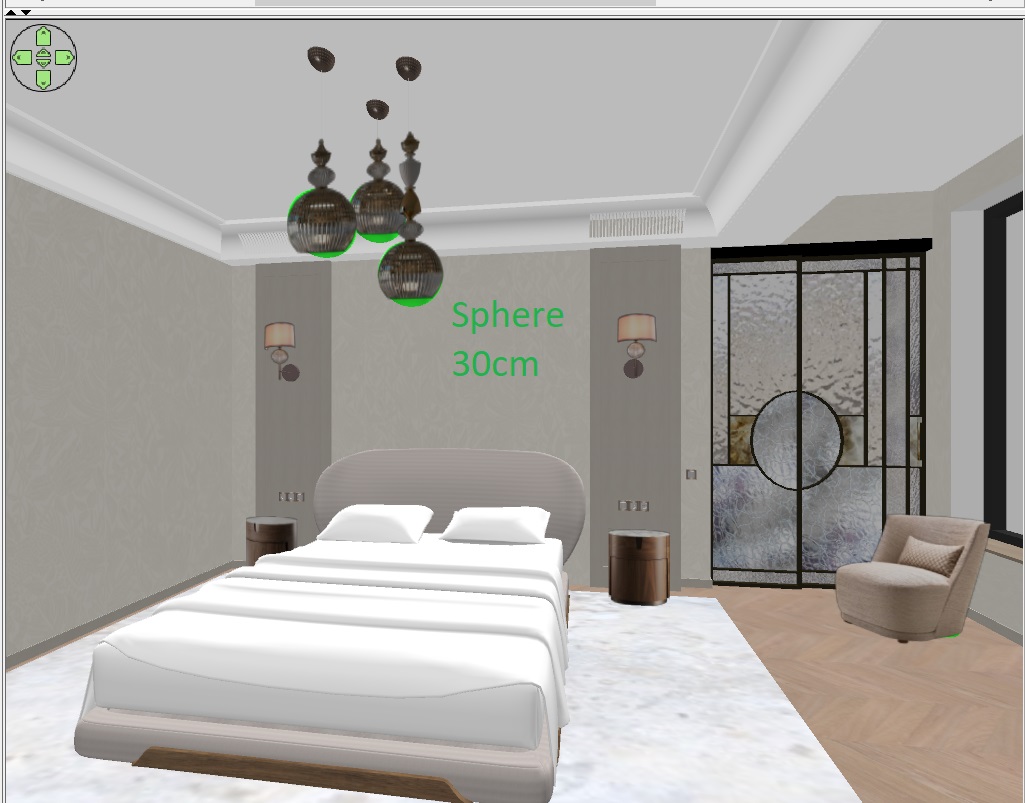
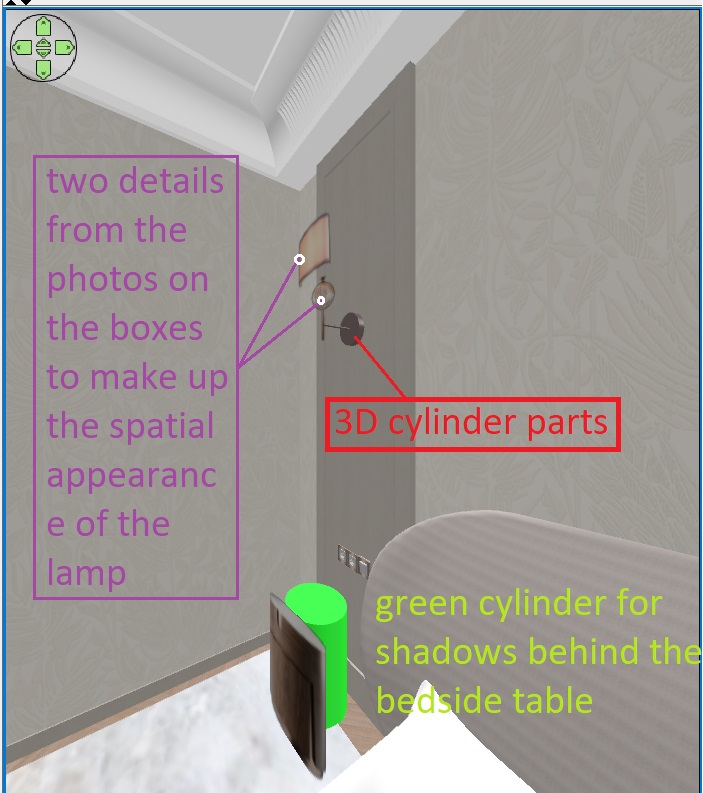
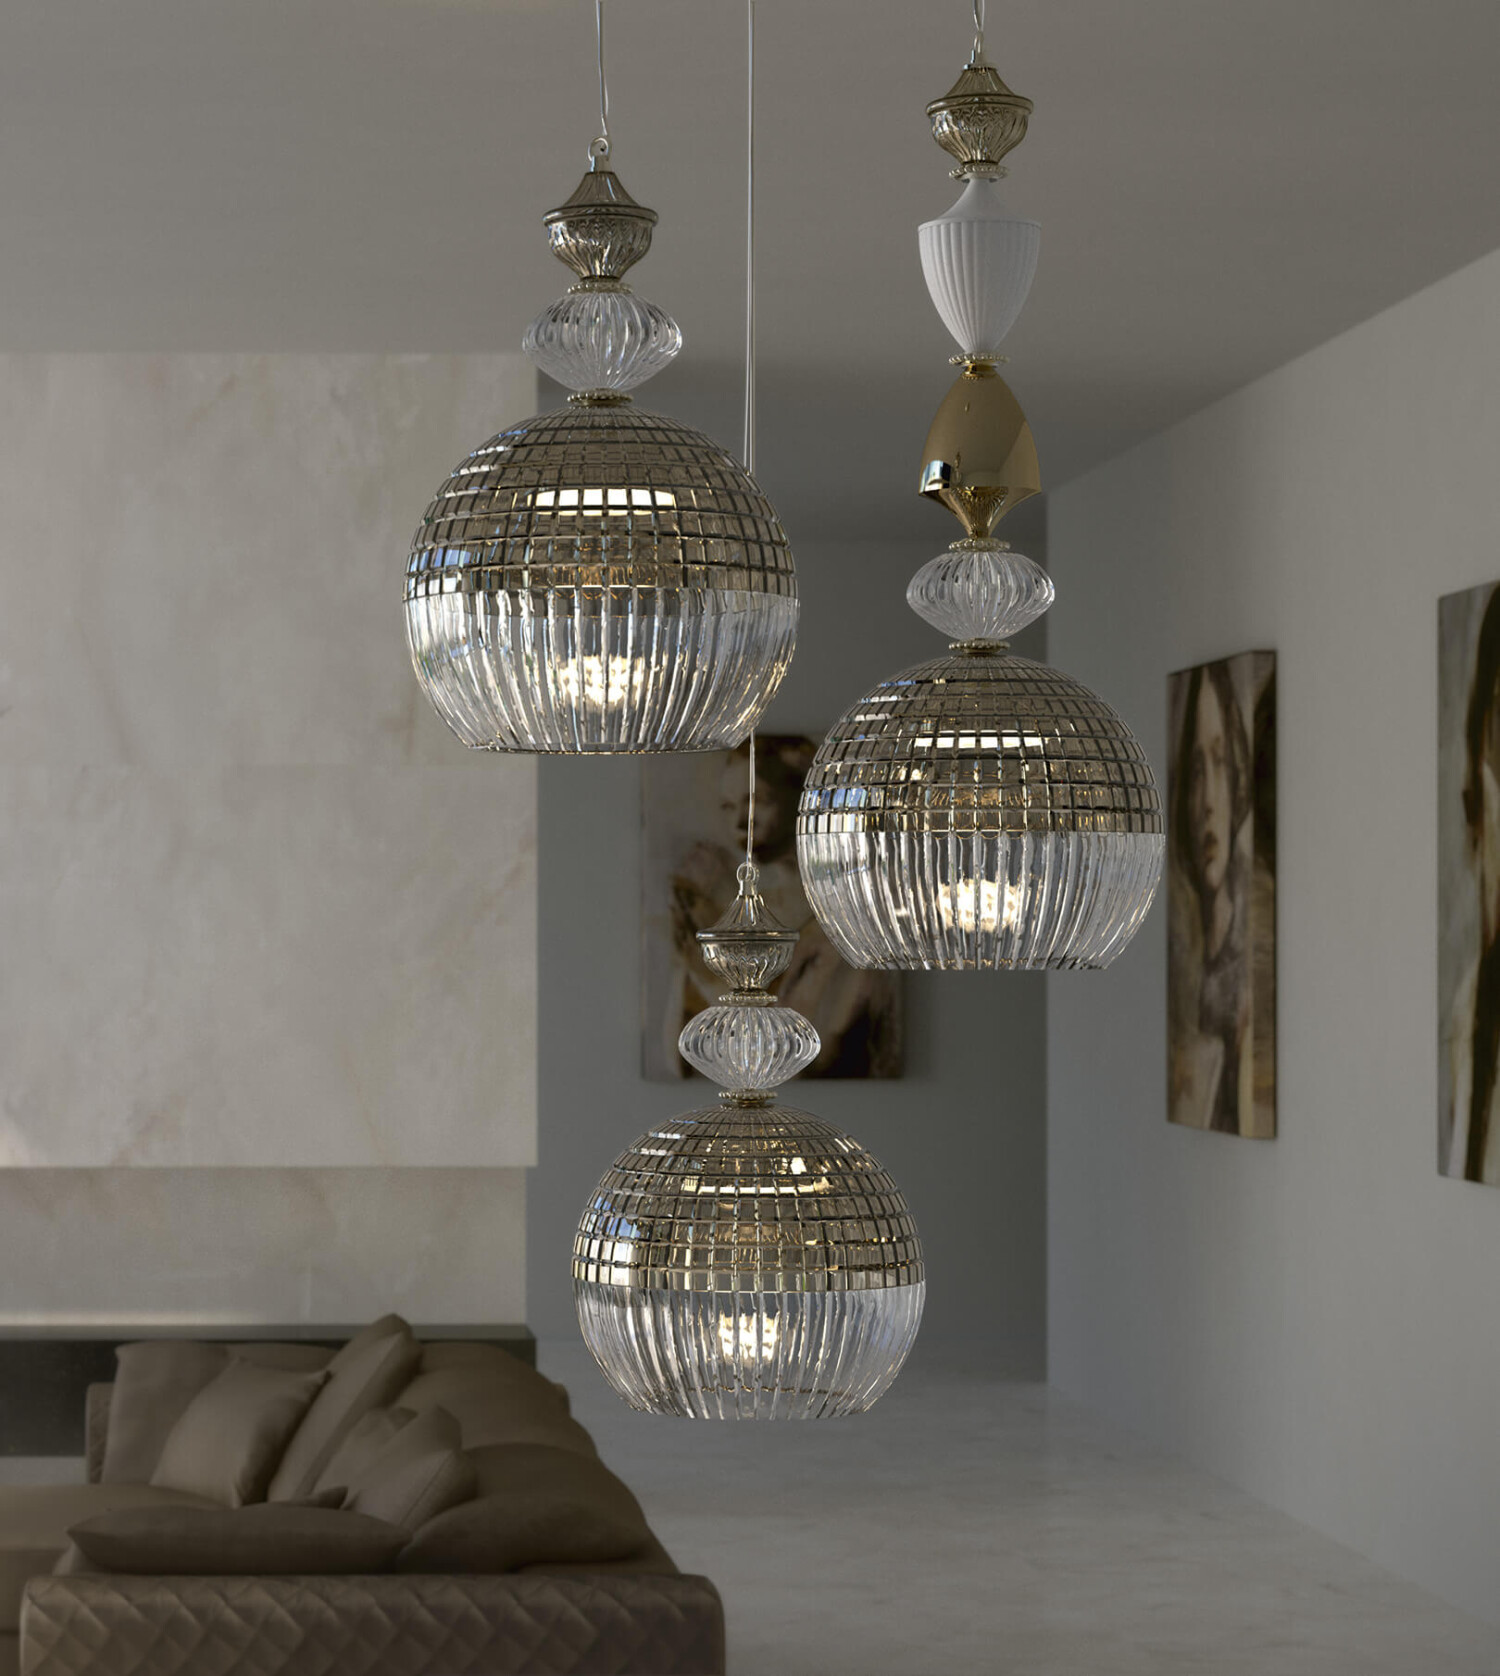
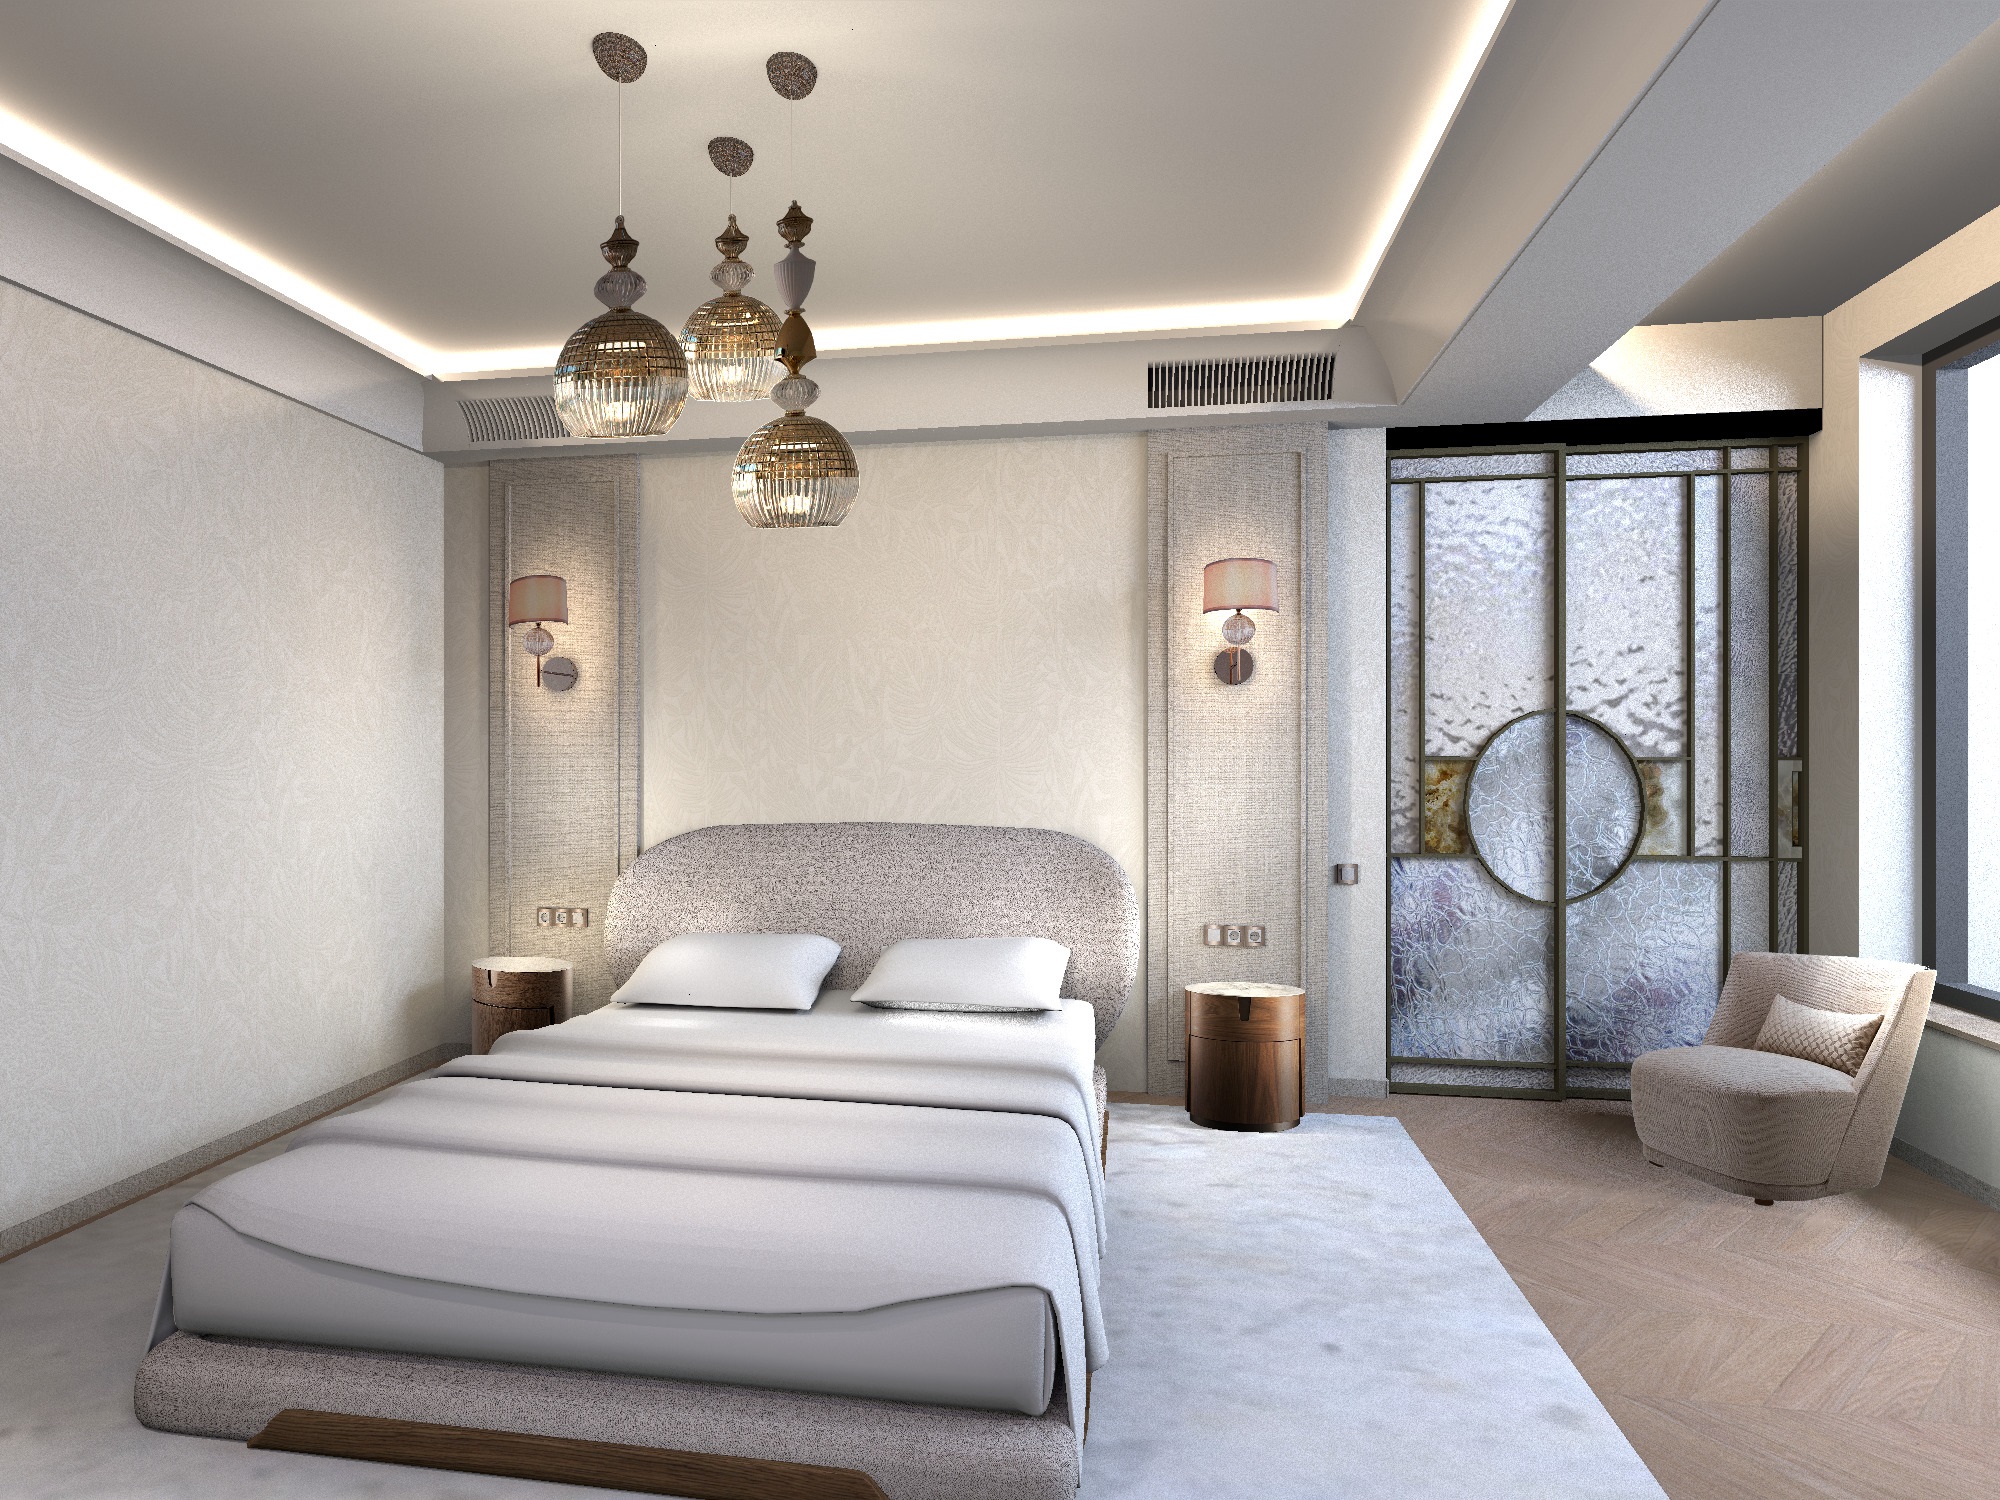
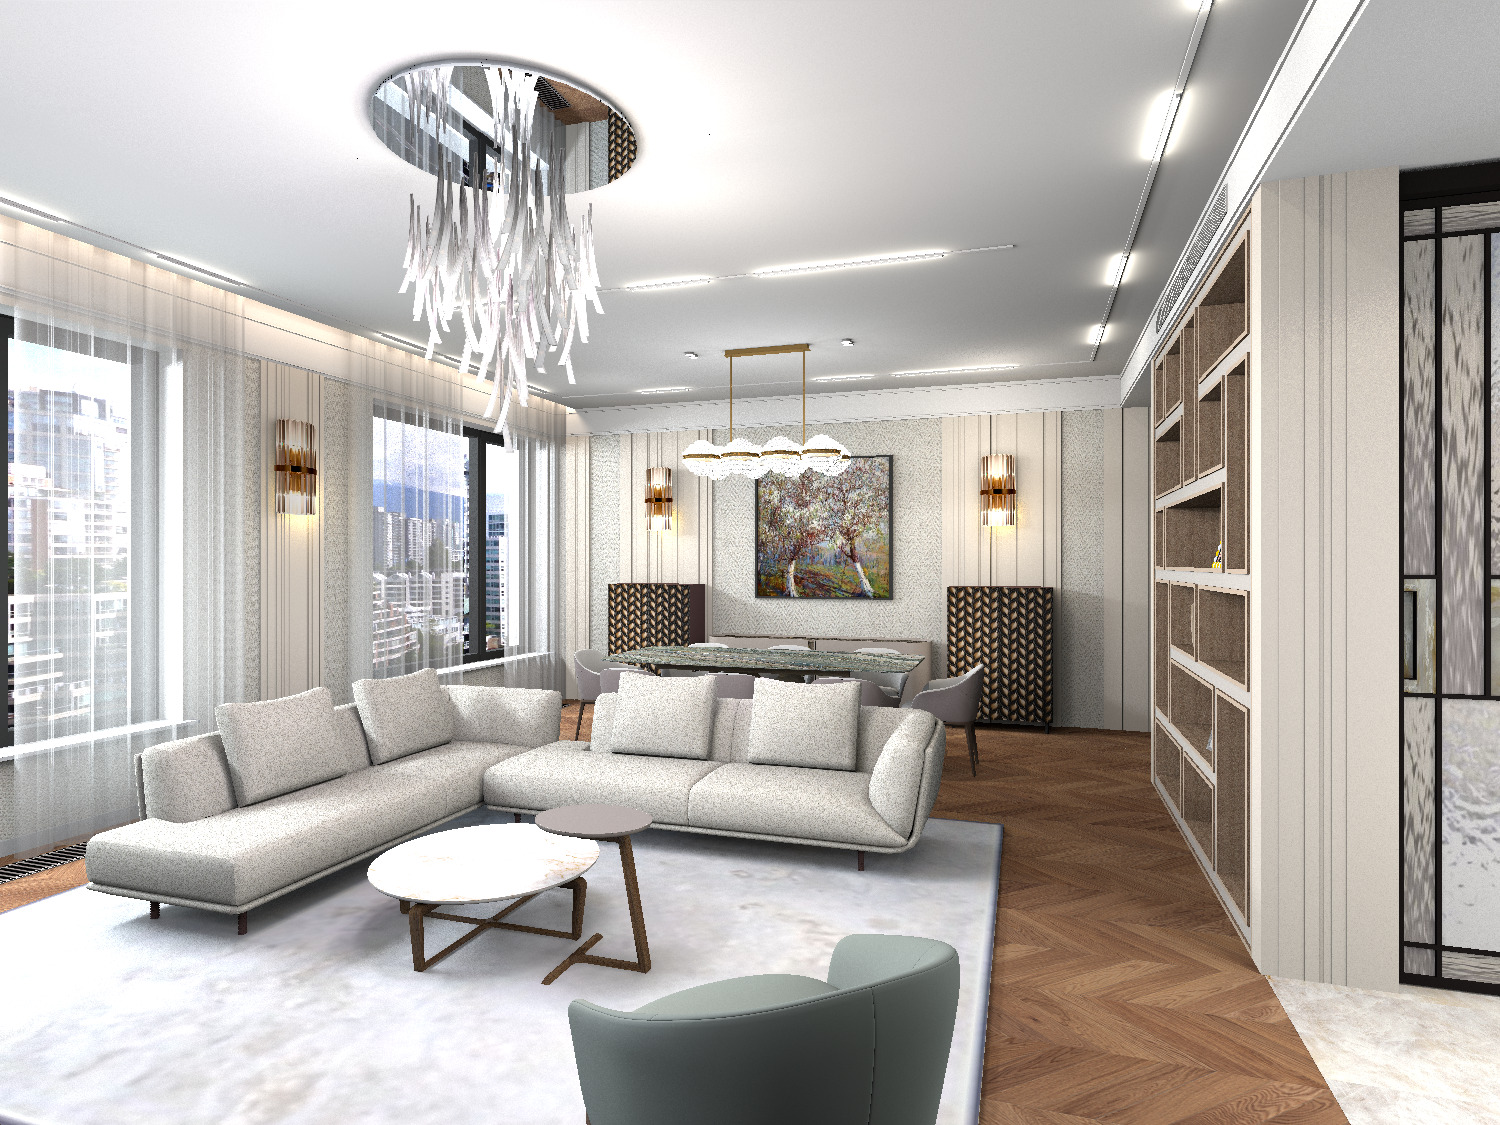
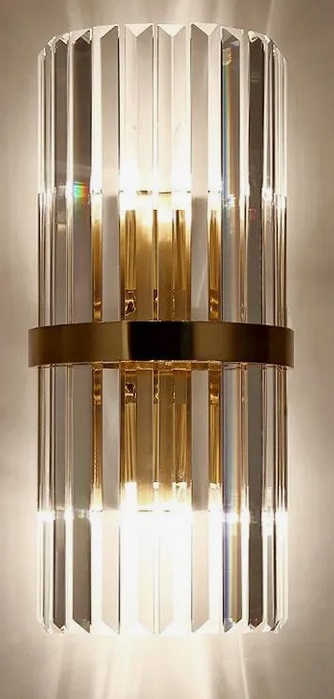
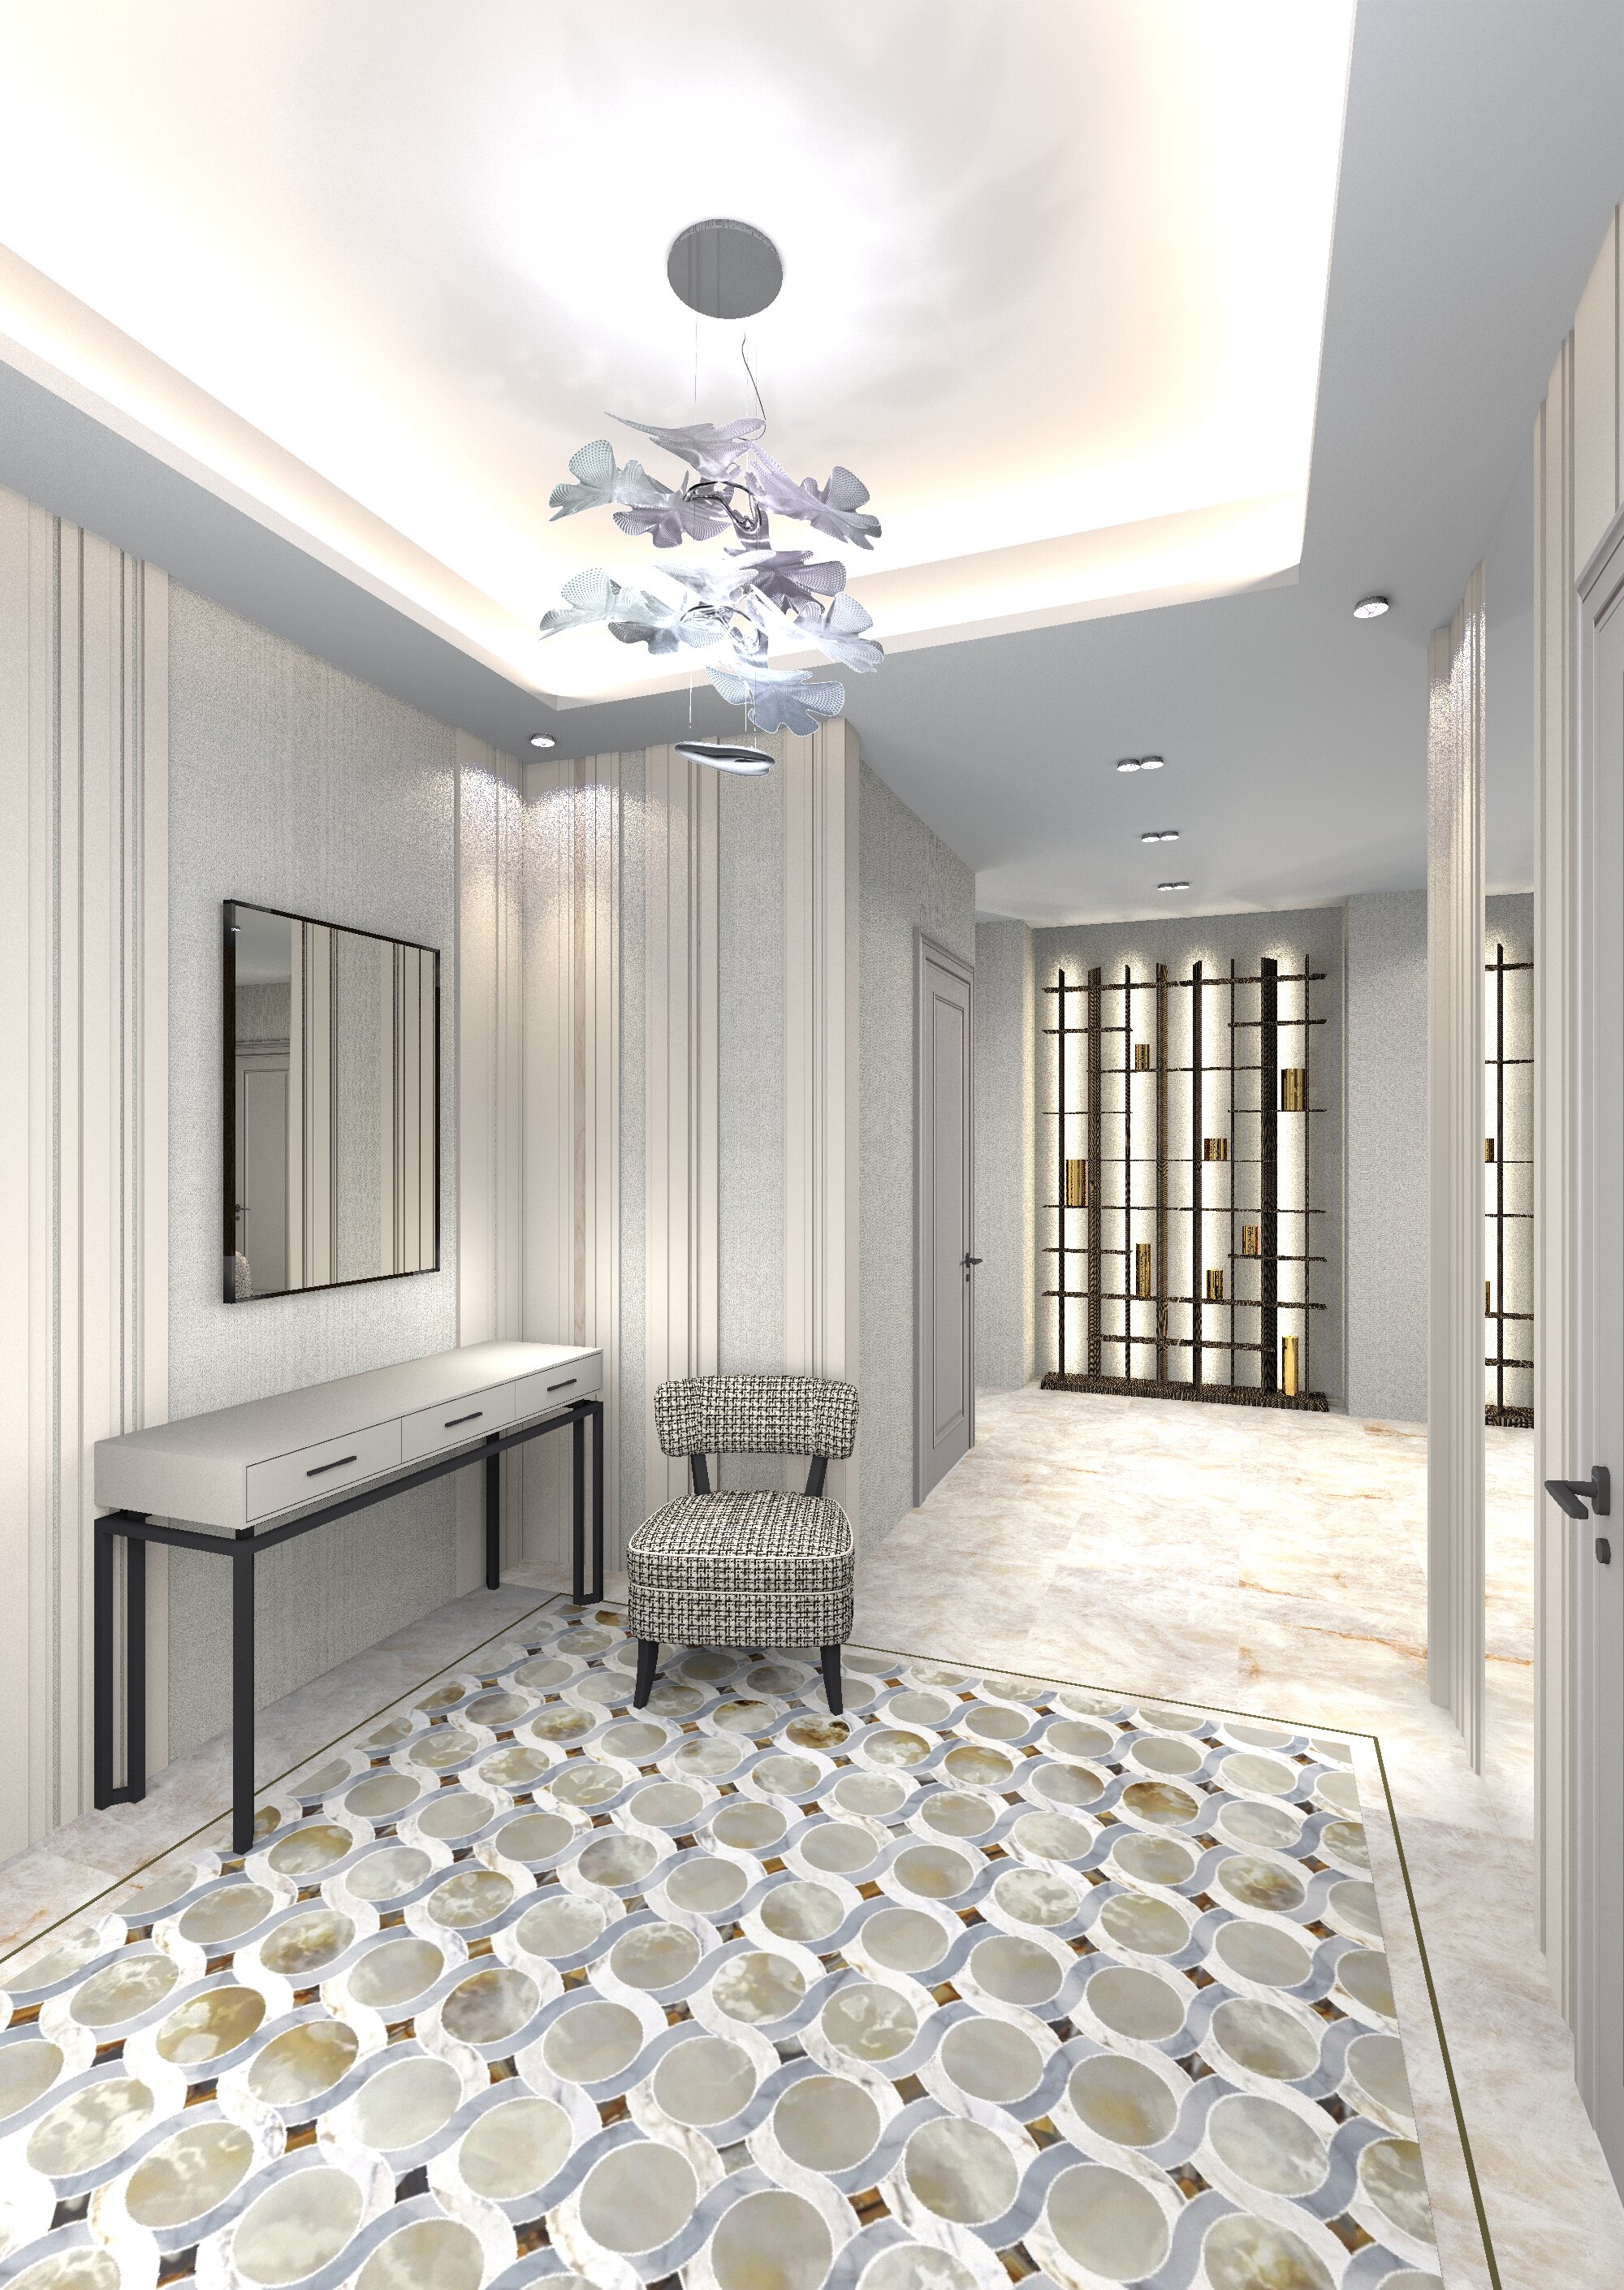
Here I decided to do almost everything with the help of photos on the boxes, the 3d model is just the bed. All the lamps, bedside tables, and armchair are PNG photos. For example, a chandelier. I prepared three lamps on a transparent background from the general photo, I needed to arrange them in a different order. The main volume of each lamp is a round glass shade with a diameter of 30 cm. C arranged the green template spheres in the right order at their heights. I put up boxes of photographs in front of them, stretched these boxes while maintaining the proportions so that the photos exactly match the green templates in terms of the dimensions of the ceiling lights. I lifted the boxes to the required height. After that, I prepared a group of a sphere and a thin cylinder (these will be 3D details of a cup and cord for each lamp, they create the impression of a real spatial model of a chandelier). The sconce also consists of a 3D base element and two separate photographs of a lampshade and a vertical stick with a hanging ball are attached to it. The real wall lamp model, for example, weighs 256MB, horror. And this imitation doesn't weigh anything. And the wall lamp can be viewed from different angles, because there is a 3D element that creates the appearance of a spatial model. The photo boxes are highlighted with narrow colored hemispheres at the ends, so you get bright photos from the right edge. To make the bedside tables and the armchair cast shadows on the walls, I placed bright green real cylinders behind the boxes of photographs, carefully reduced them so that they were not visible in the frame behind the photographs. They cast shadows as if from bedside tables and armchairs. This picture with a complex heavy bed model took 5 hours to load, with heavy lamp models it probably wouldn't have started at all, and I didn't try. I made a mistake, I had to flip the mirror photo of the chandeliers, the light comes from the window. But for me, on the contrary, I did not notice.
Here, too, the chandelier and sconces are made with the help of photographs. I realized that if you combine 3D spatial details and objects with photographs, you can imperceptibly create very complex interiors that can be processed by the SH3D program.
Russia
Joined: Aug 13, 2022
Post Count: 568
Status:
Offline
Re: Apartment project with lighting by invisible hemispheres. I continue advertising
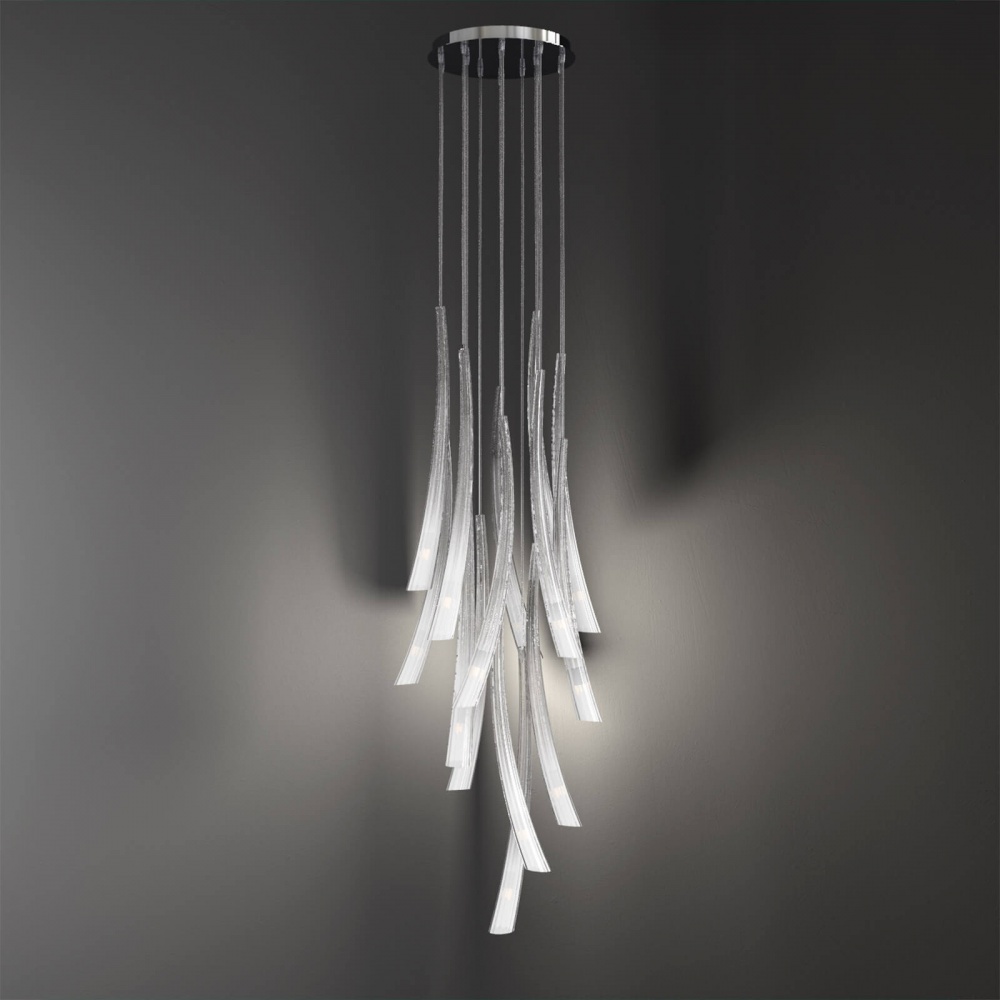
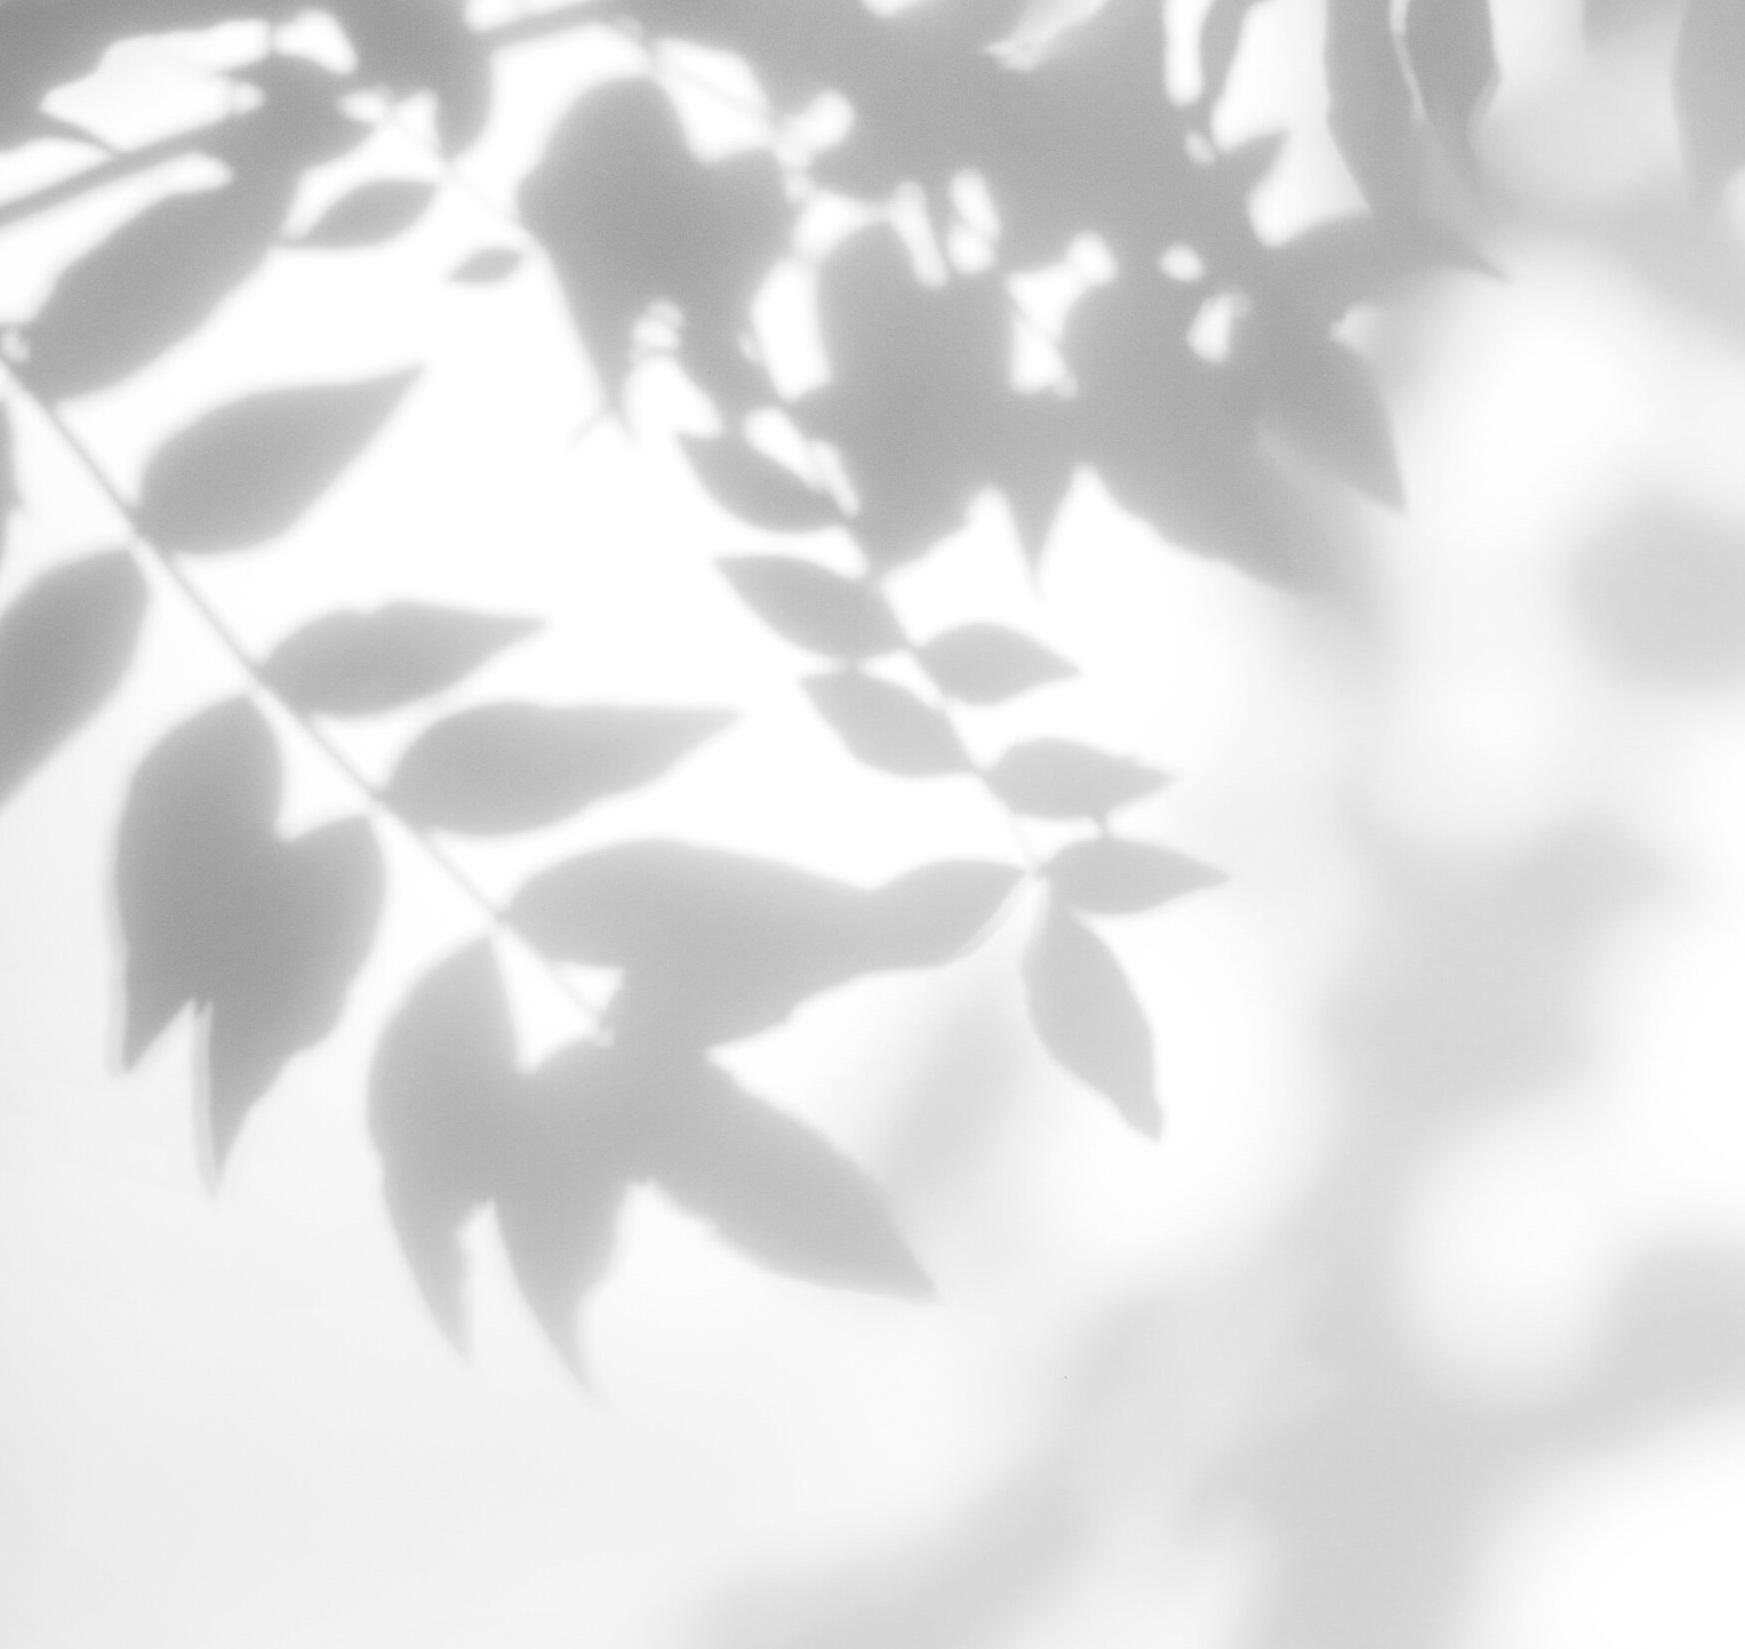
I made a complicated glass chandelier, but I couldn't find a 3D model for it. applied the photo. and I also tried to make shadows on the ceiling. I took a drawing with leaves, made a blurred edge and reduced the transparency to 10%. I placed everything under the ceiling.
France
Joined: Oct 20, 2017
Post Count: 312
Status:
Offline
Re: Apartment project with lighting by invisible hemispheres. I continue advertising
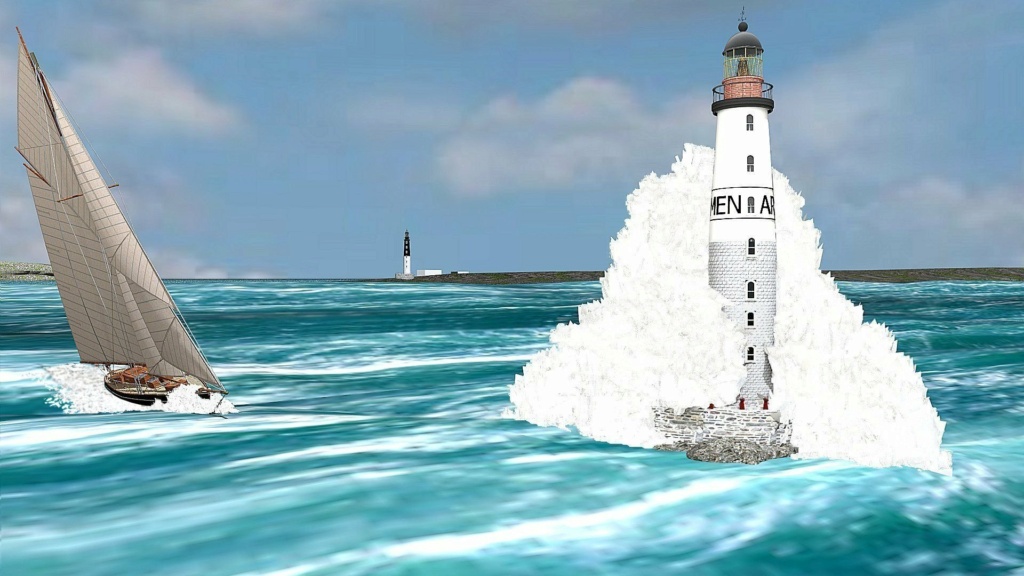
Comme d'habitude, ce que vous réalisez est vraiment magnifique. Et l'idée d'utiliser des feuilles d'arbre pour créer le lustre est excellente. Les divers modèles de végétaux offrent parfois des possibilités inattendues dans des domaines très différents comme celui de pouvoir créer l'écume de vagues par exemple.
En tous cas, je ne me lasse pas de découvrir vos créations.
----------------------------------------
[Edit 1 times,
last edit by captaincook at Feb 27, 2025, 3:45:42 PM]
Russia
Joined: Aug 13, 2022
Post Count: 568
Status:
Offline
Re: Apartment project with lighting by invisible hemispheres. I continue advertising
Merci beaucoup captaincook. Je dois avouer que votre travail est hors de portée pour le moment. Je ne comprends même pas beaucoup comment vous le faites. Je vais continuer à apprendre de vos emplois, merci!! C'est merveilleux qu'il existe un tel programme où vous pouvez faire de la créativité. j'attends vos nouveaux travaux. Il y a une minute, Le Cam a sifflé.
Russia
Joined: Aug 13, 2022
Post Count: 568
Status:
Offline
Re: Apartment project with lighting by invisible hemispheres. I continue advertising
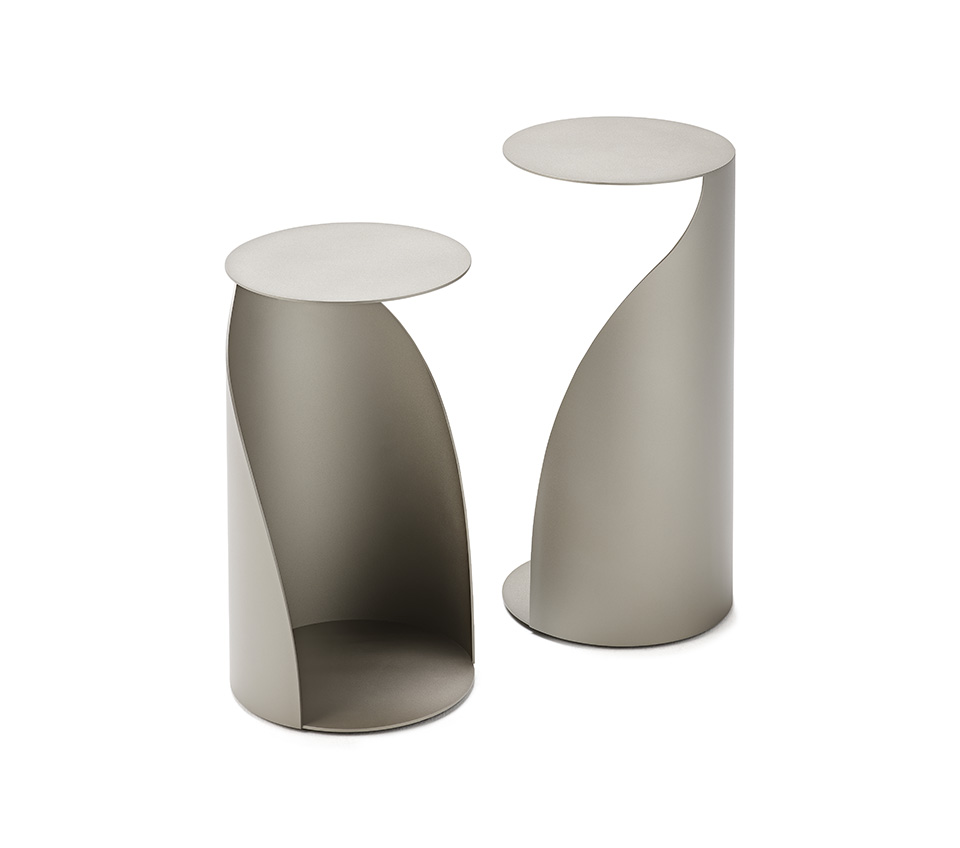
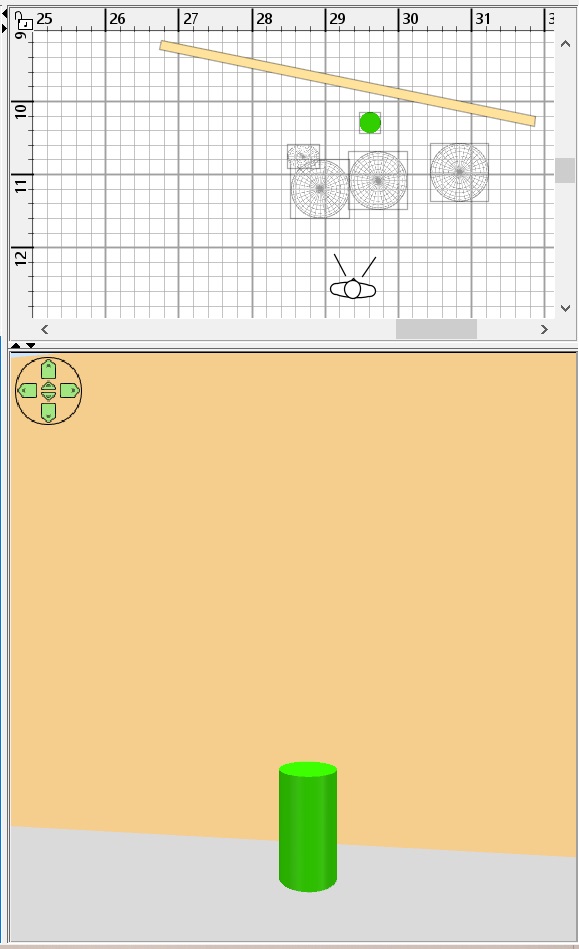
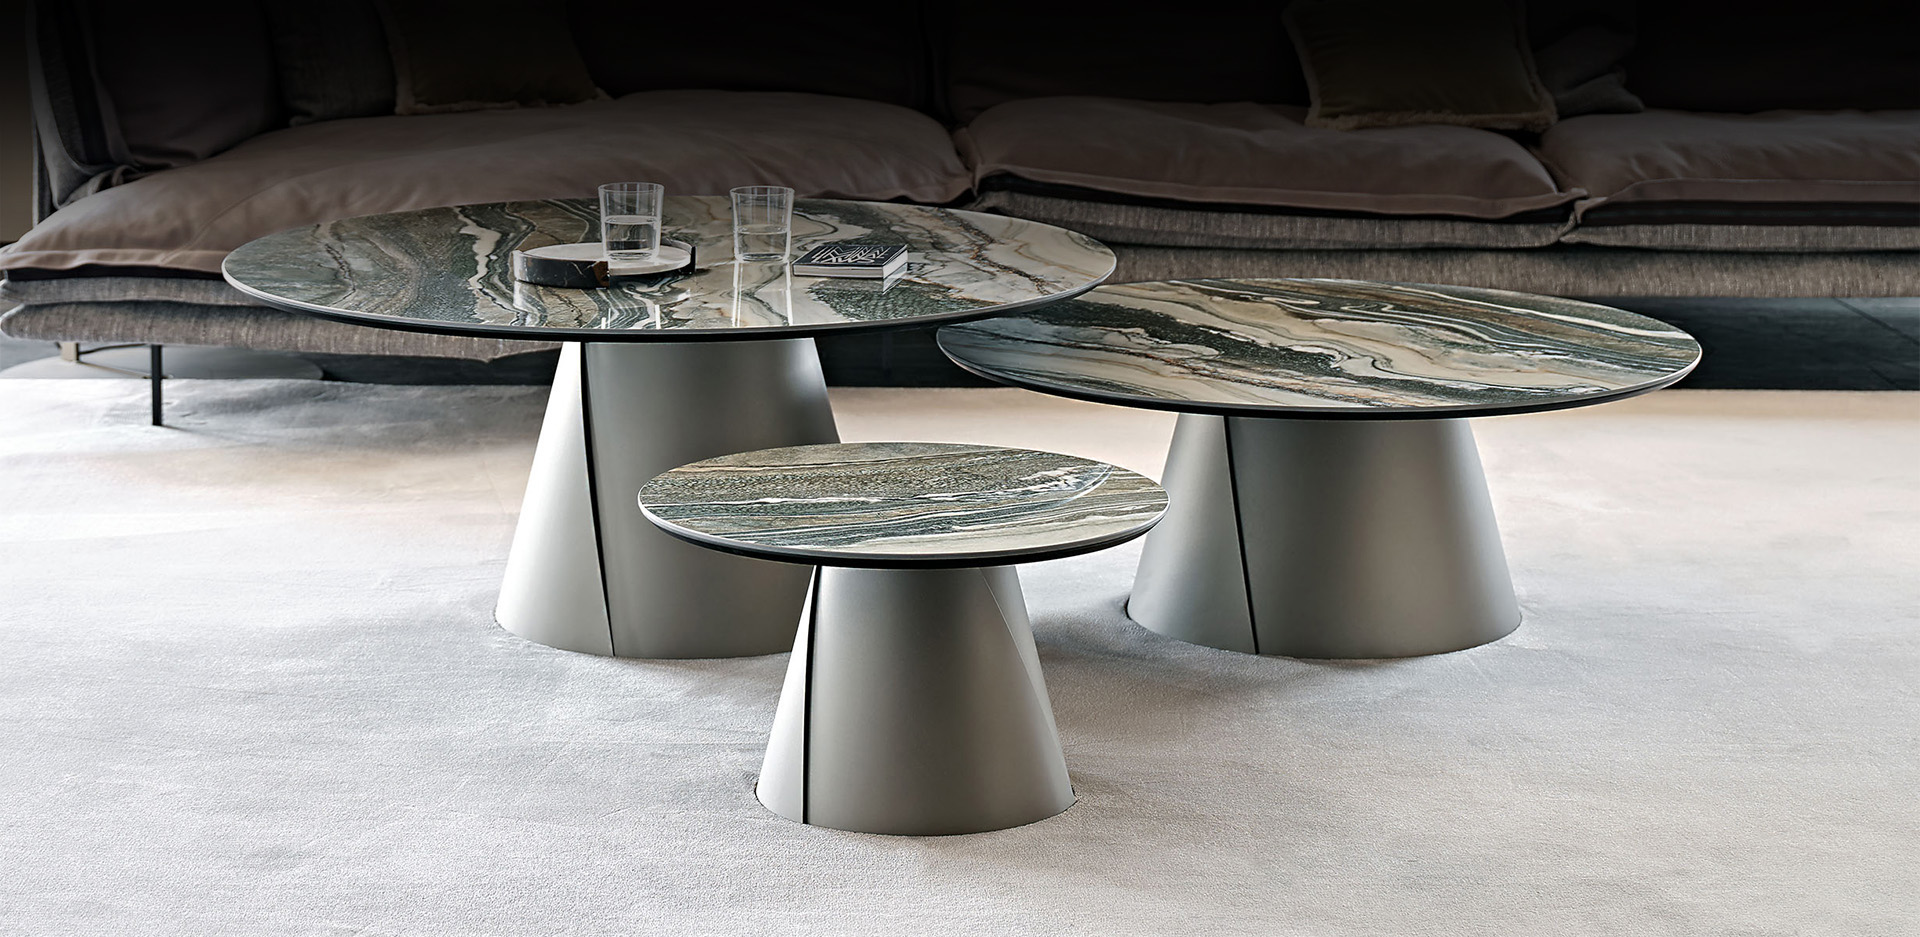
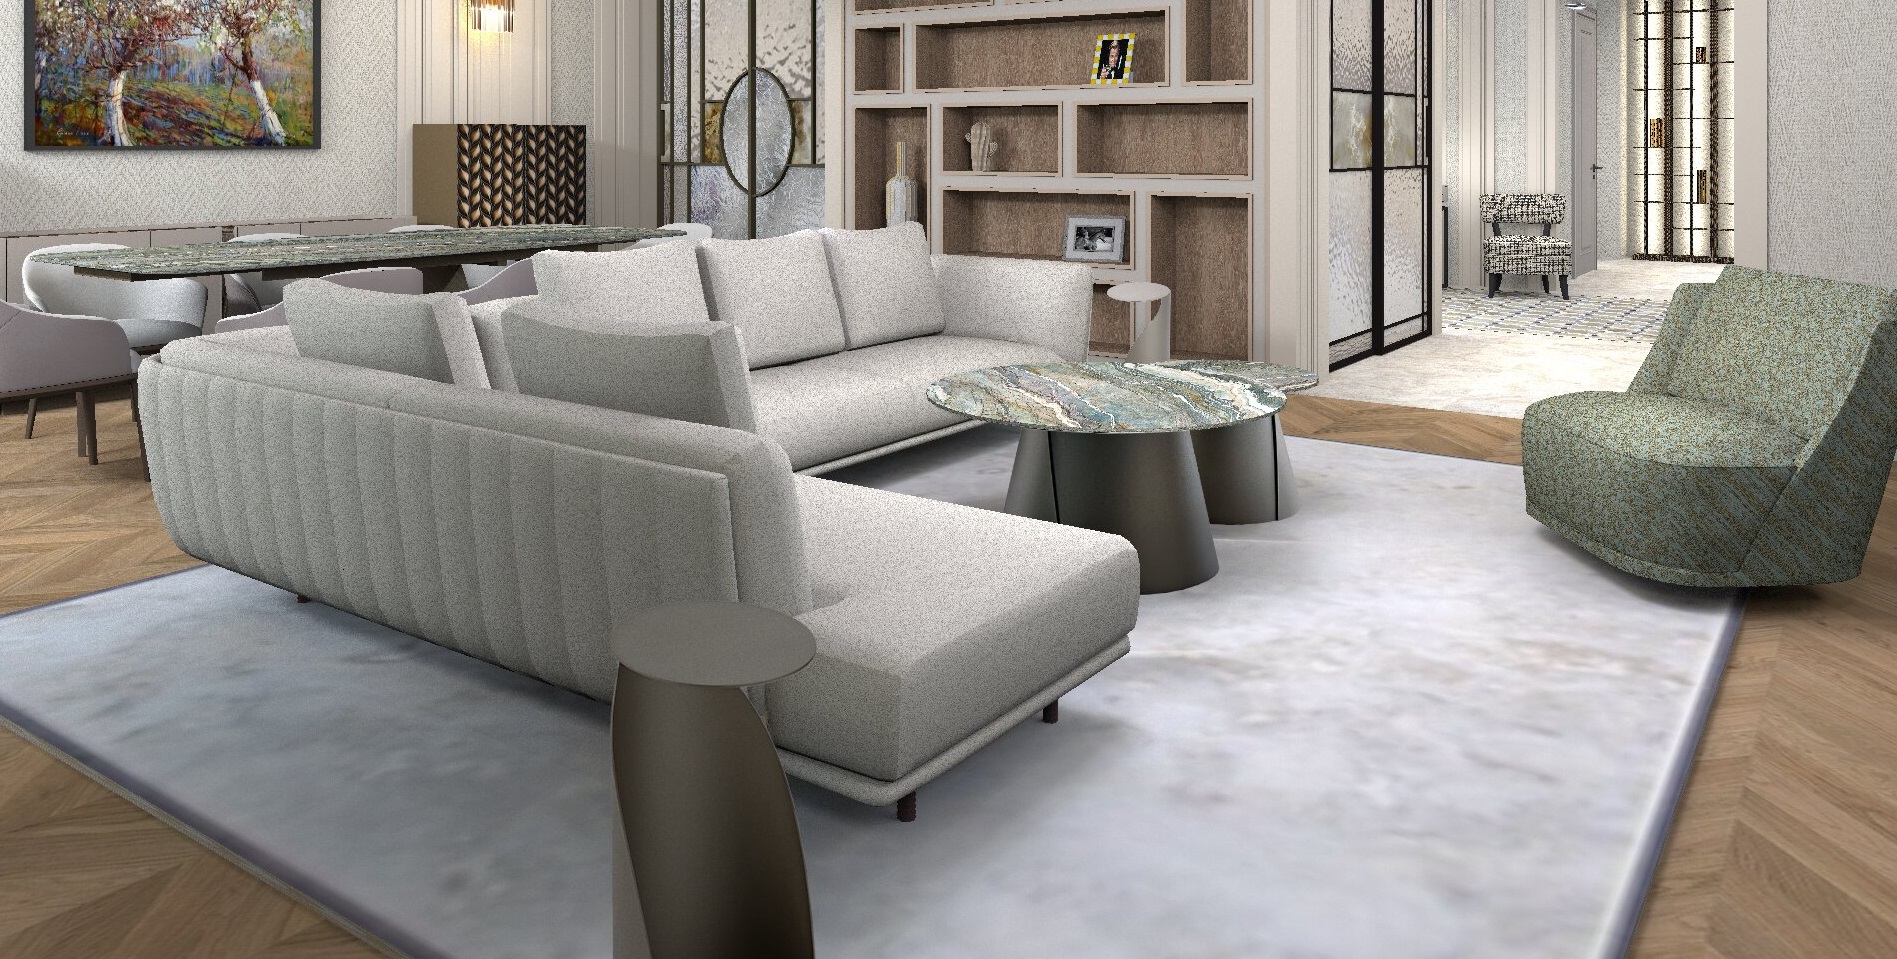
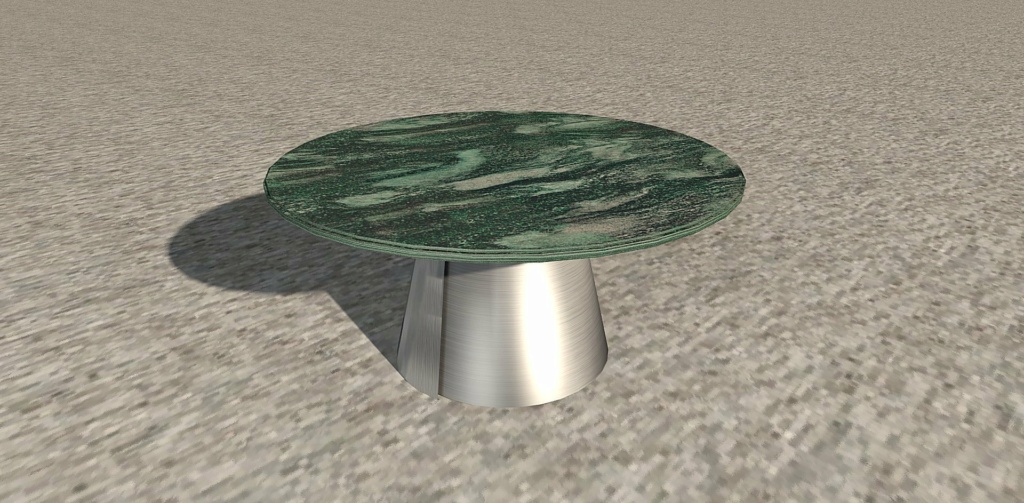
I'm thrilled with this way of taking photos on boxes. No need to look for models. I took two Cattelan coffee tables. Divided it into two separate images. I'll show you how to do it using the example of the table on the right. Its dimensions in reality are 29x29x54cm.
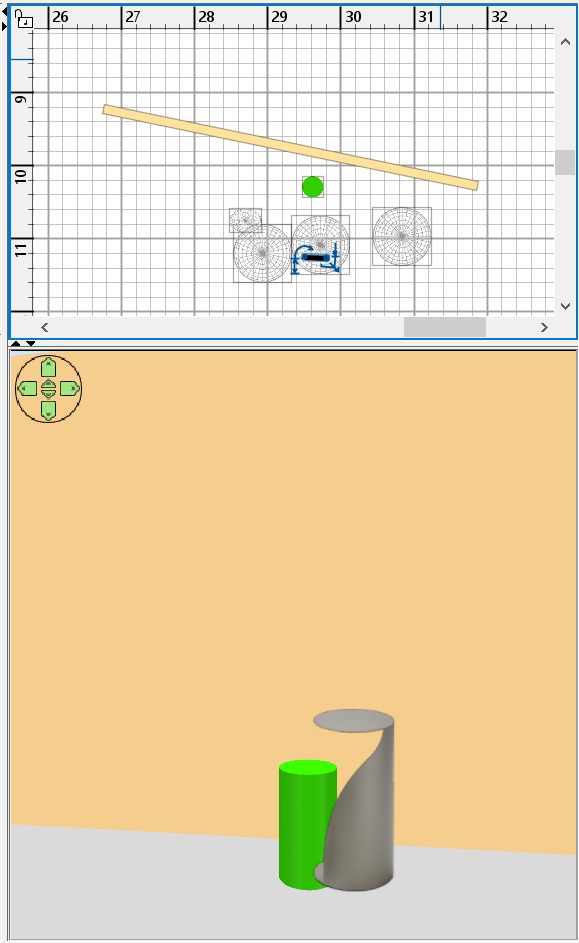
I cleared the background around the table and saved it in PNG. Now you need to create a bright colored cylinder as a template, put it in the place where the real table should be. The dimensions of the cylinder are like those of the table 29x29kh54.
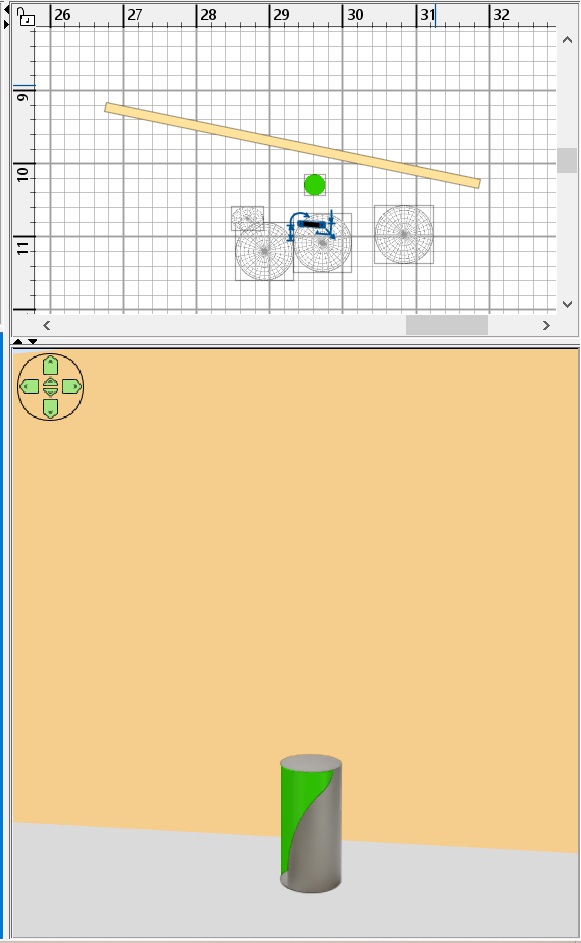
create a thin box with aspect ratios like a PNG image. I have it 30x54cm. Make all sides except the front invisible. The box should not be very close to the cylinder template, on the contrary. The further away from the template and higher above the floor, the better. Less unnecessary shadows from the box and PNG. carefully combine the image and the template.
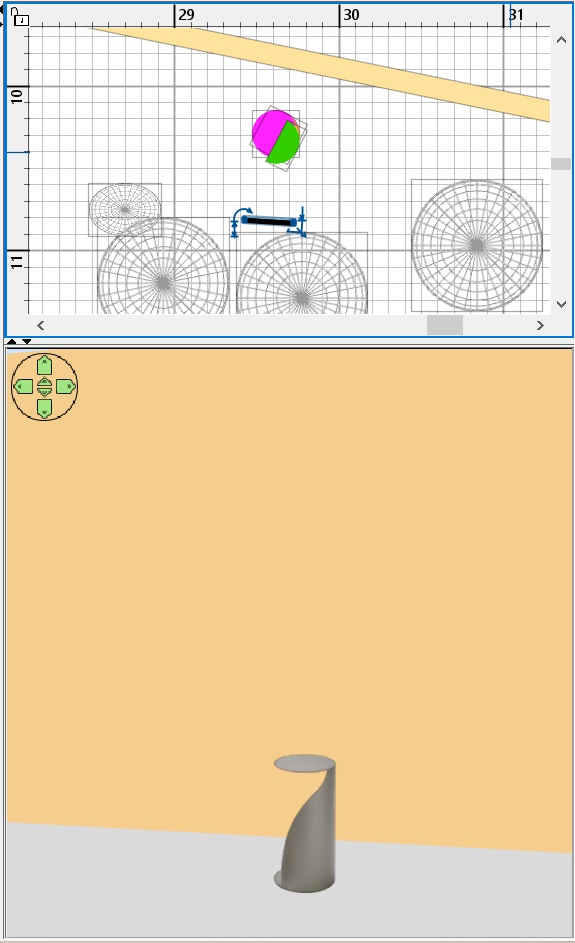
now, in place of the cylinder, you need to create a group of primitives that more accurately repeat the real table. Such primitives are available on the Dodecagon website, there are hemispheres, half-cylinders, and cut cones. Thanks Keet. All of this is great for creating a duplicate in rough form. The task of this group of figures is to cast shadows on the walls and floor. Combine this set and the PNG so that nothing sticks out over the edges of the image. And of course now we don't need a cylinder.
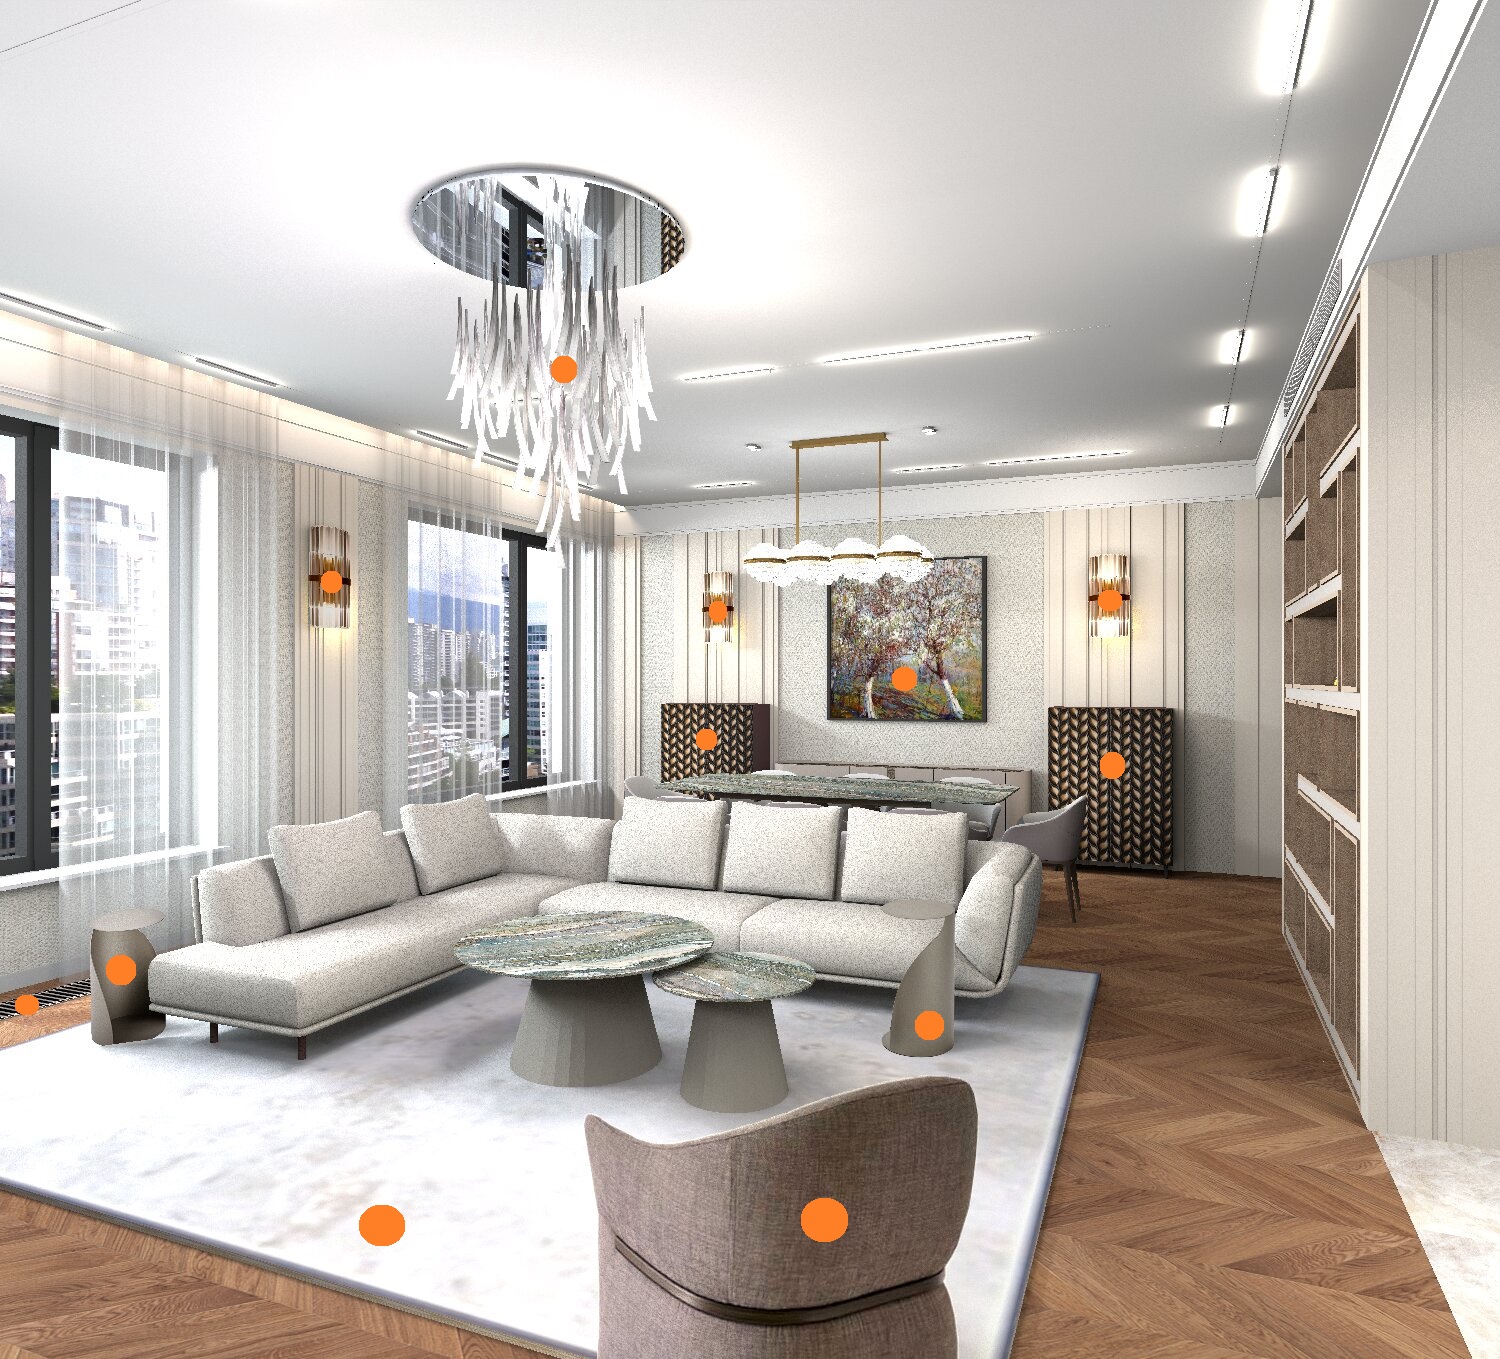
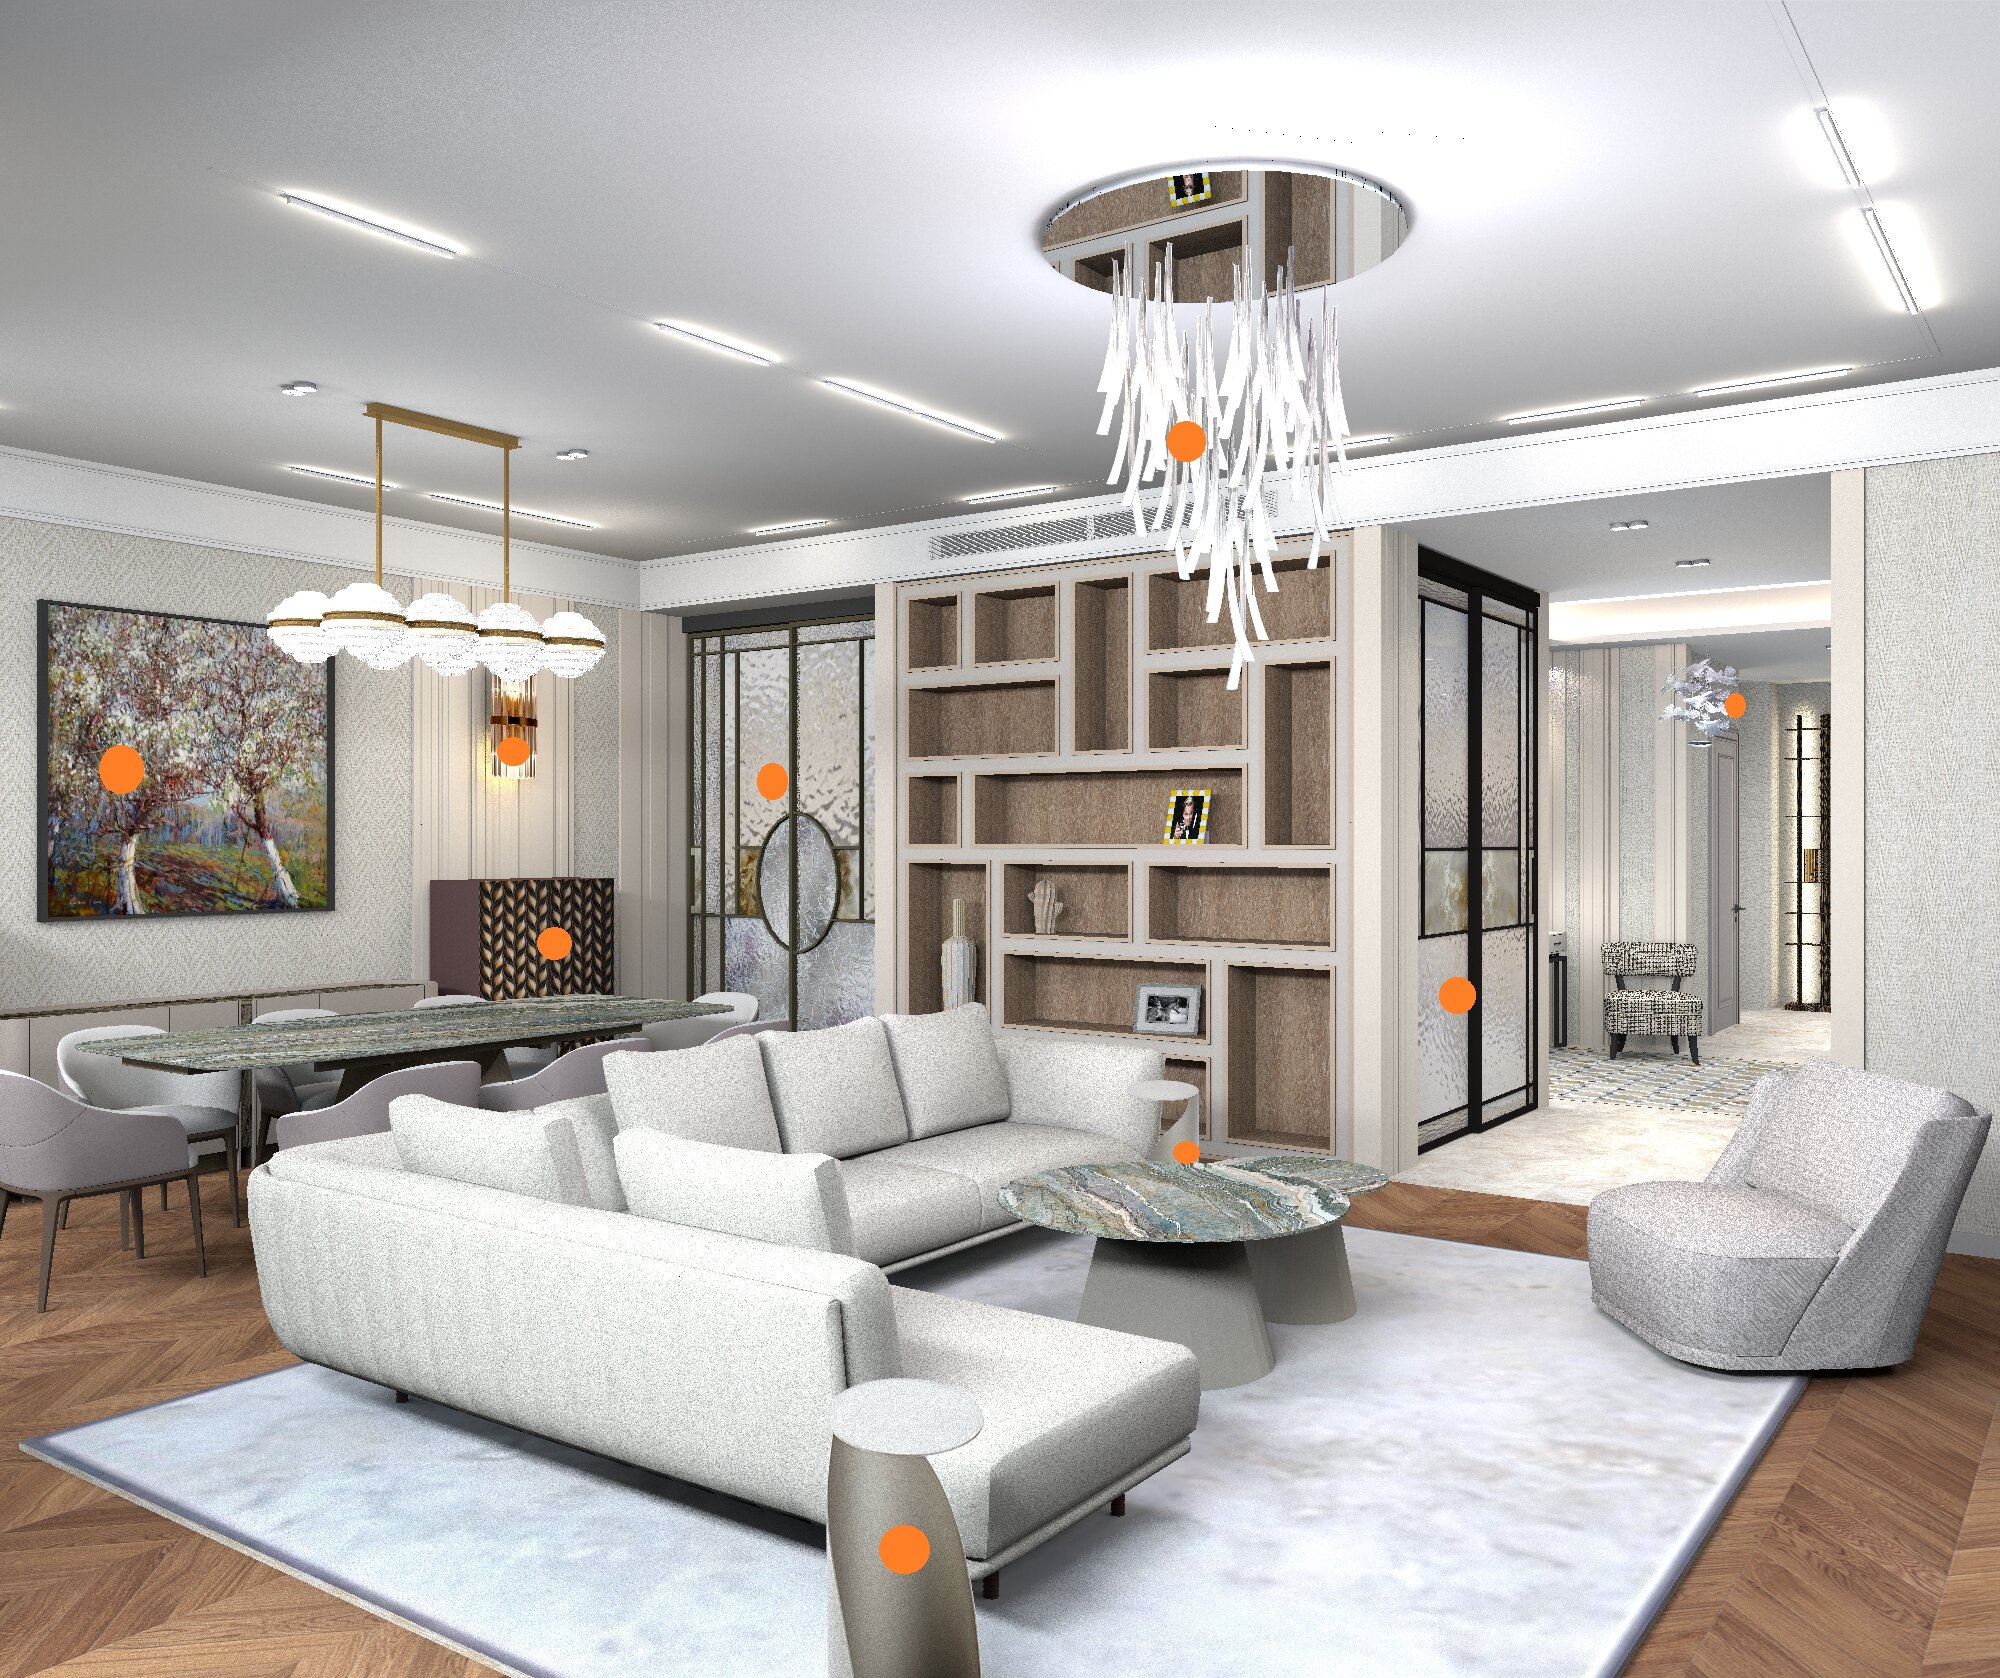
with this method, you can fill the interior with very complex and beautiful objects without 3D models. The program can handle it! And the rendering time will decrease significantly. For example, with such boxes it is 4 hours, and if you use models, it is 25-30 hours. And sometimes the program even refuses to render. Now I can do anything I want!! In these renderings, I have marked with orange circles those objects that are made with the help of boxes. These are not 3d models. A great way!! Try it!! I'm using it more and more often.
France
Joined: Oct 20, 2017
Post Count: 312
Status:
Offline
Re: Apartment project with lighting by invisible hemispheres. I continue advertising
Bonjour GaudiGalopin. Une fois de plus, je suis admiratif de ce que vous arrivez à réaliser. Votre imagination et les explications de la façon dont vous procédez pour obtenir de tels rendus sont incroyables. Grace à vous, j'en apprends tous les jours un peu plus.
Russia
Joined: Aug 13, 2022
Post Count: 568
Status:
Offline
Re: Apartment project with lighting by invisible hemispheres. I continue advertising
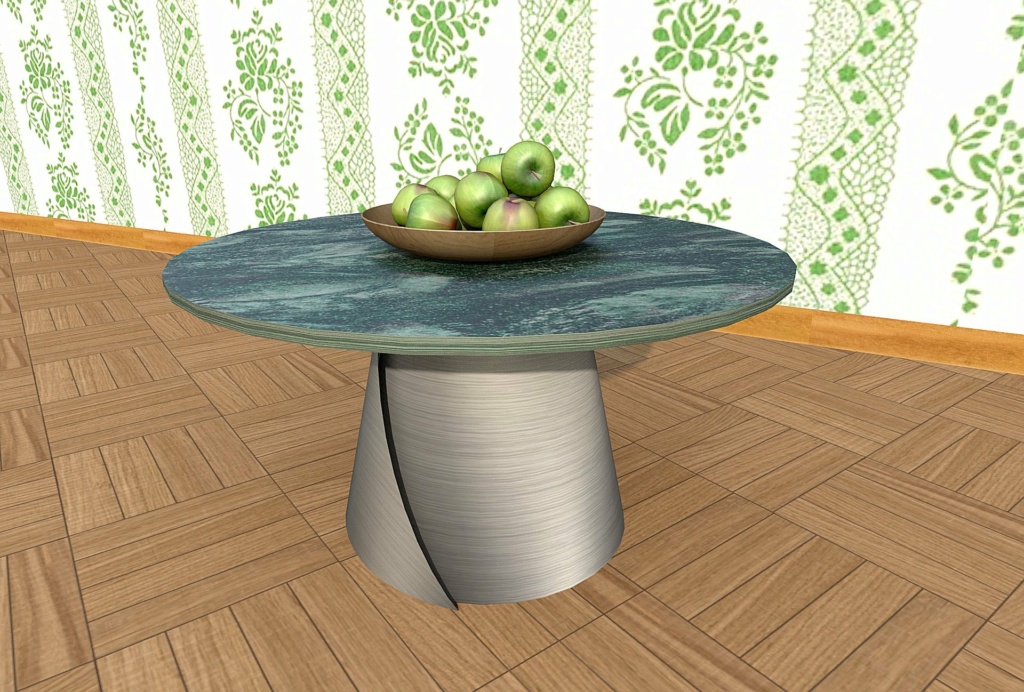
Merci beaucoup, capitaine Cook. J'ai continué à compléter les tables basses, j'ai Ajouté des supports métalliques en titane. Avec l'aide d'un modèle 3D dans SH3D, ce type est impossible à obtenir, et avec l'aide d'une photo sur la boîte, tout se passe. Je vois dans cette méthode l'avenir du rendu SH3D. il est Très efficace de combiner des formes 3D simples et des photos de pièces complexes.
Netherlands
Joined: Apr 8, 2022
Post Count: 1363
Status:
Offline
Re: Apartment project with lighting by invisible hemispheres. I continue advertising
Avec l'aide d'un modèle 3D dans SH3D, ce type est impossible à obtenir, et avec l'aide d'une photo sur la boîte, tout se passe. Je vois dans cette méthode l'avenir du rendu SH3D. il est Très efficace de combiner des formes 3D simples et des photos de pièces complexes.
Ce modèle n'est pas trop difficile à créer, mais malheureusement pas avec Sweet Home 3D. Du moins, pas les détails les plus fins.
Je ne suis pas sûr que ce soit l'avenir du rendu 3D de Sweet Home. Je pense plutôt qu'il s'agit d'un ajout exceptionnel aux possibilités existantes. Il est certainement plus efficace en termes de temps de rendu, mais vous ne pouvez pas vous "promener" dans le modèle comme vous le feriez avec un modèle réel. Et bien sûr, c'est une excellente alternative pour les situations où il n'y a tout simplement pas de modèle. Mais pensez au temps que vous avez dû passer sur l'armoire classique. Le résultat final est excellent, mais si vous disposiez d'un modèle réel, il serait beaucoup plus rentable de laisser l'ordinateur prendre beaucoup de temps pour effectuer le rendu que de passer de nombreuses heures coûteuses. Il est également beaucoup plus facile de modifier les couleurs ou les textures avec un vrai modèle.
Il s'agit donc d'une excellente alternative, parfois la seule disponible, mais s'il existe un modèle ou si je peux le créer, c'est la solution que je préfère. Je pense que cela vaut pour la plupart des utilisateurs qui ne se concentrent pas principalement sur le rendu de photos. Traduit avec DeepL.com (version gratuite)
[English]
With the help of a 3D model in SH3D, this type is impossible to obtain, and with the help of a photo on the box, everything happens. I see this method as the future of SH3D rendering. It's very efficient to combine simple 3D shapes with photos of complex parts.
That model is not too difficult to create but unfortunately not with Sweet Home 3D. At least not the fine details.
I'm not sure it's the future of Sweet Home 3D rendering. I think more of it as an exceptional addition to the existing possibilities. It certainly is more efficient in terms of rendering time but you can't "walk around" the model like you can with a real model. And of course it is a excellent alternative for those situations where there simply is no model. But think about the time you had to spend on the classic cabinet. The final result is great but if you had a real model it would be much more cost-effective to let the computer take a long time to render than to spend many expensive hours. Changing colors or textures is also much easier with a real model.
So an excellent alternative and sometimes the only one available but if there's a model available or I can create it than that would remain my preferred way. I think that goes for most users who do not mainly focus on photo rendering.
---------------------------------------- Dodecagon.nl 1000+ 3D models, manuals, and projects
Russia
Joined: Aug 13, 2022
Post Count: 568
Status:
Offline
Re: Apartment project with lighting by invisible hemispheres. I continue advertising
So an excellent alternative and sometimes the only one available but if there's a model available or I can create it than that would remain my preferred way. I think that goes for most users who do not mainly focus on photo rendering.
Yes, of course, it's all about the need to do the exact rendering. Not everyone needs it as the main result of their work. I use the SH3D program for exactly this purpose, just for visualization, so I'm exploring these possibilities. They are important to me, of course. I want to say once again that SH3D has a volume limit that is very difficult to go beyond in the render. And such photos as a replacement for models help to fill the interior with objects and continue to use this wonderful program. Yes, there are other excellent visualization programs that are certainly better and more productive than SH, but I'm trying to be faithful))) his first love. The 3D model in SH3D does not allow showing many types of materials - unpolished metal, for example, with its complex reflexes and reflections. Unfortunately, my experiments with complex rendering settings have no real benefit (although some hidden features can be used locally). Photos of some parts can help replace this flaw without compromising the standard rendering. For me, this is a very good way to work at the right level of visualization. And do not use other special programs. This is a top-level sport for me))).
France
Joined: Oct 20, 2017
Post Count: 312
Status:
Offline
Re: Apartment project with lighting by invisible hemispheres. I continue advertising
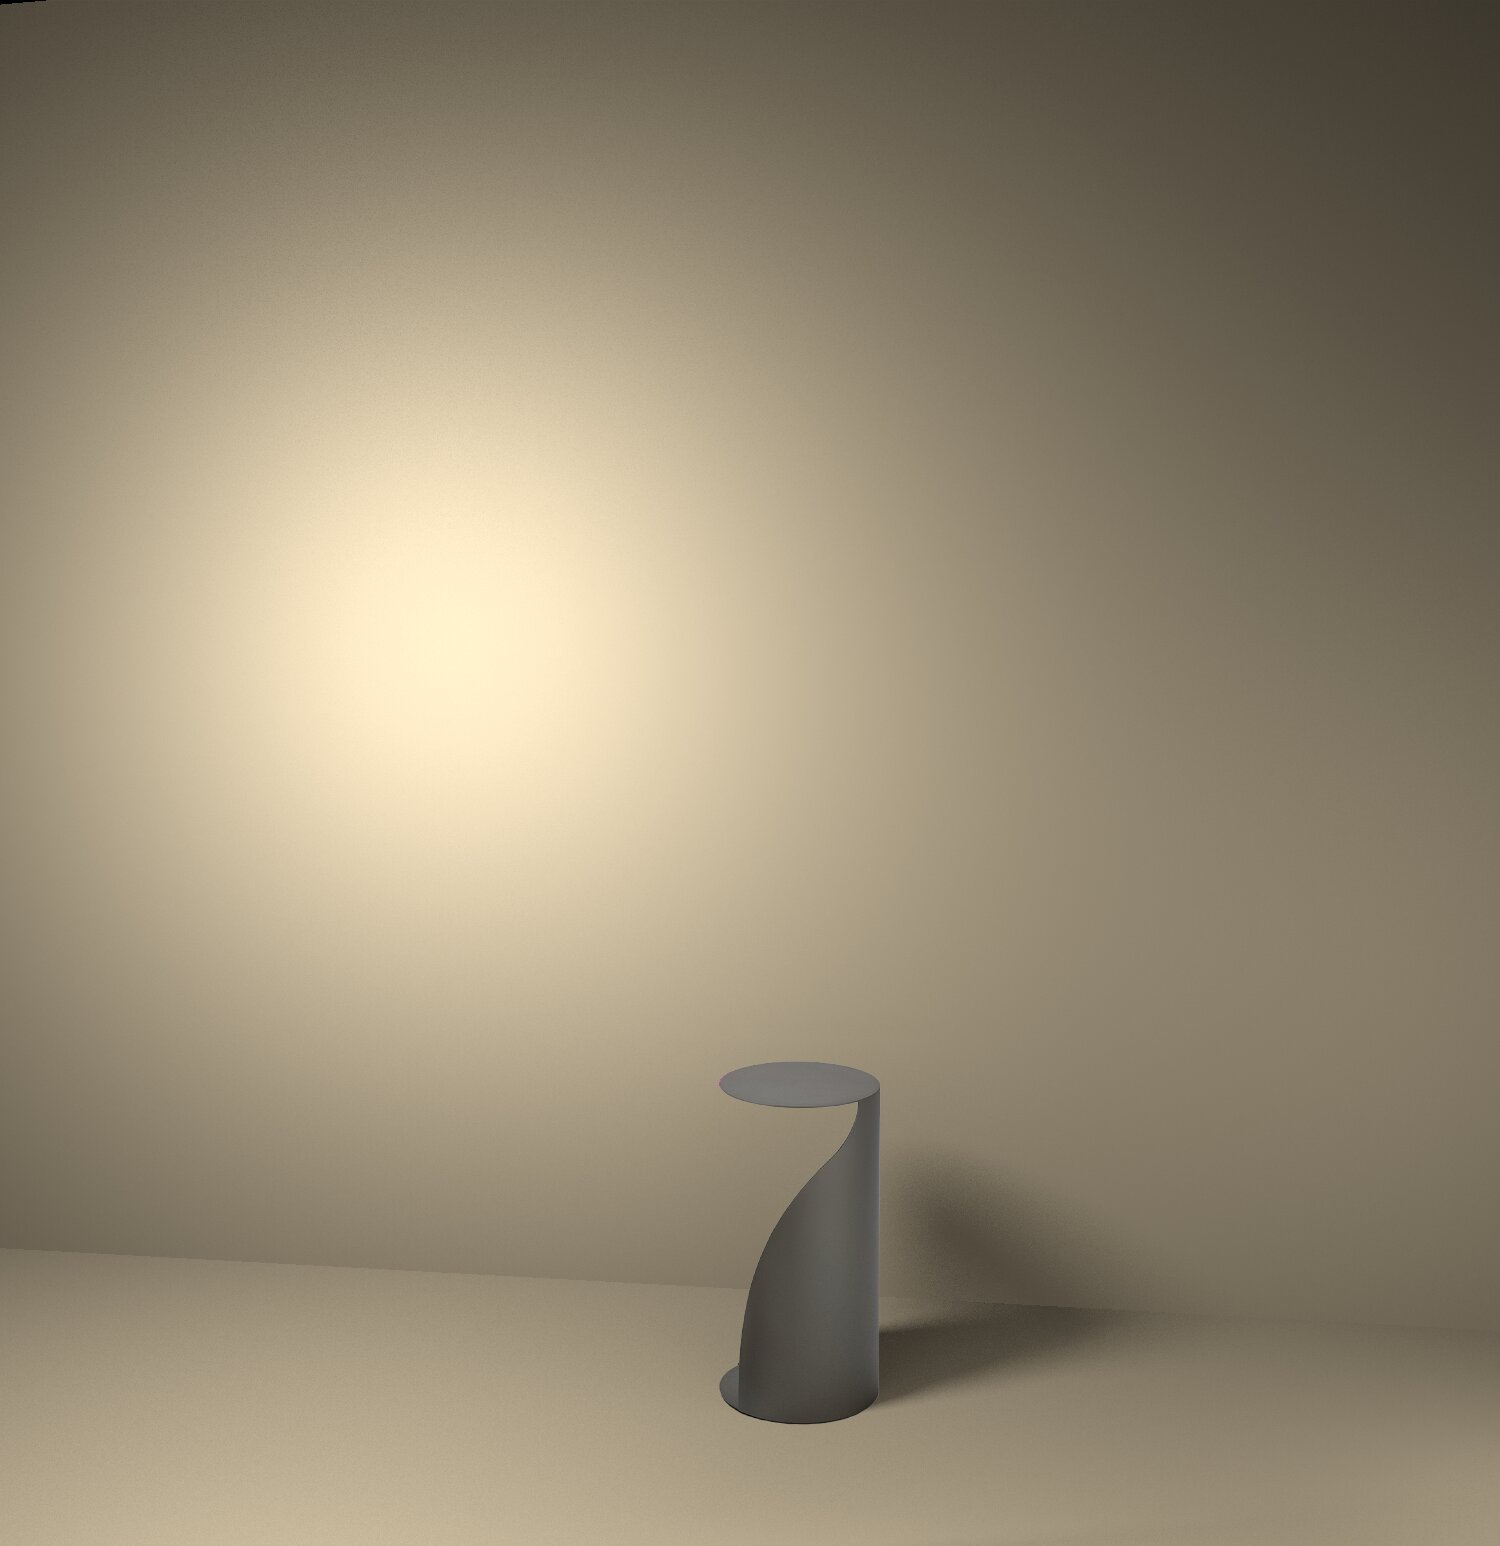
Bonjour.
Je me suis amusé à essayer de créer le modèle de table visible sur les images de GaudiGalopin, mais en le créant avec SH3D. J'avoue que ça m'a pris pas mal de temps avec un résultat moyen. Il a fallu aussi que je me serve de Sketchup pour modifier le cône et en obtenir qu'une petite portion visible sur le côté gauche du cône principal.
Sur cette deuxième image, je ne me suis servi que de Sweet Home.
----------------------------------------
[Edit 4 times,
last edit by captaincook at Mar 11, 2025, 4:51:44 PM]