|
Sweet Home 3D Forum » List all forums » » Forum: Sweet Home 3D bar » » » Thread: Photo rendering test |
|
| Print at Feb 2, 2026, 7:09:17 AM | |
| Posted by enkonyito at Sep 24, 2016, 4:13:47 AM |
|
Photo rendering test This first test concerns the comparison of rendering with or without caustics photons using SimpleRoom.sh3d file. position 2 (time of day: 21h)_causticsPhotons 500000 (moon icon) position 2 (time of day: 21h)_causticsPhotons 0 (moon icon) position 2 (time of day: 20h)_causticsPhotons 500000 (sun icon) [note: added information in blue] ---------------------------------------- EnkoNyito |
| Posted by Miker777 at Sep 24, 2016, 12:21:00 PM |
|
Re: Photo rendering test Hi enkonyito love the 1st image shows the light broken up by the water, out of curiosity is there another difference in the 3rd image, the lighting on the door is much improved there. Mike |
| Posted by enkonyito at Sep 25, 2016, 3:28:48 AM |
|
Re: Photo rendering test Hi Mike, The difference between the 1st and 3rd image is that caustics are not visible in daylight with Sunflow rendering engine. I don't know why. ![]() 20:00, it was sunset. ---------------------------------------- EnkoNyito |
| Posted by MartinSK at Sep 25, 2016, 12:18:57 PM |
|
Re: Photo rendering test Here I have an image of my new project what I am working on... Heh... It's a little joke,because it looks like indirect light,but it's not true. My settings were PATH-0...but ENHANCED EXTERNAL BRIGHT...and in combination with sS-SILK and shining walls it looks like this... Sometimes you have to be a little liar if you want to have an image looking like indirect light... ![]() and @Mike...your pics looks still better and better... I see you enjoy it.. I am happy. Martin |
| Posted by mazoola at Sep 25, 2016, 12:19:43 PM |
|
Re: Photo rendering test @enkonyito The difference between the 1st and 3rd image is that caustics are not visible in daylight with Sunflow rendering engine. I don't know why. According to the Sunflow wiki It's also important to note that at this time IBL and Sunsky do not emit photons, therefore, no caustics are viewable when using these lights. I haven't dug through the code enough, but it appears time of day (and, presumably, Sunsky vs IBL) can affect renders even when the scene receives no illumination from the sun. In tests of a rendering issue I finally discovered was caused by mapping different materials to the front and back surfaces of a SketchUp-originated model, I found the same scene rendered differently depending on time of day -- even when the scene was set within an opaque box. Even though neither sky light will generate caustics, you might want to try rendering your scene using a textured sky (or without a textured sky, if one was present for your first render), just to see if one of the two sky models was somehow blocking Sunflow from rendering caustics generated by other sources. Knowing that might possibly help locate and correct the problem within Sunflow. maz |
| Posted by Miker777 at Sep 25, 2016, 1:04:11 PM |
|
Re: Photo rendering test @enkonyito I feel a fool now, , i thought the 20h and 21h referred to the render time, 21 hours to render an image!!! i was never gonna go near caustics.@martin Beautiful image yet again, i can see how an outside light source would "shine" through the large windows and onto the floor, but on the area just outside the main room the "shine" also appears square, i cannot figure that out ![]() |
| Posted by MartinSK at Sep 25, 2016, 8:38:47 PM |
|
Re: Photo rendering test Hi miker. There is nothimg spetial with that shining squares. There are upper windows there and its a normal sun shining through The results are...shinimg squares. It is not final picture. Just only experimnental rendering during the creative process. |
| Posted by Miker777 at Sep 25, 2016, 9:05:04 PM |
|
Re: Photo rendering test Thats me over thinking it again, mistook the roof windows for ceiling lights. Mike |
| Posted by MartinSK at Sep 25, 2016, 9:35:06 PM |
|
Re: Photo rendering test There will be roog windos there and on the lower rloor I want to give lights there . |
| Posted by enkonyito at Sep 26, 2016, 9:05:00 PM |
|
Re: Photo rendering test @Miker ...i thought the 20h and 21h referred to the render time, 21 hours to render an image!!! I wouldn't have the patience to wait as long especially that complex renderings monopolize my computer that has only 2 cores.Previous tests on caustics take less than 2 minutes. @mazoola According to the Sunflow wiki I had seen this info but I thought that caustics would still be visible with the use of the desk lamp.It's also important to note that at this time IBL and Sunsky do not emit photons, therefore, no caustics are viewable when using these lights. ...you might want to try rendering your scene using a textured sky (or without a textured sky, if one was present for your first render)... Previous tests on caustics use a sky without texture.I did other tests with a blue sky texture but I get the same result: no caustics when it's daylight (sun icon). With enhance external brightness enabled. sky without texture (sun icon) sky with texture (sun icon) ---------------------------------------- EnkoNyito |
| Posted by Miker777 at Sep 26, 2016, 9:30:41 PM |
|
Re: Photo rendering test Thank you enkonyito Any render that takes more than 3 or 4 games of solitaire is too long for me. ![]() |
| Posted by enkonyito at Sep 27, 2016, 6:18:45 PM |
|
Re: Photo rendering test @Martin It's a little joke,because it looks like indirect light,but it's not true. My settings were PATH-0...but ENHANCED EXTERNAL BRIGHT...and in combination with sS-SILK and shining walls it looks like this... Nice trick to simulate indirect light with a rendering time less long! ![]() You discovered that the Enhance external brightness option brings light to the interior of a room with large openings. ![]() image size: 600 x 450 pixels advanced settings: aAmax 1, gI default, dB 0, sS glossy without Enhance external brightness option (rendering time: 16min 57.9s) with Enhance external brightness option (rendering time: 35min 14.1s) ---------------------------------------- EnkoNyito |
| Posted by MartinSK at Oct 1, 2016, 9:54:40 PM |
|
Re: Photo rendering test Here is another image I made of my friend's new bathroom I create in style of 50's. There is no trick here. It's a combination of IPR and indirect light... I am happy that it is really possible to create very photorealistic pictures here with 1.3.1 renderer... settings here... GI path DB 1 algorythm IPR picture size 6000x4000px then resized to 1000x667px time rendering 13 hours 30 minutes ![]() |
| Posted by enkonyito at Oct 3, 2016, 5:56:55 PM |
|
Re: Photo rendering test I like the shiny effect and the reflection of light on the wall. ---------------------------------------- EnkoNyito |
| Posted by enkonyito at Mar 22, 2017, 4:12:14 AM |
|
Re: Photo rendering test This test concerns sunsky or ibl samples. (PVR means PhotoVideoRendering plug-in) aerial view virtual visit ---------------------------------------- EnkoNyito |
| Posted by bdfd at Mar 22, 2017, 7:58:25 AM |
|
Re: Photo rendering test Hi enkonyito, Great work ! On aerial view, I prefer the third. Same thing for virtual visit. But I'm a question, PVR 1.1, why not PVR 1.3.2 ? ![]() ---------------------------------------- Evil progresses when good people do nothing! --- SH3D 7.1 and nothing else - W11 64b in 4K |
| Posted by enkonyito at Mar 23, 2017, 5:02:10 PM |
|
Re: Photo rendering test But I'm a question, PVR 1.1, why not PVR 1.3.2 ? As shown here , the PhotoVideoRendering-1.0 plug-in is completely compatible with SH3D-5.3 (Managed transformations applied on texture coordinates).The effect of the option "Enhance external brightness" depends on the image used for the sky or the time of day. ---------------------------------------- EnkoNyito |
| Posted by enkonyito at Jan 7, 2018, 4:23:23 AM |
|
Re: Photo rendering test These tests concern the modification of the number of sky samples (ImageBasedLight, SunSkyLight) and indirect light (PathTracingGIEngine). These use the configuration aAmin = aAmax = 0 to determine the max value of samples that offers the best quality. The max value for ibl samples is 512. The max value for sunsky samples is 512. The max value for path samples is 512. For sunsky samples and path samples, quality is inherent to the value of aAmax. As the sunflow doc suggests, the max samples value is divided by the corresponding number of samples (aAmin = aAmax). You can use the PVR-1.4 beta version to test these changes as well as the minimum night brightness . ---------------------------------------- EnkoNyito |
| Posted by enkonyito at May 26, 2018, 3:49:57 AM |
|
Re: Photo rendering test Example of using the light panels created for version 1.5 of the PhotoVideoRendering plug-in. ---------------------------------------- EnkoNyito |
| Posted by Ceciliabr at May 27, 2018, 6:56:49 PM |
|
Re: Photo rendering test This looks like something I would love to get my hands on cec |
| Posted by enkonyito at Jun 21, 2018, 5:33:09 AM |
|
Re: Photo rendering test This test concerns the Add ceiling lights option. In the future, we will be able to automatically add a square light panel as a ceiling light. Two solutions are proposed but only one choice will be retained given the coding. Choice 1: viewable light panel Choice 2: unviewable light panel Which solution do you prefer? ---------------------------------------- EnkoNyito |
| Posted by bdfd at Jun 21, 2018, 8:16:06 AM |
|
Re: Photo rendering test Hi enko, Choice 2 without hesitation ! ![]() ---------------------------------------- Evil progresses when good people do nothing! --- SH3D 7.1 and nothing else - W11 64b in 4K |
| Posted by Ceciliabr at Jun 21, 2018, 10:18:38 AM |
|
Re: Photo rendering test #2, of course. Will you include custom intensity? Cec |
| Posted by ndorigatti at Jun 21, 2018, 12:01:43 PM |
|
Re: Photo rendering test I agree on 2, given that if one wants a "Viewable" one she/he can add it manually! |
| Posted by hansmex at Jun 21, 2018, 5:38:13 PM |
|
Re: Photo rendering test #2 please :-) PS: I love the light panels! ---------------------------------------- Hans new website - under constuction hansdirkse.info |
| Posted by enkonyito at Jun 22, 2018, 9:26:43 PM |
|
Re: Photo rendering test Thank you all for your participation! Choice 2: 4/4 @hansmex I love the light panels! Nice to know it.@Ceciliabr Will you include custom intensity? The PhotoRenderer class calculates the power of light based on the area of the room.To have a customizable intensity, it would be better to add a light power option in the room modification panel like lights. Otherwise, we can divide the ceiling of the room into several small to decrease the intensity or distribute lighting. The automatic addition of a light panel as a ceiling light will be available for the next version of SH3D in case there are changes in the source files needed by the plug-in. ---------------------------------------- EnkoNyito |
| Posted by enkonyito at Jun 26, 2018, 2:27:28 AM |
|
Re: Photo rendering test To have a customizable intensity, it would be better to add a light power option in the room modification panel like lights. Here's what it gives in a derived version.To add this feature, I modified 4 source files (RoomPanel.java, RoomController.java, Room.java and PhotoRenderer.java). The main constraint is that for each update of Sweet Home 3D it will be necessary to create a corresponding derived version (SH3D-version_derived.jar). ---------------------------------------- EnkoNyito |
| Posted by bdfd at Jun 26, 2018, 9:22:32 AM |
|
Re: Photo rendering test To have a customizable intensity, it would be better to add a light power option in the room modification panel like lights. Here's what it gives in a derived version.To add this feature, I modified 4 source files (RoomPanel.java, RoomController.java, Room.java and PhotoRenderer.java). The main constraint is that for each update of Sweet Home 3D it will be necessary to create a corresponding derived version (SH3D-version_derived.jar). Bravo ! Included in the nextly 5.8, we hope ! ![]() . ---------------------------------------- Evil progresses when good people do nothing! --- SH3D 7.1 and nothing else - W11 64b in 4K |
| Posted by hansmex at Jun 26, 2018, 10:17:51 AM |
|
Re: Photo rendering test @Enko, These days I don't have much time to use SH3D, but I found an hour or so to "play" with your light panels. They are all very interesting, but I liked #3 best. Rotated so one points up to illuminate the ceiling at a very low setting (around 5%) and one pointing down at around 15% gives a very nice base illumination of a room. I'm curious to see what others will do with them, heh Cecilia? H ---------------------------------------- Hans new website - under constuction hansdirkse.info |
| Posted by Ceciliabr at Jun 26, 2018, 2:57:33 PM |
|
Re: Photo rendering test @hansmex Like you I don't have a lot of time to use on SH3D for the moment, so I haven't been able to play with the new light panels as much as I would have liked. But judging from the little I have done, these new features brings another dimension to SH3D. I agree with you on #3 being the most usable panel, especially if the light source is to be placed within the camera view, but for light sources placed outside the camera view, I find it easier to work with the visual panels. Personally I don't like ceiling lights at all (except for when I'm cleaning), but with the new ceiling light options, I think we will see lots of better and more evenly lighted images here. Cec |
| Posted by Ceciliabr at Jun 26, 2018, 3:02:04 PM |
|
Re: Photo rendering test @ enkonyito I think this is a very good solution! Cec |
| Posted by enkonyito at Jun 26, 2018, 9:28:01 PM |
|
Re: Photo rendering test @Ceciliabr Unfortunately, the plug-in can not be at the same time compatible with the standard version of SH3D and take into account this feature (adjustable ceiling light power) in the derived version. ![]() PS: The plug-in and the derived version of SH3D will be able to use a light panel as ceiling light. ---------------------------------------- EnkoNyito |
| Posted by Mike53 at Jun 26, 2018, 11:27:29 PM |
|
Re: Photo rendering test Love these lights Enkonyito, like Hans, i have them pointing up at low power, and, as if by magic, white ceilings, thank for that. Still no idea about all the version numbers and abbreviations mean, but then, i have never even changed anything in the advanced settings for the rendering tools, so its not an issue. i look forward to your final versions, if there can be such a thing. thank you again Mike |
| Posted by enkonyito at Mar 15, 2019, 12:06:04 AM |
|
Re: Photo rendering test Hi all ! I propose you to test a feature that automatically adds ambient lighting instead of a room's ceiling light. With silk shader With glossy shader Don't hesitate to say what you think. ---------------------------------------- ---------------------------------------- ---------------------------------------- EnkoNyito |
| Posted by ndorigatti at Mar 15, 2019, 9:23:35 AM |
|
Re: Photo rendering test May I vote about 10 times? In any case, YES!!! I've never used ceiling lights, but I will for sure use this option! |
| Posted by hansmex at Mar 15, 2019, 10:06:28 AM |
|
Re: Photo rendering test Hello Enko, After playing a bit with this beta version, I have a few questions: 1 - The amount of light is quite low. Is there a way to increase it? 2 - Where is the light source placed? Where do the shadows originate? 3 - What is the difference with a (large) light source placed in the (middle of) the room? Thanks for your efforts! H ---------------------------------------- Hans new website - under constuction hansdirkse.info |
| Posted by UbuntuBirdy at Mar 15, 2019, 12:48:23 PM |
|
Re: Photo rendering test I often use ceiling lights, but I'm never really happy with the result... And now you give us ambient light - and I'm happy! But as Hans mentioned, the amount of light is quite low. Would be great if we could adjust that value. ---------------------------------------- Pascal SH3D 6.6 / Ubuntu 22.04 (Mainline-Kernel) / Radeon RX580 / Ryzen 7 5800x |
| Posted by Mike53 at Mar 15, 2019, 7:01:07 PM |
|
Re: Photo rendering test This sounds excellent, agree with Hans's points, the brightness is down to personal opinion, but, i do wonder if it's possible, at the level you have shown, could it be linked to the time of day, eg, your example = 8AM, probably means a lot of work, i have no idea, may work though. Mike |
| Posted by enkonyito at Mar 15, 2019, 7:35:14 PM |
|
Re: Photo rendering test 
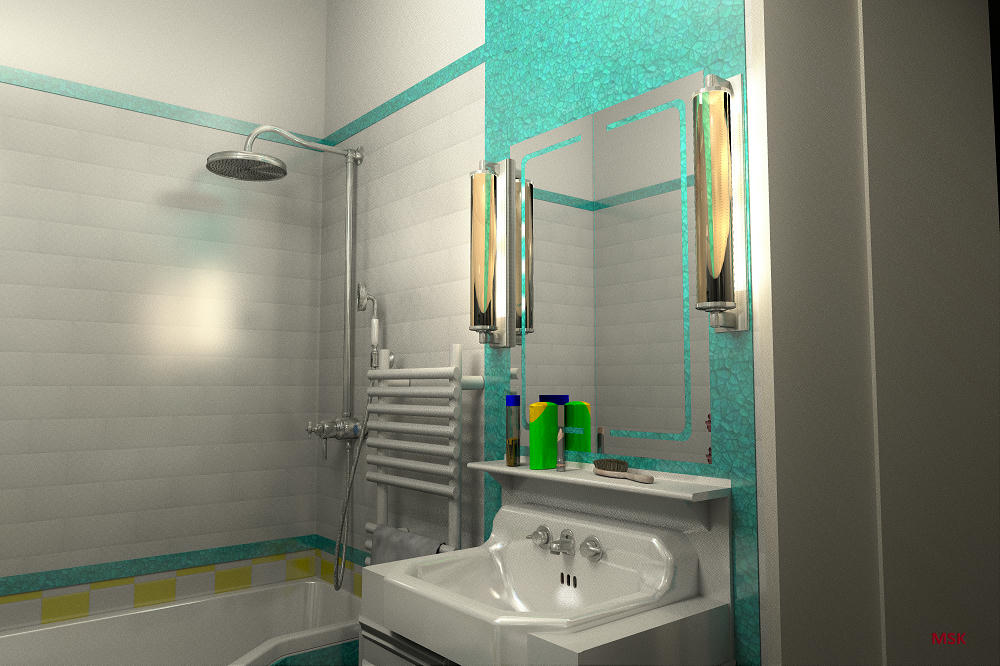
Glad to see the interest you all have for this option! 
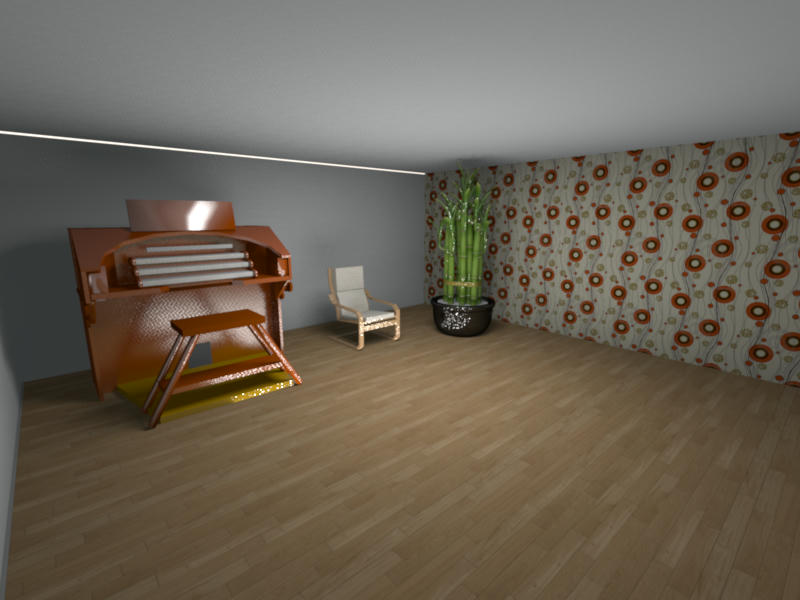
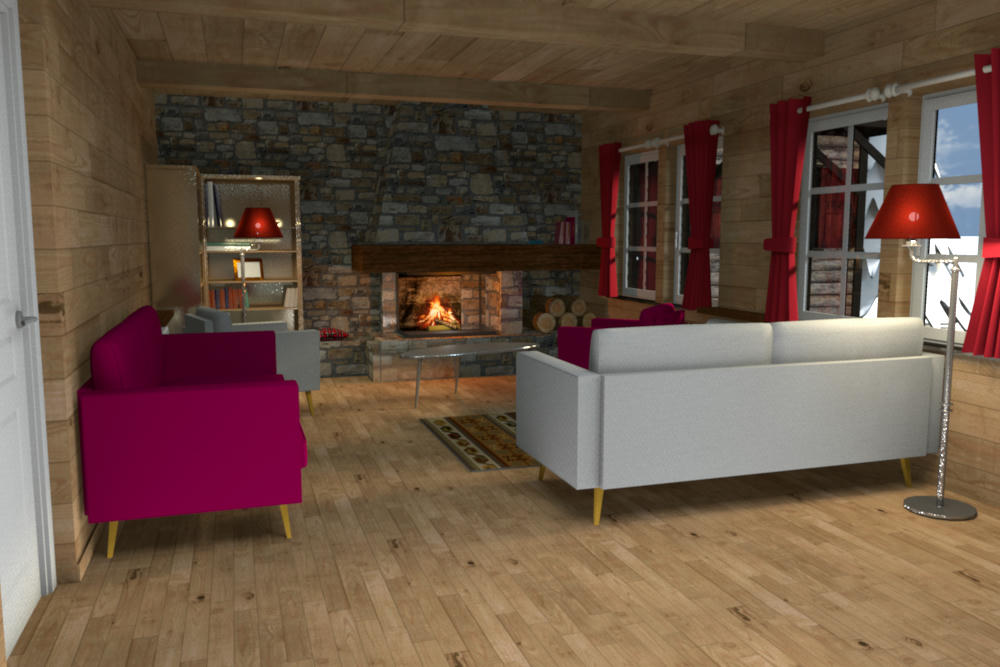
...could it be linked to the time of day... Like the light panel - daylight? Yes, but the interest of ambient lighting is that it works day and night.1 - The amount of light is quite low. Is there a way to increase it? 2 - Where is the light source placed? Where do the shadows originate? 3 - What is the difference with a (large) light source placed in the (middle of) the room? In the part of the source code managing the ceiling light of the rooms, I replaced this treatment using a light sphere float power = (float)Math.sqrt(room.getArea()) / 3;float roomAreaInSquareMeter = room.getArea() / 10000;In both cases, the power is based on the area of the room. The main difference between a large light sphere and light panels is that they can be placed very close to an object and project much softer shadows. That's why I chose the solution of a medium panel on the ceiling and a panel 4 times bigger on the floor with a power 4 times smaller. This gives the impression that light comes from all sides. I updated the download link with a version using the "maximum" power. It would be possible to manually change the power of the ambient lighting with radio buttons or a slider but it would be necessary to see the impact that it could have on the interface of photo rendering. Enko ---------------------------------------- EnkoNyito |
| Posted by hansmex at Mar 16, 2019, 9:21:41 AM |
Re: Photo rendering test![]() This is the result of a quick test of version 2. The level of illumination is now very usable as a kind of basic lighting. Unfortunately there is a white line along the ceiling. I think a way to set the lighting level is needed, preferably numerical (1-100?). H ---------------------------------------- Hans new website - under constuction hansdirkse.info |
| Posted by Mike53 at Mar 16, 2019, 1:29:29 PM |
|
Re: Photo rendering test Ran a test render myself and found that this is quite good. For me its a bit bright at floor level and therefore casts rather heavy shadows up onto the ceiling. Adding lights at ceiling level. in this case molding level, did improve this, but that would negate the need for the ambient element. ![]() I will experiment with other combinations and inform you of my findings. Excellent work enkonyito, thankyou Mike |
| Posted by enkonyito at Mar 18, 2019, 3:21:08 AM |
|
Re: Photo rendering test Hans, Mike, Thank you for your feedback! Here is a beta version with ambient lighting adjustment. ![]() Keep in mind that ambient lighting replaces the ceiling light in each room. [Note to moderator: the update of the attached file PVR-1.7betaTest2 to add a second instead of replacing the first in this post] ---------------------------------------- EnkoNyito |
| Posted by UbuntuBirdy at Mar 18, 2019, 6:00:53 AM |
|
Re: Photo rendering test ...feels like rendering-heaven! ---------------------------------------- Pascal SH3D 6.6 / Ubuntu 22.04 (Mainline-Kernel) / Radeon RX580 / Ryzen 7 5800x |
| Posted by hansmex at Mar 18, 2019, 2:47:53 PM |
Re: Photo rendering test![]() 1 - The white line along the ceiling is now gone. It was caused because I had several versions of the plugin in the same directory. Even though I disabled the unwanted versions by renaming them, SH3D kept seeing them and offering them as possible tools. Only by completely deleting these older versions from the plugin-directory, did SH3D agree that they were gone. With that, several kinds of unwanted behaviour disappeared. 2 - It has always been my hope that someone (wink, wink, Enko) would re-program the 4 quality settings in SH3D. - Q1 is quick and dirty, comparable to current Q1 or Q2. - Q2 would be comparable to current Q3: fast and good - Q3 would be a standard, high quality rendering nearing photo-quality. If this quality setting offers additional settings, they should be self-explanatory, e.g. slider 1 = sharper-unsharper, slider 2 - brighter-dimmer, slider 3 glossy-matt, etc - Q4 would offer access to all kinds of settings for those interested in that kind of thing, comparably to what the plugin now offers, but which, for simple people like me, is far too complex to use. 3 - The current version of the plugin is very nice, the slider works well. Unfortunately there's still not enough light. The plant behind the couch is almost invisible, even though the slider is set at 100%. Thanks Enko, keep up the good work. Hans ---------------------------------------- Hans new website - under constuction hansdirkse.info |
| Posted by bdfd at Mar 19, 2019, 7:19:57 AM |
Re: Photo rendering test3 - The current version of the plugin is very nice, the slider works well. Unfortunately there's still not enough light. The plant behind the couch is almost invisible, even though the slider is set at 100%. Tottaly agreed with Hans on this 3rd point (after realized my own tests). Hans Enko, keep up the good work, I know that it's not easy. . ---------------------------------------- Evil progresses when good people do nothing! --- SH3D 7.1 and nothing else - W11 64b in 4K |
| Posted by enkonyito at Mar 21, 2019, 4:37:12 AM |
|
Re: Photo rendering test In this version, all panels have the same power but their brightness is related to their surface. It's the best I can do. Enko ---------------------------------------- EnkoNyito |
| Posted by UbuntuBirdy at Mar 21, 2019, 11:02:22 PM |
|
Re: Photo rendering test For me it works absolutely great! Together with Enhance external brightness it generates beautful results ![]() @Hans I can not agree with your point 2: the Q1-Q4 are perfect as they are, because Q3 has to have the absolute same setting as Q4 to be a "quick" preview for Q4. ---------------------------------------- Pascal SH3D 6.6 / Ubuntu 22.04 (Mainline-Kernel) / Radeon RX580 / Ryzen 7 5800x |
| Posted by hansmex at Apr 9, 2019, 2:34:58 PM |
|
Re: Photo rendering test This is a test render with v1.7beta, settings: - Q4 - enhanced external brightness - ambient ligthing 75% - anti-aliasing min-max 2-3 - caustic photons 2 mln - shininess glossy - filter lanczos - smapler bucket (settings are from Cecilia's file in THIS post) ![]() This is a test render with v1.7beta, settings: - Q4 - default settings - enhanced external brightness - ambient ligthing 75% ![]() I prefer the second one: - it's made with standard settings - it's slightly lighter, looks a bit better. Great work, Enko! Thanks! H ---------------------------------------- Hans new website - under constuction hansdirkse.info |
| Posted by Mike53 at Apr 9, 2019, 4:32:23 PM |
|
Re: Photo rendering test Very nice results Hans, though i prefer the first, seems to have more atmosphere, how long did they take m8? |
| Posted by bdfd at Apr 9, 2019, 7:49:51 PM |
|
Re: Photo rendering test Hi Hans, Like Mike, I prefer too the first, we don't see the defaults of shineness... . ---------------------------------------- Evil progresses when good people do nothing! --- SH3D 7.1 and nothing else - W11 64b in 4K |
| Posted by VeroniQ at Apr 9, 2019, 11:46:03 PM |
|
Re: Photo rendering test I like the first rendering too! Well done, all of you! |
| Posted by enkonyito at Apr 11, 2019, 7:10:33 AM |
|
Re: Photo rendering test I prefer the second one: Thanks Hans!- it's made with standard settings - it's slightly lighter, looks a bit better. Great work, Enko! Thanks! I think Cecilia used interior light panels to simulate ambient lighting. The diffedBounces=0 parameter allows you to have more depth (from the lightest to the darkest). So I did a quick test with this new beta version without using the interior panels or the external brightness. Settings: - anti-aliasing min/max: 1/2 - global illumination: default - caustics photons: 0 - shininess shader: glossy - filter: blackman-harris - sampler algorithm: bucket diffusedBounces: 0 diffusedBounces: 1 Enko ---------------------------------------- EnkoNyito |
| Posted by Ceciliabr at Apr 23, 2019, 12:26:57 AM |
|
Re: Photo rendering test Easter is finally over. My sunburns ( from uncritical sunbathing in the Norwegian mountains) appears to be healing, and my crushed pride ( from ending up last in the ski-jump competition) is rapidly becoming a distant and soon forgotten memory... i think. Back in sunny Copenhagen, where the crocus is ready to flourish, I have finally found the time to seriously explore the sweethome3d forum. I think Cecilia used interior light panels to simulate ambient lighting Yes, I did ( and shame on me?)Yes, I could have used your ambient light option, had it been available at the time. It wasn't. But quite frankly: I probably wouldn't have used it, even if it had been available. Most of my projects are not really suited for automatic ambient lighting, and I have already formed a habit of creating my own ambiences, prior to the introduction of this automatic ambience-creator. That being said, I think the ambient light option is a great enhancement to SH3D, and I really hope people prefer using your ambient light option to the default "Add Ceiling Light"-option ( which in my opinion has done more harm than good to any rendering I have seen using it). Am I simulating ambient light.... ? What do you think? What came first; my simulation, or the "real" ambient light? With the introduction of the new light panels, producing a variety of "simulations" of ambient light were automatically kickstarted. All the options were really there from the beginning, once the panel lights were installed. "Simulated ambient lighting" were there for anyone with an interest in lighting. I can only assume anyone with a hard-core interest in rendering, instantly fell in love with these new options, and I know for a fact that I was far from the first user to experiment with this and present it at the forum. To me, these panel lights represented a turning point – or rather; it represents THE turning point – as the greatest thing that have so far happened in my short history with SH3D.. In my opinion, the automatic "ambient light" - option is a good spin-off, but it's just that. It has lots of limitations – limitations that are not there when you "simulate" it. Why, you might ask, are most of my projects not suited for automatic ambient lighting? Mainly because I prefer to work with dual ceilings, and the automatic light ambience is locked ( as far as I have experienced) to the physical room created by SH3D. For anyone using custom ceilings, the automatic ambient lighting is really not a relevant option: Ambient lighting: Simulated ambient lighting: Well, anyway: The most fundamental aspect of it is: Isn't the ambient light-option basically just an automatic simulation, whereas my manual "simulation" is a more controllable option? I'm just asking... Cecilia |
| Posted by enkonyito at Apr 23, 2019, 5:38:54 AM |
|
Re: Photo rendering test Yes, I did ( and shame on me?) No, quite the contrary. I quoted you to explain the difference in rendering and because you use the light panels in your interiors.I used them mainly to simulate the natural light coming from the outside. The use of the term "ambient lighting" may not have been used by you or other users yet, but in practice this was already the case. As soon as a 60 cm square light panel was used instead of the default room ceiling light, the beginnings of automatic ambient lighting were there. The major flaw was that the ceiling remained dark. In the "new" automatic ambient lighting, there are 2 light panels and the ceiling is now visible. The constraint is that the size of the square panels remains limited even if now it is proportional to the area of the room. This is not the case for non-novice users or more accustomed to manually placing the light panels. In the recent projects of the blog, I show what can give the automatic ambient lighting (combined with other lighting) after having modified the ceilings of certain rooms. Enko ---------------------------------------- EnkoNyito |
| Posted by hansmex at Apr 23, 2019, 9:41:02 AM |
|
Re: Photo rendering test Cecilia, I scrolled up and down at least 20 times to compare the two images, but I can't find the difference(s), if any... Maybe smaller pictures that can both be seen at the same time would illustrate the difference(s) better?? Hans ---------------------------------------- Hans new website - under constuction hansdirkse.info |
| Posted by Ceciliabr at Apr 23, 2019, 9:58:55 PM |
|
Re: Photo rendering test @hansmex Maybe smaller pictures that can both be seen at the same time would illustrate the difference(s) better?? Good point! Instead of making a smaller version, I have made a gif animation that toggles between the two images:: ![]() On my monitors the difference is quite noticeable. The darker image is the one with "ambient lighting"set @ 100%. If you still don't see any difference, I suggest you check your monitors contrast / brightness balance. There should be a built-in calibration procedure you can follow. Cec |
| Posted by Ceciliabr at Apr 23, 2019, 11:15:01 PM |
|
Re: Photo rendering test No, quite the contrary. I quoted you to explain the difference in rendering and because you use the light panels in your interiors. I was just trying to be funny :) Yes, I have used the light panels a lot on the interiors. I often do that. I know that some people are very fond of natural light, but I'm really more into using light sources as a creative tool. I literally grew up on a film set, where getting the light right was the top one priority. I often find myself thinking it's a photo-shoot when I'm lighting my scenes. Natural light is all around us every day, whereas artificial lights can create some really special moods and play tricks on our perception of reality. I remember my first attempt to use the new panel lights: For me, being able to set lights like this, was magic. With the panel lights I can recreate some magic moments and use everything I learned about lighting from "growing up" at film sets and photo shoots. Cec |
| Posted by enkonyito at Aug 12, 2019, 9:44:47 PM |
|
Re: Photo rendering test This test concerns Sunflow shininess shaders: - Uber (silk) - Phong - Ward - Shiny (glossy) Here is a comparison of these shaders by varying the shininess under 2 types of lighting. The Diffuse shader is used when the object is matt. Enko ---------------------------------------- EnkoNyito |
| Posted by enkonyito at Aug 19, 2019, 3:51:53 AM |
|
Re: Photo rendering test New configuration for a sky color with enhanced external brightness. Enko Nyito ---------------------------------------- EnkoNyito |
| Posted by enkonyito at Aug 22, 2019, 2:17:48 AM |
|
Re: Photo rendering test Hi all, Which background do you prefer? It will be visible when saving the image after stopping a rendering. Enko ---------------------------------------- EnkoNyito |
| Posted by hansmex at Aug 22, 2019, 9:43:44 AM |
|
Re: Photo rendering test I prefer the darker background. ---------------------------------------- Hans new website - under constuction hansdirkse.info |
| Posted by ndorigatti at Aug 22, 2019, 10:15:31 AM |
|
Re: Photo rendering test Dark One! |
| Posted by UbuntuBirdy at Aug 22, 2019, 6:12:51 PM |
|
Re: Photo rendering test For me the dark one is the one to go with. ---------------------------------------- Pascal SH3D 6.6 / Ubuntu 22.04 (Mainline-Kernel) / Radeon RX580 / Ryzen 7 5800x |
| Posted by enkonyito at Aug 23, 2019, 4:52:32 AM |
|
Re: Photo rendering test Thank you all, the dark background will be chosen. Here is the preview of the png file in an image editor. Enko ---------------------------------------- EnkoNyito |
| Posted by maureenowaters at Oct 16, 2019, 10:31:58 AM |
|
Re: Photo rendering test Here is another image I made of my friend's new bathroom I create in style of 50's. There is no trick here. It's a combination of IPR and indirect light... I am happy that it is really possible to create very photorealistic pictures here with 1.3.1 renderer... settings here... GI path DB 1 algorythm IPR picture size 6000x4000px then resized to 1000x667px time rendering 13 hours 30 minutes ![]() So beautiful design guys. Thanks for sharing. |
| Posted by maureenowaters at Nov 2, 2019, 5:11:53 AM |
|
Re: Photo rendering test I think first one is better than the others. |
| Posted by AliAhsan at Dec 20, 2019, 8:15:08 AM |
|
Re: Photo rendering test I like the first image. It clearly shows the different effects of light near the bottle and the glass. It looks pretty much realistic. However, the colour of the door looks much better in the 3rd image. |
| Posted by enkonyito at Mar 28, 2020, 8:56:40 PM |
|
Re: Photo rendering test This test concerns YafaRay transparent materials and shadow depth. With a shadow depth of 16, the shadow of transparent objects appears less dark in places. (good) For the rough_glass material, the shadow remains transparent instead of being translucent and the rendering is longer. (not good) Enko ---------------------------------------- EnkoNyito |
| Posted by enkonyito at Apr 26, 2020, 9:28:17 PM |
|
Re: Photo rendering test There is a link between anti-aliasing and sampling. In SunFlow, the anti-aliasing values range from 0 to 5, which corresponds to sampling values from 1 to 1024. In YafaRay, the sampling values corresponding to anti-aliasing are also a multiplication factor. Examples of YafaRay renderings with their anti-aliasing samples mulitplied to those of the sun, ambient occlusion, path tracing, ibl or skylight. AAminSamples 16, sunSamples 8, AOsamples 1, pathSamples 8 AAminSamples 16, iblSamples 16, pathSamples 2 AAminSamples 16, skylightSamples 32, pathSamples 2 ---------------------------------------- EnkoNyito |
|
|
Current timezone is GMT Feb 2, 2026, 7:09:17 AM |