


Sweet Home 3Dユーザーガイド
- はじめに
- インストール
- ユーザーインターフェース
- 新しい住宅の開始
- 住宅設計図のインポート
- 壁の描画
- 壁の編集
- ドア、窓、家具の追加
- 部屋の描画
- レベルの追加
- 3Dビューの編集
- 3Dビューの写真作成
- 3Dビデオの作成
- OBJ形式へのエクスポート
- 3Dモデルのインポート
- 寸法の描画
- テキストの追加
- 印刷
- プラグインの追加
開始前に
 はじめに
はじめに
Sweet Home 3D is a free interior design application that helps you place your furniture on a house 2D plan, with a 3D preview.
Available at https://www.sweethome3d.com/, this program is aimed at people who want to design their interior quickly, whether they are moving or they just want to redesign their existing home. Numerous visual guides help you draw the plan of your home and layout furniture. You may draw the walls of your rooms upon the image of an existing plan, and then, drag and drop furniture onto the plan from a catalog organized by categories. Each change in the 2D plan is simultaneously updated in the 3D view, to show you a realistic rendering of your layout.
This users guide shows you how to create a home with Sweet Home 3D version 7.5. After describing its user interface, you’ll learn how to draw the walls of your home, and how to layout the furniture. The example created in this tutorial is available at https://www.sweethome3d.com/examples/userGuideExample.sh3d (3.2 MB).

For more information, you may also view Sweet Home 3D video tutorials, use Sweet Home 3D help accessible from the Help button found in the tool bar of Sweet Home 3D windows, and learn more advanced tips.

インストール
(バージョン7.5.17 – 291 MB)
Sweet Home 3D may be run on Windows, macOS, Linux, iOS and Android, and is translated in 29 different languages.
Depending on your system, use the following instructions to download Sweet Home 3D and install it:
| Windows: | Download https://sourceforge.net/projects/sweethome3d/files/SweetHome3D/SweetHome3D-7.5/SweetHome3D-7.5-windows.exe/download (84.9 MB), run the downloaded installation program, and follow the instructions from the setup wizard. |
| macOS: | Download https://sourceforge.net/projects/sweethome3d/files/SweetHome3D/SweetHome3D-7.5/SweetHome3D-7.5-macosx.dmg/download (83.6 MB), double-click on the downloaded file and run Sweet Home 3D application found in the opened folder. To install Sweet Home 3D, drag and drop the application in the folder of your choice. |
| Linux: | Download https://sourceforge.net/projects/sweethome3d/files/SweetHome3D/SweetHome3D-7.5/SweetHome3D-7.5-linux-x64.tgz/download (71.7 MB), uncompress the downloaded file and run SweetHome3D application found in the uncompressed directory. To install Sweet Home 3D, move the uncompressed directory to one of your choice. |
| iOS / Android: | Download Sweet Home 3D Mobile from Apple’s App Store and Google Play. |
You may also edit your homes with Sweet Home 3D Online on any device supporting WebGL. The features of this version are similar to the ones of the downloadable version except that your homes will be automatically saved on the server of this web site once you registered. The Online version doesn’t have any menu bar, but all the menu items of the downloadable version are reachable from its contextual menus or the tool bar, except 3D models importation, as well as photos and videos creation.
ユーザーインターフェース
Each Sweet Home 3D window edits the interior design of a home and is divided in four resizable panes, with a tool bar at its top, as shown in figure 2 (for the Mobile version, see also this page).

1
The furniture catalog
This catalog, organized by categories, contains all the furniture and objects you may add to your home design. You can display the furniture of a category by clicking on the triangle beside its name.
2
住宅家具リスト
このリストには住宅の家具が含まれ、名前、サイズ、その他の特性が表示されます。各列のタイトルをクリックしてソートできます。
3
住宅平面図
このペインは、グリッド上で定規に囲まれた住宅を上から見た図を表示します。このペインでマウスを使用して住宅の壁を描き、その上に家具をレイアウトします。
4
住宅3Dビュー
このペインは住宅を3次元で表示します。このペインでは、上から、または仮想訪問者の視点から住宅を見ることができます。

各ペインはフォーカスを持つことができ(つまり、キーボード入力を受け取る)、一部の操作はフォーカスされたペインに依存します。フォーカスされたペインは、それを囲む色付きの長方形で識別できます。例えば、図2では住宅平面図にフォーカスがあります。別のペインにフォーカスを移すには、TabキーとShift + Tabキーを使用するか、フォーカスを得るべきペインをクリックしてください。

住宅平面図で行われたすべての変更は、ツールバーの元に戻すボタンとやり直しボタンをクリックして元に戻す/やり直すことができます。プログラムが提案するさまざまな操作を試すことをためらわないでください。
壁を描画し、正確な間取り図を作成
 新しい住宅の開始
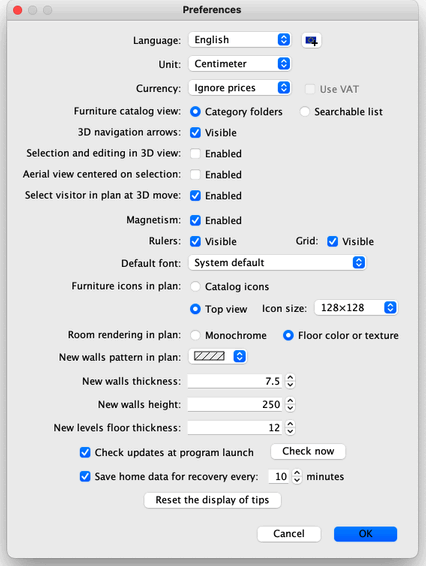
先に進む前に、図3に示すように、macOSではSweet Home 3D > 環境設定…メニュー項目、その他のシステムではファイル > 環境設定…メニュー項目で環境設定ダイアログボックスを表示してください。プログラムで使用されるデフォルトの単位、壁のデフォルトの厚さと高さ、その他の環境設定を確認してください。

To create a home, simply use the default home created at Sweet Home 3D launch or click on the New home button in the tool bar.
The suggested steps of a home design in Sweet Home 3D are:
- 住宅平面図の背景画像として、住宅のスキャンした設計図をインポートする
- この背景画像上に壁を描く
- 壁の厚さ、色、テクスチャを編集する
- 住宅平面図にドアと窓を追加し、サイズを調整して、空の住宅のリアルなビューを得る
- 住宅平面図に家具を追加し、サイズと位置を調整し、必要に応じてインポートした3Dモデルを使用する
- 描き部屋を、床と天井の色やテクスチャを変更する
- 住宅が複数階建ての場合、レベルを追加し、それらを結ぶ階段を設置し、各レベルについて最初の6つの手順を繰り返す
- 住宅平面図に寸法を描き、テキストを追加して、印刷前に文書化する
これらの手順中、レイアウトの視点を変更するために3Dビューでナビゲートすることが多いでしょう。

By the way, don’t forget to regularly save your project by clicking on the Save home button (except with the Online version where the edited home is automatically saved). A Sweet Home 3D file may be exchanged with other users and may contain imported 3D models not present in the default catalog.
You may also create images of the 3D view at PNG format, compute 3D videos from a virtual path in your home and export the 3D view of your home at OBJ + MTL format.
住宅設計図のインポート
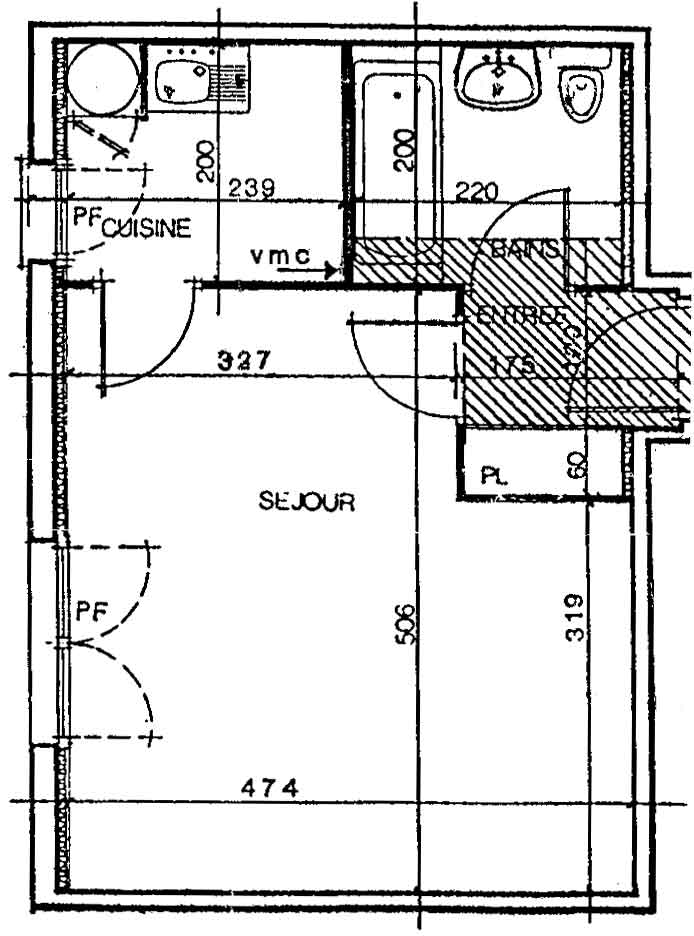
This first step is not mandatory but it speeds up the drawing of the walls of an existing home. So try to find the blueprint of your home and scan it if you didn’t do it yet, ensuring the image is correctly rotated. Don’t import a large file in Sweet Home 3D, this image is supposed to be a helper, not some art!
平面図 > 背景画像をインポート…メニューを選択して、図4に示すように、画像ファイルの選択とスケール設定を支援するウィザードを表示してください。
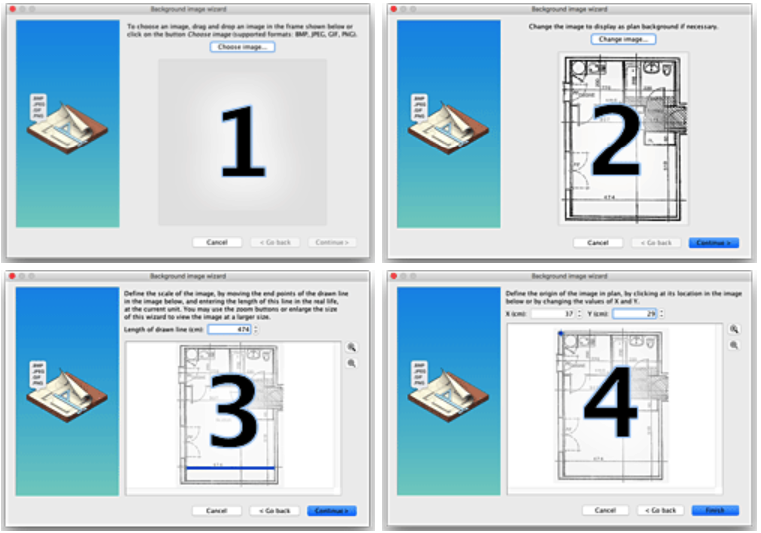
- Click on Choose image and choose your image in the file dialog box. Sweet Home 3D supports BMP, JPEG, GIF or PNG formats. The scanned image used in this tutorial is available at https://www.sweethome3d.com/examples/userGuideBluePrint.jpg
- 画像が読み込まれたら、続行をクリックしてください。
- 画像に描かれた色付きの線の端点を移動して、この線が既知の長さに一致するように画像のスケールを定義してください。次に、描かれた線の長さフィールドにこの線の実際の長さを入力し、続行をクリックしてください。
- 平面図における画像の原点、つまり住宅平面図の点(0, 0)に一致する画像内の点を定義してください。次に、完了をクリックしてください。
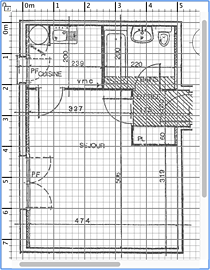
ウィザードが閉じられると、図5に示すように、選択したスケールで住宅平面図グリッドの背後に画像が表示されます。間違ったスケールや位置を選択した場合は、メニューから平面図 > 背景画像を変更…を選択して編集してください。
iOSデバイスをお持ちで、インポートする設計図がまだない場合、Tape Measureアプリを使用すると数分で設計図を作成できます。数回のタップだけで、住宅の正確な平面図を生成できます:
- アプリを開き、部屋の各角にスマートフォンを向けてください。
- 進みながらタップして角をマークしてください。
- すべての角がマークされると、アプリが完全にスケールされた平面図を生成します。
- 平面図をスマートフォンに画像として保存し、Sweet Home 3dにインポートしてください。コンピューターからSweet Home 3dを使用する場合は、画像をコンピューターに送信してからインポートしてください。
Tape Measureは現在iOSでのみ利用可能ですが、Android版も間もなくリリースされる予定です。
壁の描画

壁を描くには、まずツールバーの壁を作成ボタンをクリックしてください。
住宅平面図で新しい壁の開始点をクリックし、次に平面図でその終了点をクリックまたはダブルクリックしてください。ダブルクリックまたはEscapeキーを押すまで、新しいクリックごとに現在の壁の反対側の点と次の壁の開始点が示されます。

To help you draw walls precisely, use walls tooltip, alignment lines and change the plan scale with Zoom buttons. You may also enter the length and the angle of the wall being created after pressing the enter key (feature not available in Online and Mobile versions).
Don’t take doors and windows into account while drawing walls, because Sweet Home 3D will automatically compute the holes in the walls where you will place openings. As shown in figure 6, walls are simultaneously drawn in the plan and in the 3D view, and you can adjust the point of view in the 3D view at any time, by moving the mouse with its left button pressed.
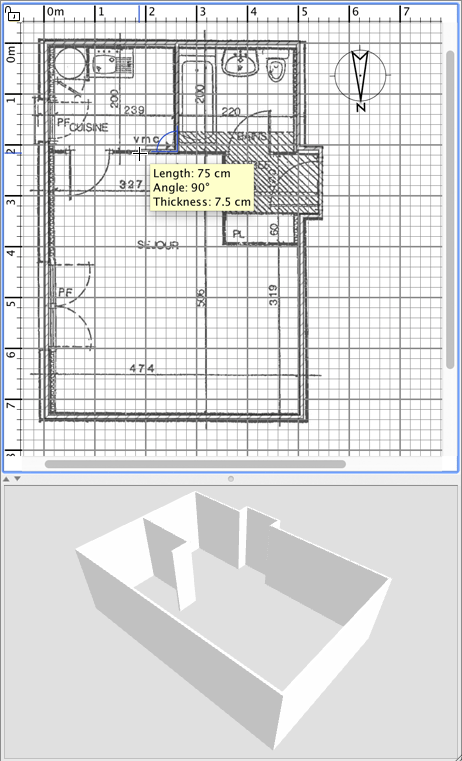
平行な壁の描画を支援するため、床上の壁の角度はデフォルトで15°の倍数になります。この磁力は、環境設定ダイアログボックスで磁力を無効にするか、Windowsでは描画中にAltキー、macOSではcmdキー、LinuxではShift + Altキーを押し続けることでキャンセルできます。
壁の編集

ツールバーの選択ボタンをクリックして、壁の描画を終了し、壁の描画中に無効になっていたツールを使用してください。
選択モードが選択されている場合、住宅平面図でオブジェクトをクリックして1つのオブジェクトを選択できます。また、オブジェクトの周りに選択矩形を描くか、Shiftキーを押しながら各オブジェクトをクリックして、1つまたは複数のオブジェクトを選択することもできます。
To move selected walls (and other objects) in the home plan, simply drag and drop them, or use keyboard arrow keys. When one wall is selected in the plan, you can also move its start and end point with the mouse or split it in two walls with Plan > Split wall menu item.
Double-click on a wall or choose Plan > Modify walls… from the menu to modify the current set of selected walls with the wall dialog box.
As shown on figure 7, this dialog box helps you to edit the colors or the textures of left and right sides of the selected walls, and their thickness and their height. If you want to use an image of your own as a texture, click on the Import button and use the texture import wizard that will guide you.

ドア、窓、家具を挿入し、各部屋をカスタマイズ
ドア、窓、家具の追加

To add furniture to your home, drag and drop furniture from catalog to the home plan or furniture list, as shown on figure 8, or select a piece in the catalog and click on the Add furniture button in the tool bar.
The pieces added to the home are selected and drawn simultaneously in the furniture list, in the home plan and in the 3D view.

First add doors and windows to your home plan to get a realistic view of your empty home. When magnestism is active, a door or a window dropped upon a wall is automatically oriented and resized depending on the orientation and the thickness of that wall.
Then add furniture and adjust their location, angle and size. When magnestism is active, a piece of furniture is automatically rotated so its back face lies along the wall upon which you released the mouse cursor, and a piece dropped on a larger one will be elevated to appear on the top of the latter, if its default elevation is at floor level.
平面図で1つのアイテムが選択されている場合、図9に示すように、選択されたアイテムの各角に表示される4つのインジケーターの1つを使用して、サイズ、高さ、角度を変更できます。
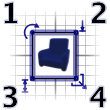
1
回転インジケーターは、選択されたアイテムを回転させるためにドラッグできる角を示します。回転中に適用される15°の磁力を切り替えるには、Altキーを押し続けてください。
2
高さインジケーターは、選択されたアイテムの床からの高さを変更するためにドラッグできる角を示します。
3
高さインジケーターは、選択されたアイテムの高さを変更するためにドラッグできる角を示します。
4
サイズインジケーターは、選択されたアイテムの幅と奥行きを変更するためにドラッグできる角を示します。
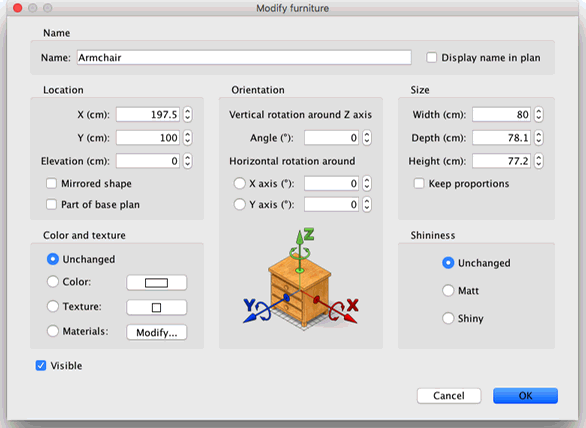
You may also double-click on a piece of furniture or choose Furniture > Modify… from the menu to modify the current set of selected pieces with the furniture dialog box. As shown on figure 10, this dialog box helps you edit the name of the selected furniture, its rotation angle, its location, its elevation from the floor, its size, its color or its texture, its visibility and whether its 3D model shape should be mirrored. If the selected objects contain one or more lights, this dialog box will let you also edit their power, but this will have an effect only at the two best quality levels in the photo creation pane.
非表示の家具は住宅プランと3Dビューには描画されませんが、後で再び表示できるよう家具リストには表示されます。
部屋の描画

部屋を描画するには、まず部屋を作成ボタンをクリックしてください。
以下のいずれかの方法で住宅プランに新しい部屋または新しい面を作成してください:
- 部屋の各角をクリックし、最後の点でダブルクリックするか、最後の点を追加した後にEscapeキーを押してください。
- 図12に示すように、既存の閉じた面(つまり壁に囲まれた面)の内側の任意の場所でダブルクリックしてください。

半分のドア段差を含む部屋
部屋を描画する前に、まず壁を描画し、ドアを追加してください。この方法を使用すると、住宅の各部屋に対応する面でダブルクリックすることで、部屋をより迅速に作成できます。また、ダブルクリックで作成された部屋には、その壁に配置された各ドアの半分のドア段差が含まれることにも注意してください。この機能により、部屋間のドアが開いているときに、3Dビューで部屋が正しく接続されることが保証されます。
部屋が作成されたら、図13に示すように、メニューからプラン>部屋を変更…を選択して、部屋の名前、床と天井の色またはテクスチャを変更できます。

1つの部屋が選択されている場合、選択モードでマウスを使用して各点を移動し、テキストの下に描画されたインジケーターで面積と名前の位置を変更することもできます。
レベルの追加
If your home has more than one level or story, you can create the additional levels by choosing Plan > Levels > Add level from the menu or by clicking on the + tab that appears when a home has more than one level. Each level is represented by a tab displayed at the top of the plan view and used to select the level into which new walls, furniture and other objects will be added.
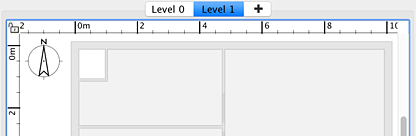
図14に示すように、下位レベルの壁と天井は、壁や部屋の描画ツールをより簡単に使用できるよう、プランビューで薄い色で表示されます。必要に応じて、他のレベルから選択されたレベルにオブジェクトをコピー/ペーストすることもできます。
各レベルのデフォルトの高度、高さ、床の厚さは、そのタブをダブルクリックするか、メニューからプラン>レベル>レベルを変更…を選択して変更できます。
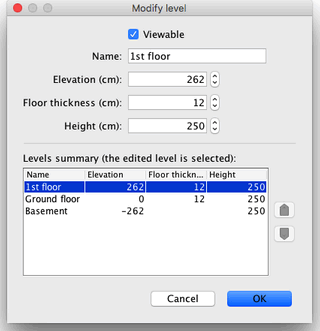
図15に示すように、レベル変更パネルには、他のレベルと比較して適切な値を選択するのに役立つ、住宅のすべてのレベルを説明するテーブルも表示されます。地下レベルを作成するには、負の高度を入力してください。レベルの高さは、編集されたレベルの天井の高度を計算するために使用されます。
2Dと3Dでデザインを表示
3Dビューの編集
住宅の描画中はいつでも、3Dビューで使用される視点を変更できます。住宅を表示する2つの異なる方法があります。3Dビュー>航空ビューメニューで設定されるデフォルト選択モードと、3Dビュー>バーチャル訪問で設定される他のモードです。どちらのモードでも、図16と17に示すように、マウスまたはキーボードの矢印を使用して現在の視点を変更できます。


バーチャル訪問モードが選択されている場合、上から見たバーチャル訪問者も住宅プランに描画されます。その位置と角度は、訪問者の移動ごとにプランと3Dビューで同時に更新されます。このバーチャル訪問者は、図18に示すように、4つのインジケーターに囲まれています。

- 頭部角度インジケーターは、訪問者の頭を上下に動かすために変更できる角度を示します。
- 視野インジケーターは、現在3Dビューで表示されている角度を示します。
- 体角度インジケーターは、訪問者の体を左右に動かすために変更できる角度を示します。
- 目の高度インジケーターは、訪問者の視点を上下に移動するためにドラッグできる点を示します。
図19に示すように、メニューから3Dビュー>3Dビューを変更…を選択して、地面と空の色またはテクスチャ、照明の明度、壁の透明度を変更することもできます。

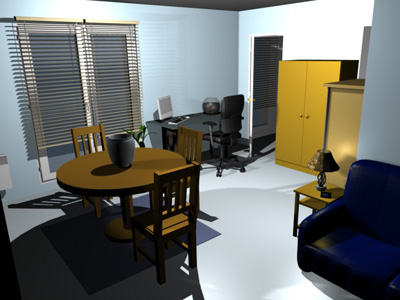
地面と空の色を変更した後、図20はこのチュートリアルで設計された住宅の3Dビューのスクリーンショットを2つ示しています。

3Dビューの写真作成

Click on the Create photo… tool to create an image of the 3D view with the size and the proportions of your choice, and save it in a file at PNG format (feature not available in Online and Mobile versions).
図24に示すように、写真作成に使用されるパネルでは、作成される画像の品質レベルも選択できます。高速品質レベルでは、作成される画像は3Dビューと同じように見えますが、最高品質レベルでは、画像はよりフォトリアリスティックになります。最高品質レベル2つでは、異なる明度レベルで照明を追加したり、時刻を変更したりして画像の照明を管理できます。また、画像の計算に使用されるレンダリングエンジンを選択することもでき、YafaRayレンダラーは一般的にSunFlowデフォルトレンダラーよりも高速に動作することが知られています。
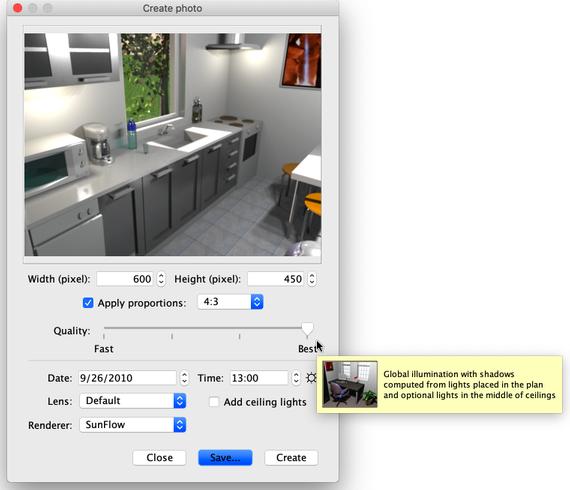
最高品質レベルでの画像計算は、住宅とコンピューターの性能によって非常に長時間かかる場合があります。ただし、この計算中でも住宅を変更できることに注意してください。技術的な理由により、写真作成パネルは同時に1つしか開くことができません。
3Dビデオの作成

Click on the Create video… tool to display the pane used to create a video from a virtual path in the 3D view (feature not available in Online and Mobile versions). As figure 25 shows, this pane lets you choose the format of the video and its quality in a way similar to the photo creation pane.

ビデオを作成するには、3Dビューでビデオカメラの初期位置を選択し、ビデオ作成パネルの赤いボタンをクリックしてください。次に、3Dビューでビデオカメラの次の位置に移動し、再び赤いボタンをクリックしてください。ビデオ中にカメラが通過する各位置でこれらの手順を繰り返してください。
赤いボタンをクリックするたびに、カメラのパスを示すために新しい点がビデオ作成パネルに追加されます。Sweet Home 3Dはカメラの垂直高度、2つの回転角度、視野も考慮するため、あらゆる種類のアニメーションを作成できます。
作成したパスが満足できるものになったら、作成ボタンをクリックしてビデオフレームの計算を開始し、この計算が完了したら保存…ボタンをクリックしてビデオをQuicktimeファイルに保存してください。このビデオはVLCなどの様々なツールで表示したり、他の形式にトランスコードしたりできます。図26と27は、図25に示されたパスから計算され、MPEG-4形式にトランスコードされた2つのビデオを示しています:
ビデオの計算は、住宅、選択した品質、コンピューターの性能によって数分から数時間かかる場合があるため、再生ボタンを使用して3Dビューでカメラのパスを大まかに確認してください。
インポートとエクスポート
OBJ形式へのエクスポート
If you want to reuse your home in 3D software like Blender or Art of Illusion to improve its rendering for example, choose 3D view > Export to OBJ format… from the menu and import the generated OBJ file in these software (feature not available in Online and Mobile versions). This menu item will write in the selected OBJ file the description of all the objects displayed in the 3D view, it will create a MTL file describing their color and finally, it will save the images of the textures, you may have used. The figure 28 shows a rendering done in Blender once a few lights were added in the scene.
3Dモデルのインポート
If a piece of furniture or an object is missing in the catalog of Sweet Home 3D, you may import a 3D model file, and use it in your home (feature not available in Online version). More than 1600 free models designed by contributors may be downloaded at https://www.sweethome3d.com/freeModels.jsp, but you can also download models from other web sites, or create your own models with software like Blender or Art of Illusion. Sweet Home 3D supports 3D model files at OBJ, DAE, 3DS format, ZIP files containing a file of this type, and KMZ files.
You can also download the full version with over 1,600 3D models, 400 textures already included
Select Furniture > Import furniture… menu item to launch the wizard that will help you to choose and size the 3D model file, as shown in figure 11. Under Windows and macOS, you may also drag and drop a 3D model file in a Sweet Home 3D window to launch this wizard.

- Click on Choose model and choose the 3D model file in the file dialog box. If you dragged and dropped in a window the 3D model file you want to import, it’s automatically selected. Once the model is loaded, click on Continue.
- Orientate the model with arrow buttons in such a way the front view displays the front face of the 3D model, and click on Continue.
- 必要に応じて、インポートされたモデルの名前、サイズ、高度、色、およびこのモデルが移動可能か、ドア、窓、または階段かどうかを変更してください。その後、続行をクリックしてください。
- Turn the 3D model with the mouse to get the best point of view on the model for the model icon displayed in the furniture catalog, furniture list and home plan. Then click on Finish.
Once the furniture import wizard is closed, the imported model will appear in the furniture catalog and/or home plan and furniture list, depending on the options you chose. You may use it as any 3D model of the default catalog.
The models proposed at the free 3D models page may also be imported by group of models stored in a SH3F file, available in the SweetHome3D-models section at https://downloads.sourceforge.net/sweethome3d/ (feature not available in Online and Mobile versions).
To install a SH3F file, simply double-click on it or select it after choosing the Furniture > Import furniture library item from the menu.
To uninstall a SH3F file, remove it from the furniture plugin folder of Sweet Home 3D, and restart the application. This folder is shown when you click on any SH3F file listed in the Furniture libraries section of the Libraries in use pane. The latter pane is displayed by clicking on the Libraries… button shown at the bottom of Sweet Home 3D About dialog box.
If needed, you may create your own SH3F files with the Furniture Library Editor, available for download at https://sourceforge.net/projects/sweethome3d/files/FurnitureLibraryEditor/FurnitureLibraryEditor-2.2.jar/download (14.4 MB).
その他の機能
寸法の描画

寸法を描画するには、まず寸法を作成ボタンをクリックしてください。
以下のいずれかの方法でプランに新しい寸法を作成できます:
- 新しい寸法の開始点をクリックし、終了点をクリックし、その後マウスポインターを移動して寸法線の各端に描画される延長線のサイズを選択した後、3回目をクリックしてください。
- 測定したい家具の境界、壁の側面、または部屋の側面にマウスポインターを移動し、プランに描画された一時的な寸法を受け入れるためにダブルクリックし、その後延長線のサイズを選択した後に3回目をクリックしてください。
どちらの場合も、2回目と3回目のクリックの間でマウスを移動しなければ、新しい寸法には延長線がありません。

テキストの追加

プランに自由テキストを追加するには、まずテキストを追加ボタンをクリックしてください。
住宅プランでテキストを追加したい位置をクリックし、表示されるダイアログボックスにテキストを入力してください。

いつでも、テキストスタイルボタンで選択されたテキストのサイズとスタイルを変更できます。
印刷
Once you designed your home, you can print it with File > Print… or File > Print to PDF… menus, and preview the result with File > Print preview… menu. By default, Sweet Home 3D prints the furniture list, the plan and the current 3D view of home, using default paper size, margins and orientation.
Choose File > Page setup… from the menu to modify this default choice (feature not available in Online and Mobile versions), as well as the scale of the printed plan, the header and the footer, as shown in figure 23.

プラグインの追加
The features of Sweet Home 3D may be extended thanks to plug-ins, that you may even develop yourself if you’re able to program in Java (feature not available in Online and Mobile version).
A plug-in is a SH3P file stored in the plug-ins folder of Sweet Home 3D. To install a SH3P file in this folder, simply double-click on this file under Windows and macOS. Under Linux, you’ll have to copy the SH3P file in the subfolder .eteks/sweethome3d/plugins of your user folder if the double-click doesn’t work.
Once the plug-ins is installed, relaunch Sweet Home 3D to let the new menu items and/or the new buttons matching the plug-ins features appear. For example, the Home rotator plug-in adds two items to the Plan menu able to rotate all the items in the home plan clock wise or counter clock wise.